Quilgo Complete Guide

This guide explains how to create quizzes, configure test delivery, enable proctoring, send tests, review reports, grade responses, export data, and collaborate with your team in Quilgo. The guide follows the real product workflow from the first screen to the final report.

Getting Started

Explore the Demo Quiz

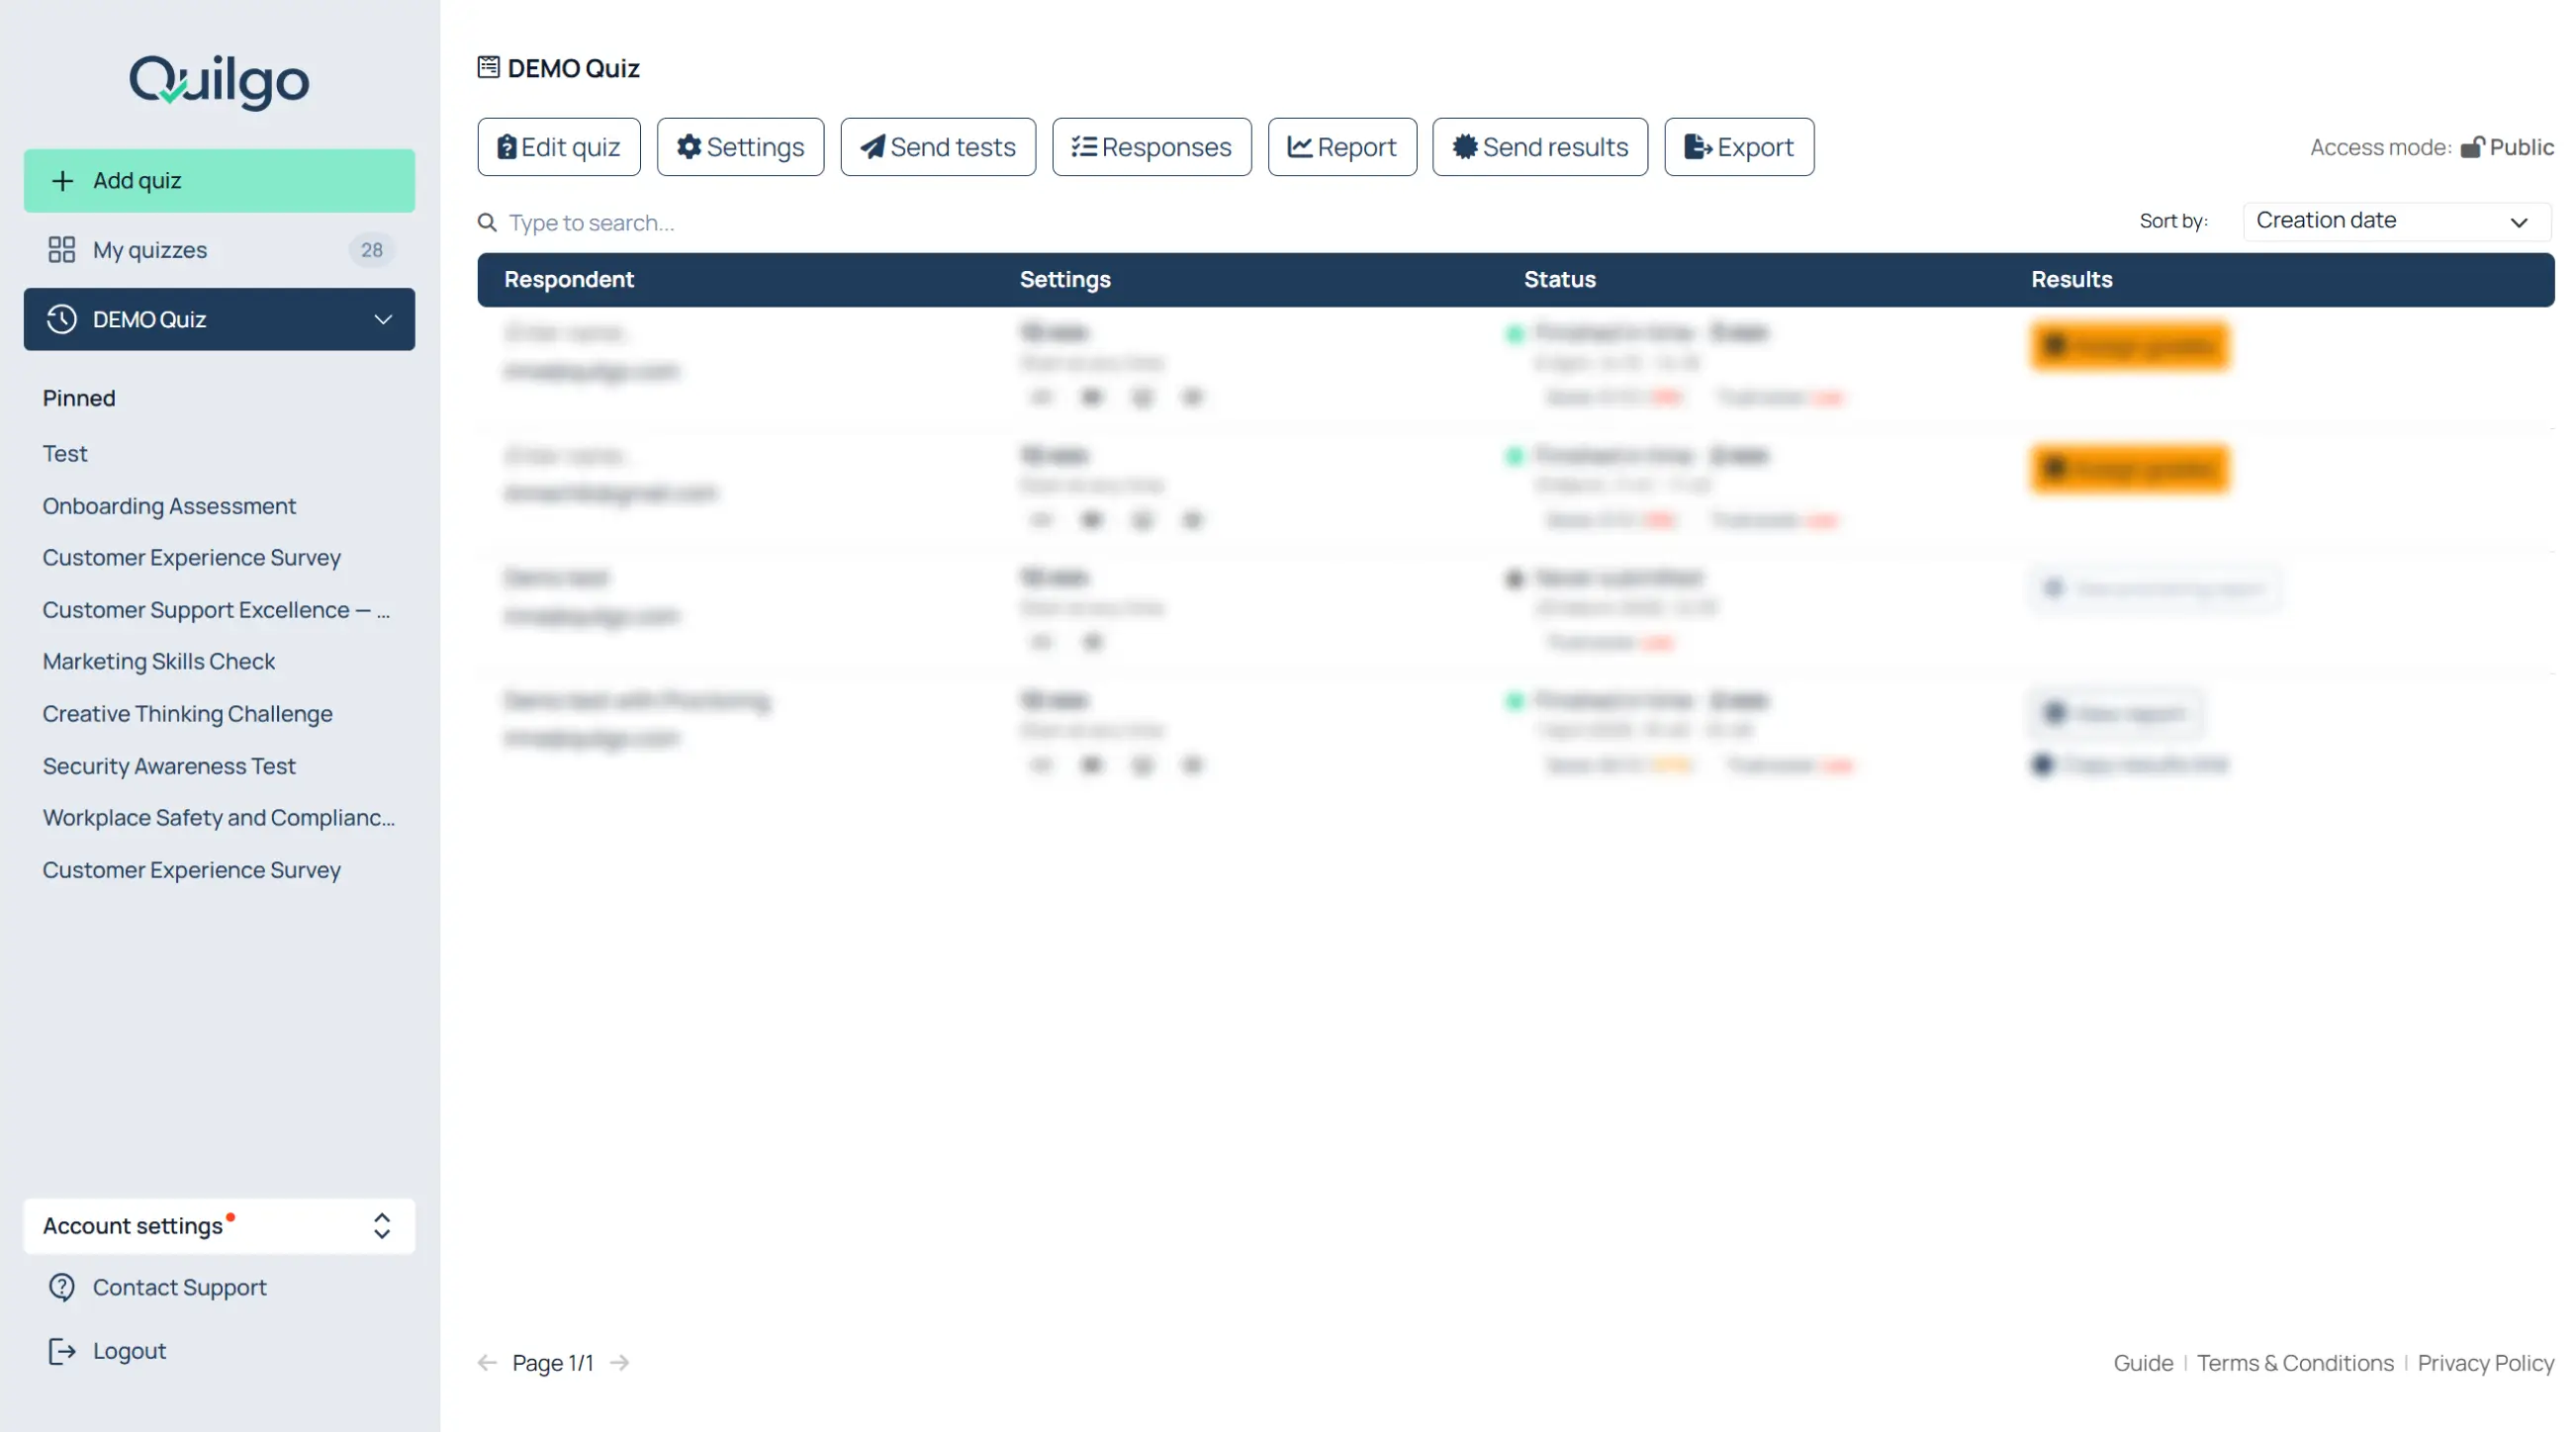
When you create a new Quilgo account, the dashboard already contains a “DEMO Quiz”.

The demo quiz helps you understand both the standard respondent experience and the proctored workflow.

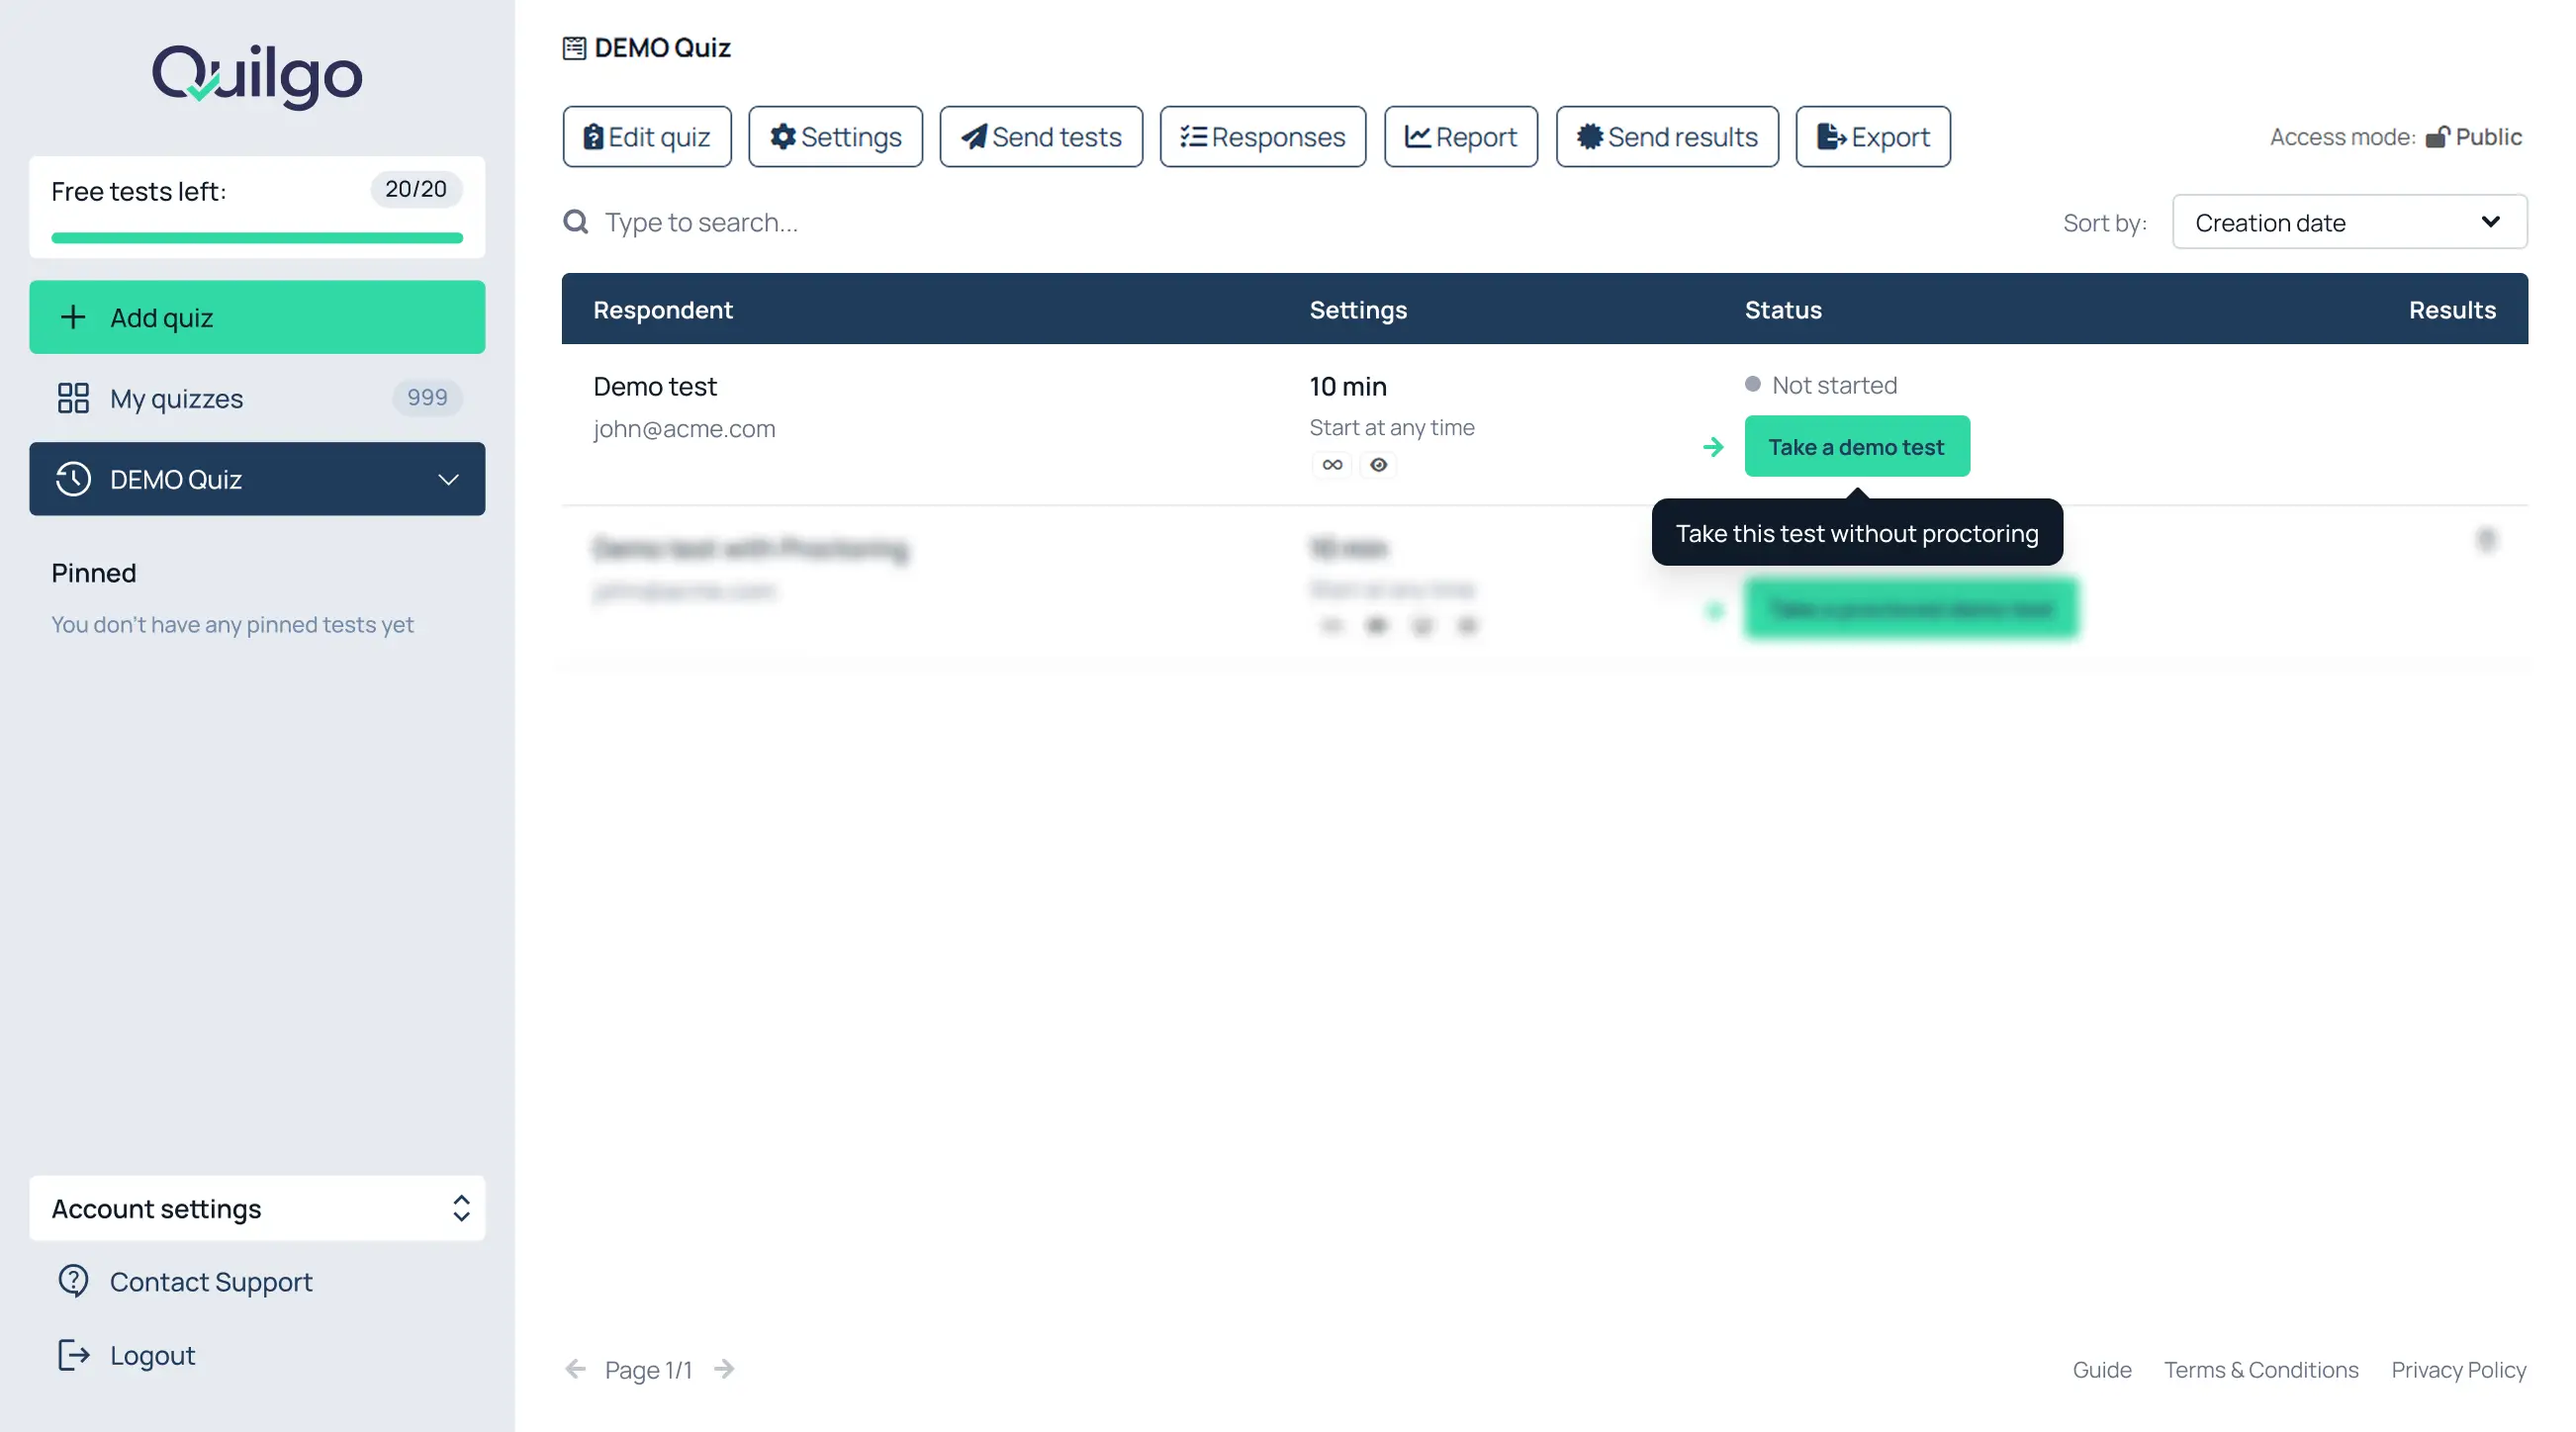
Take a regular demo test

  1. Open the “DEMO Quiz”;
  2. Click “Take a demo test”;
  3. Complete the test as a respondent;
  4. Return to the dashboard and review the generated result.

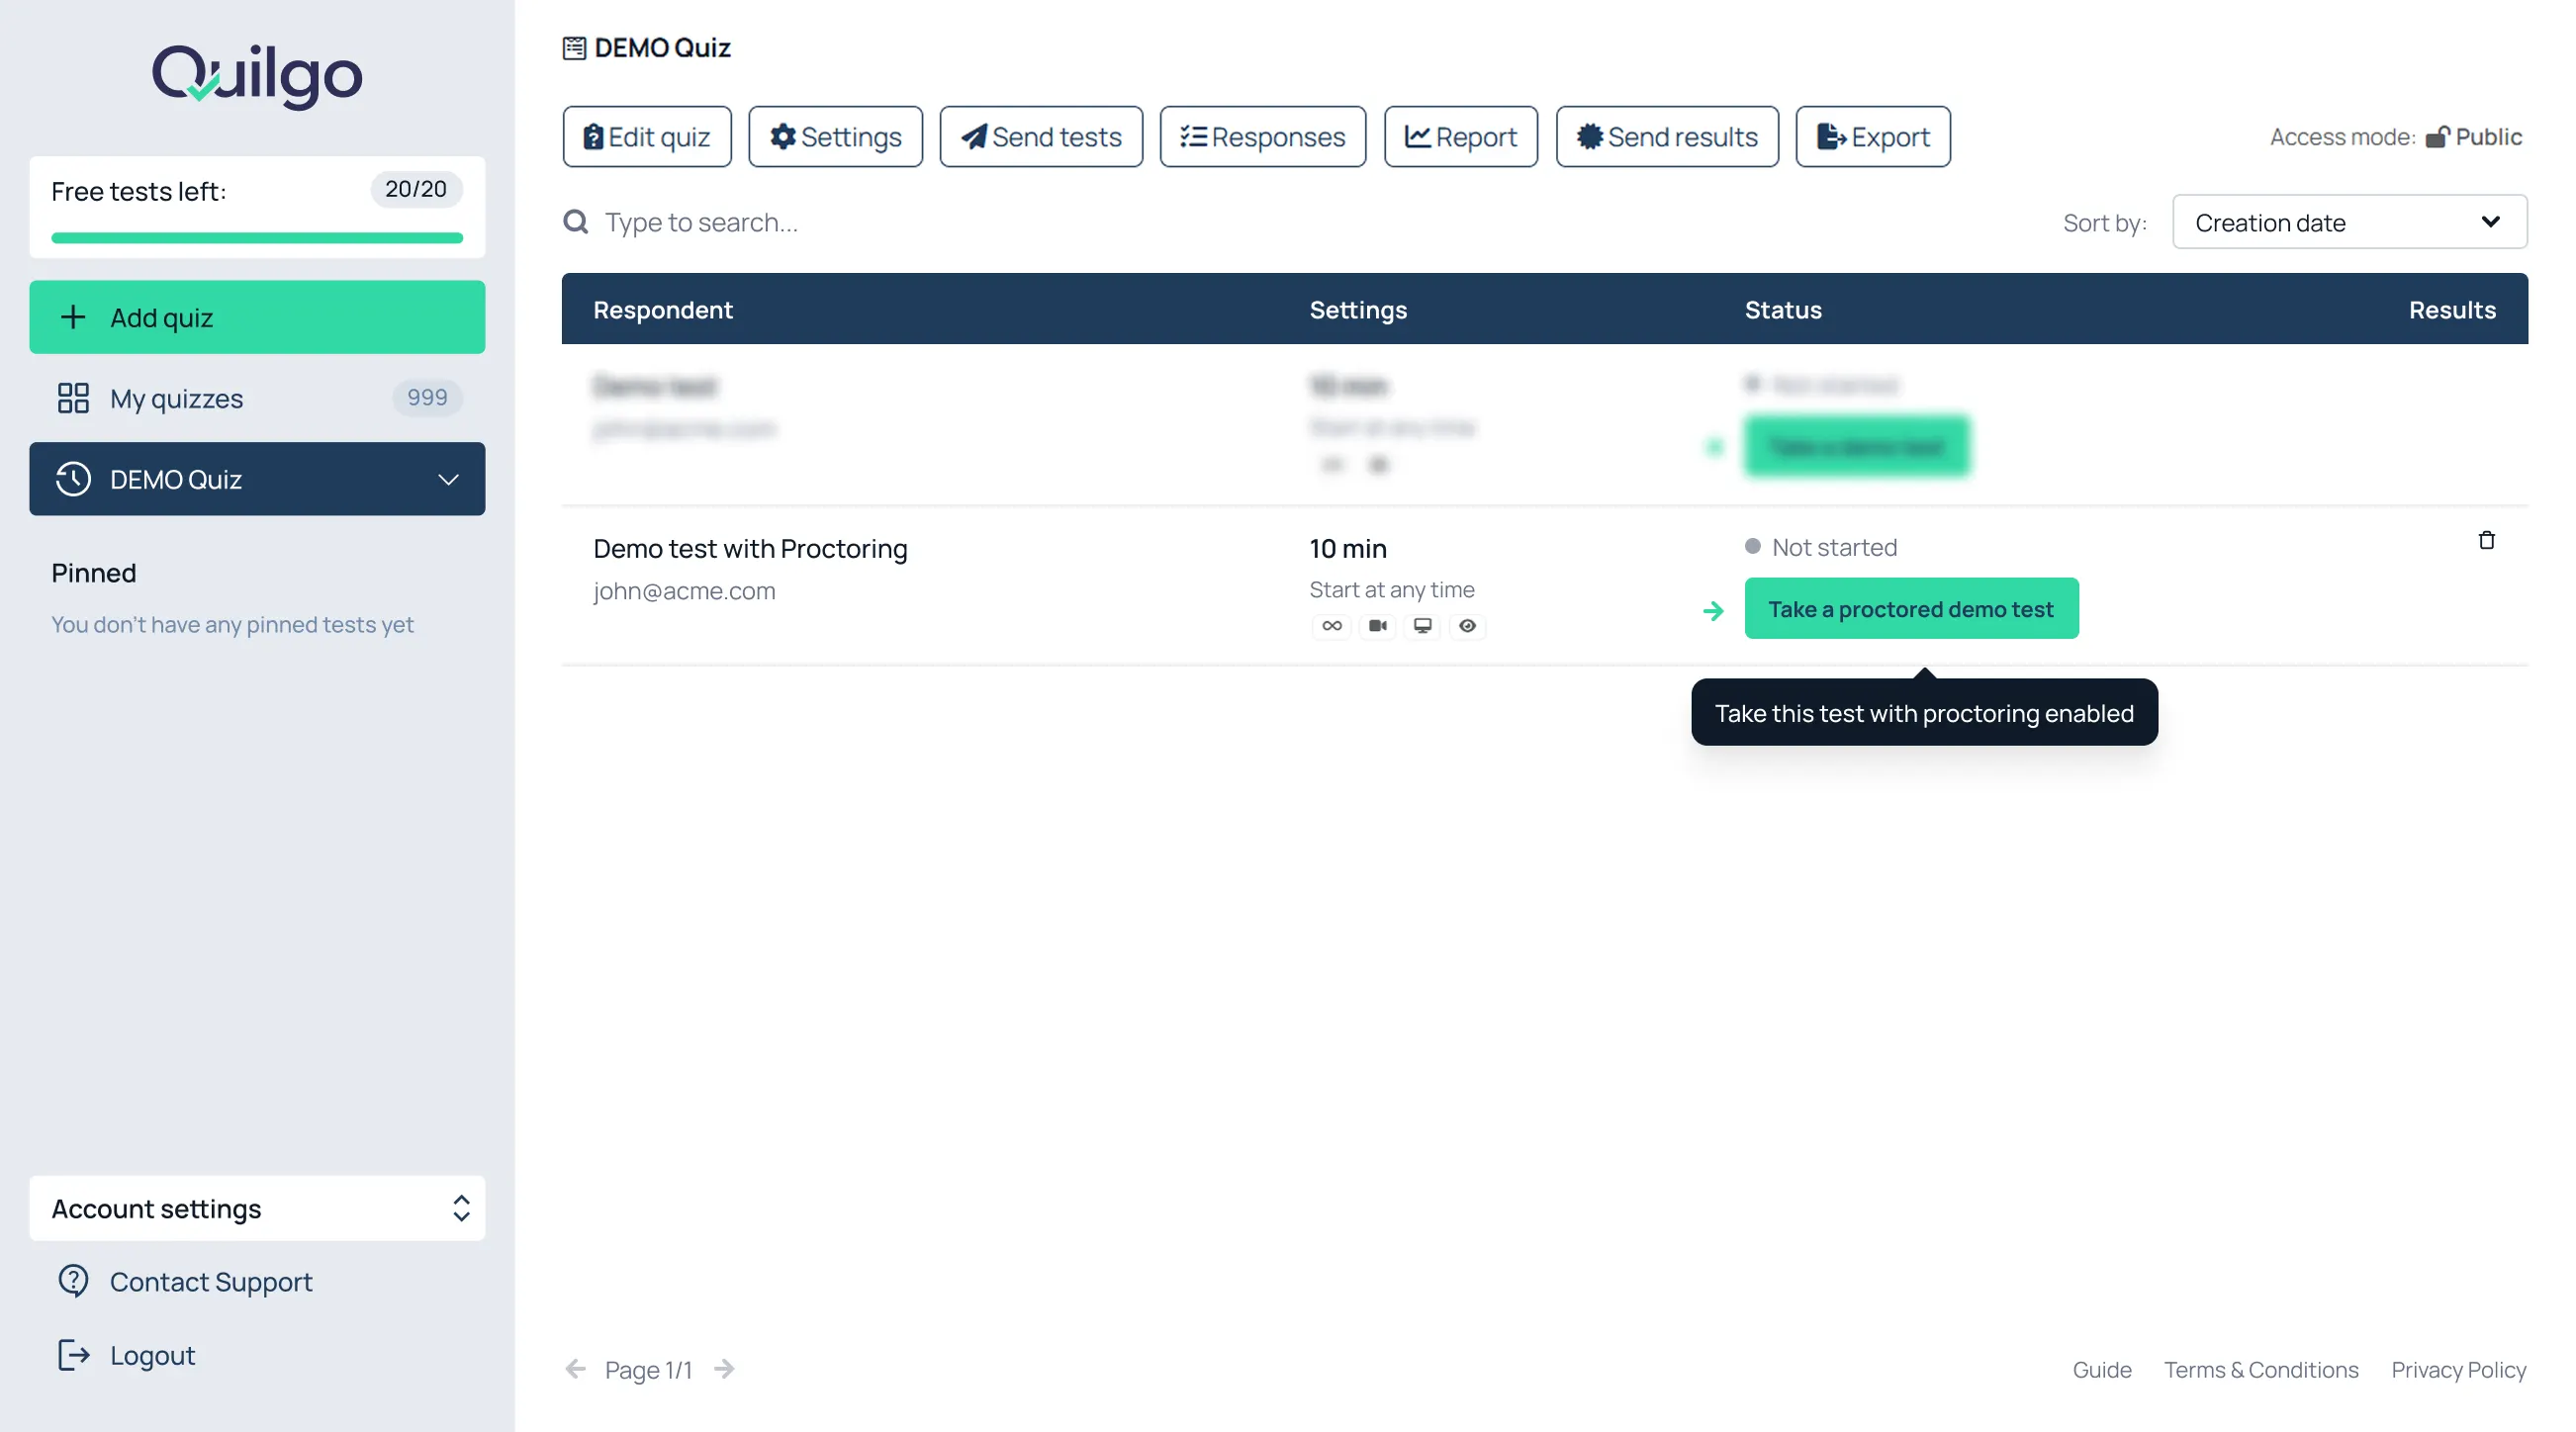
Take a proctored demo test

  1. Open the “DEMO Quiz”;
  2. Click “Take a proctored demo test”;
  3. Allow camera and screen access when asked;
  4. Complete the test;
  5. Open the generated report.

Use the proctored demo to understand:

  • camera tracking;
  • screen tracking;
  • snapshots;
  • suspicious activity detection;
  • trust score reports.
Create a Quiz

Start a New Quiz

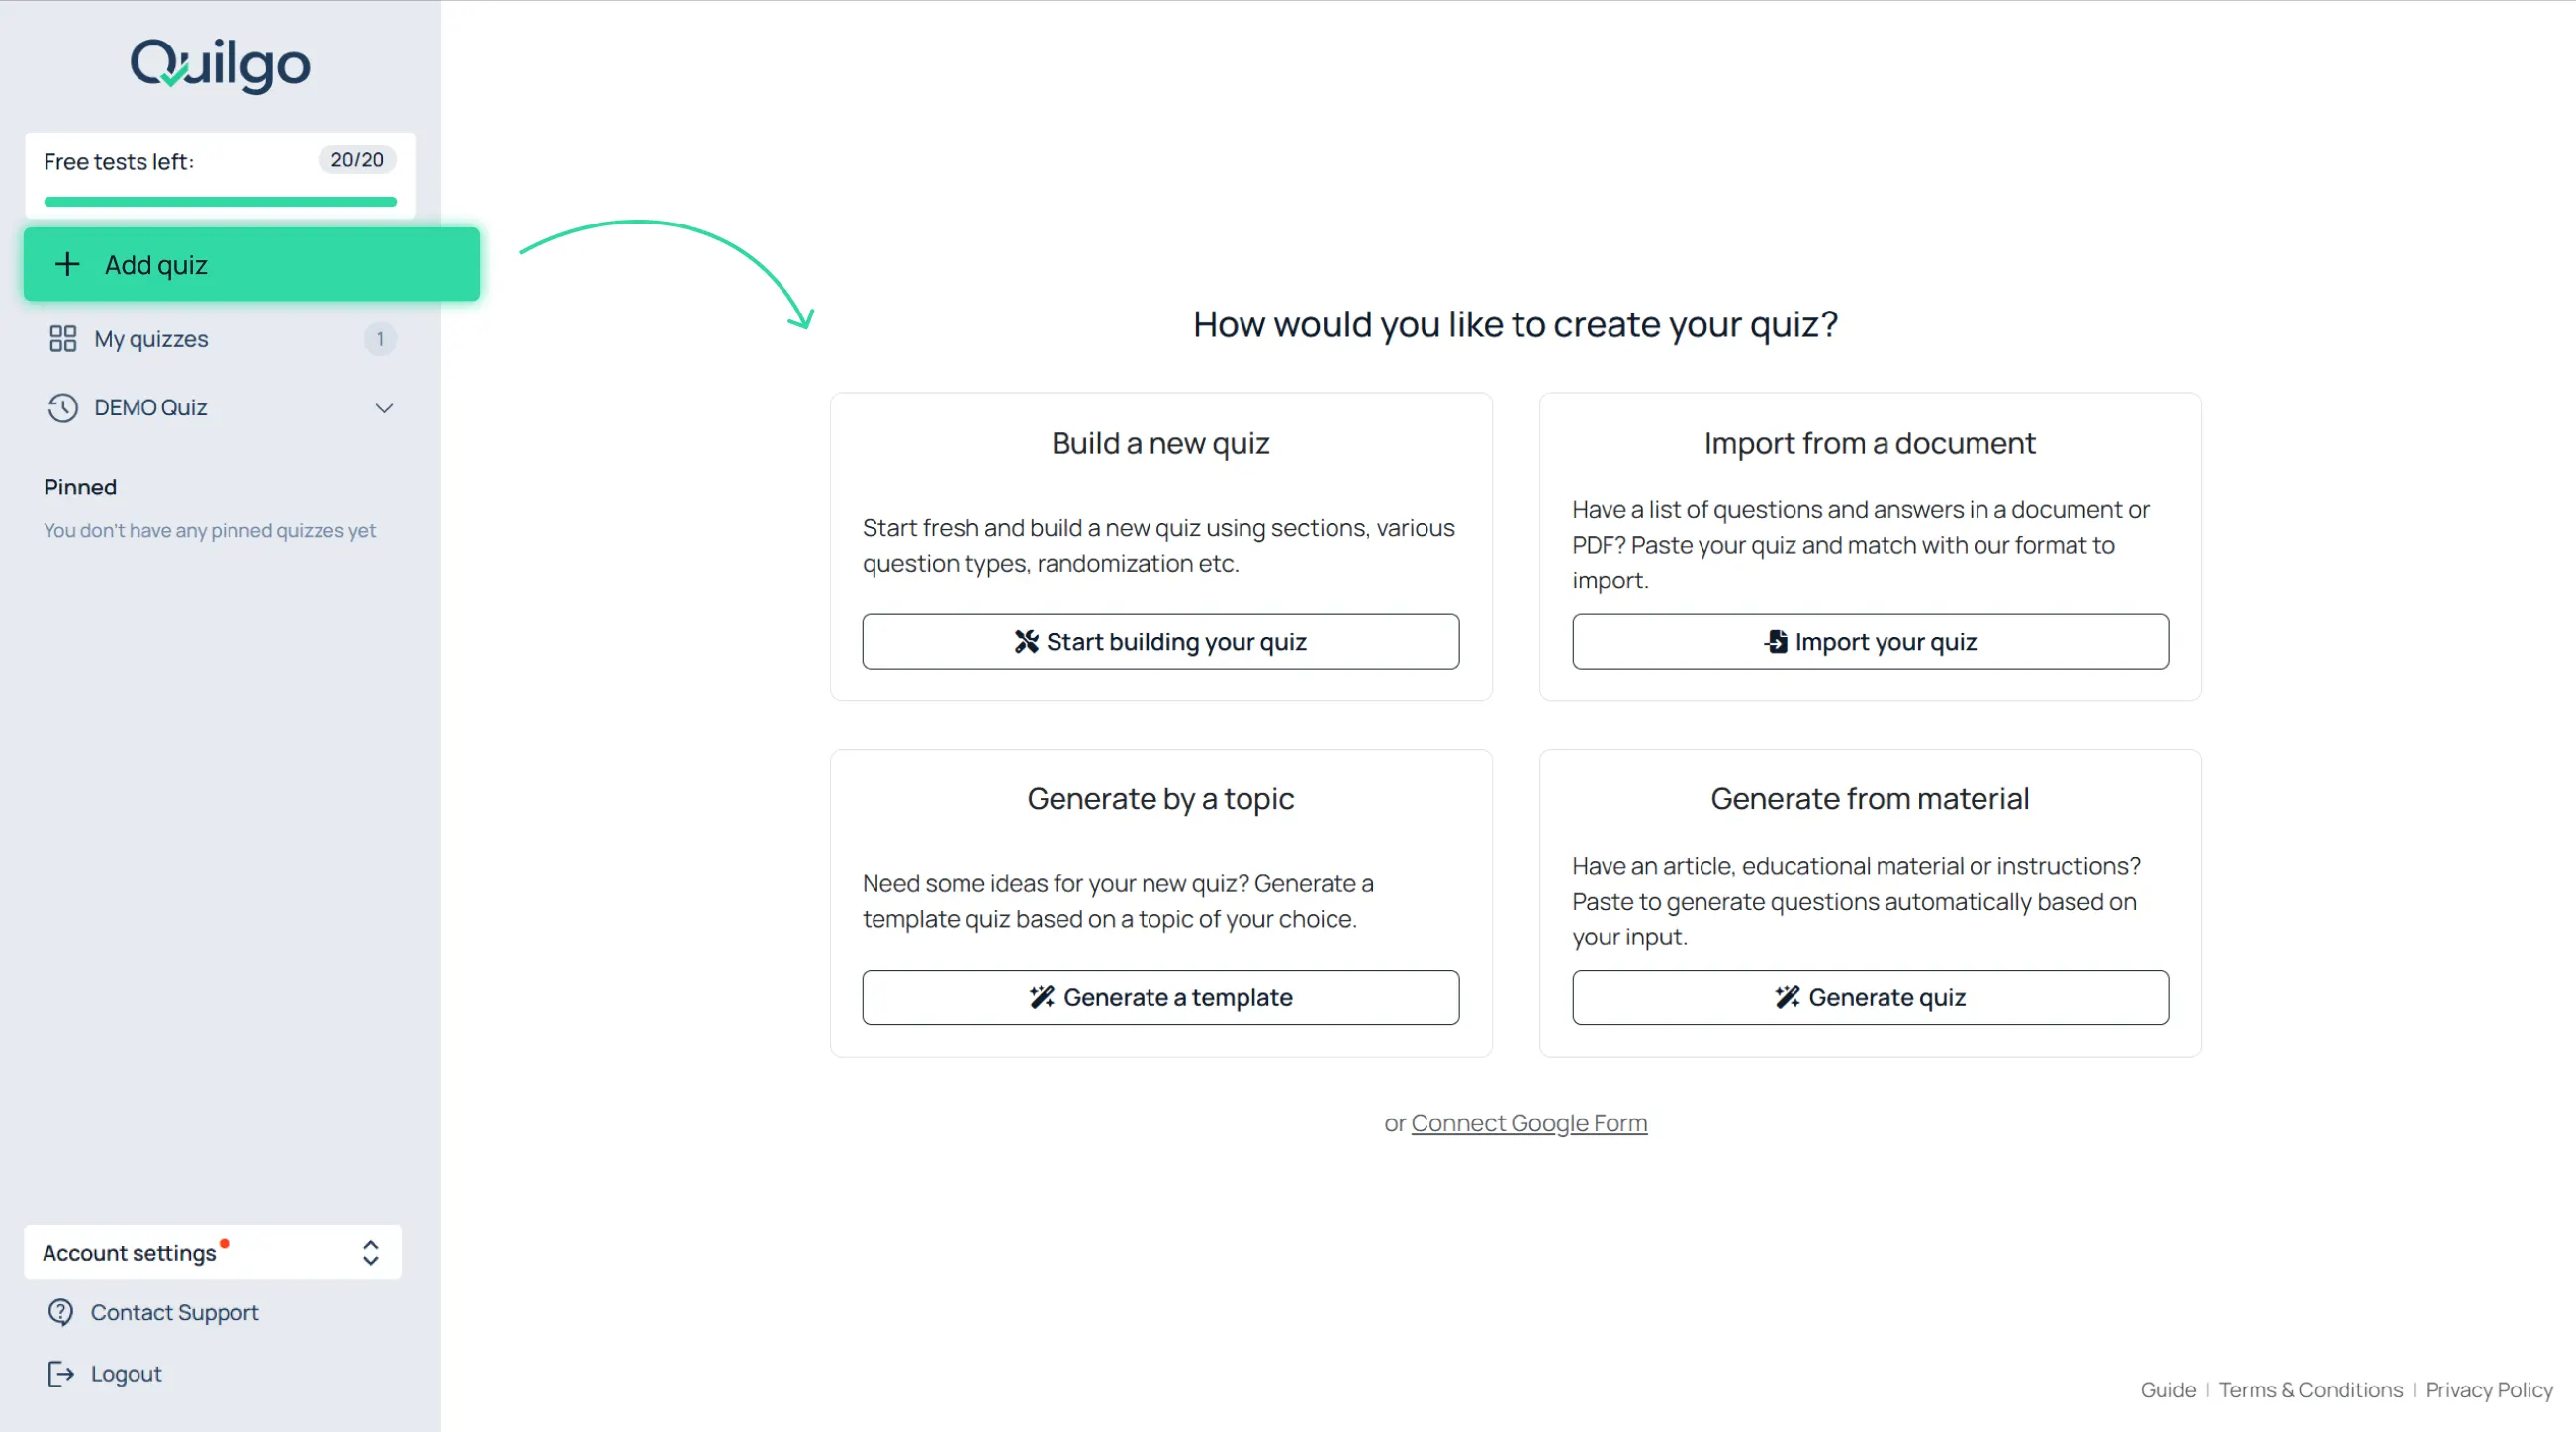
To create a new quiz:

  1. Click “+ Add quiz” in the left sidebar;
  2. Choose how you want to create the quiz.

The main creation methods are:

  • “Build a new quiz”;
  • “Import from a document”.

For a new manual quiz:

  1. Click “Build a new quiz”;
  2. Enter the quiz title;
  3. Click “Start building your quiz”.
Build Questions

Choose a Question Type

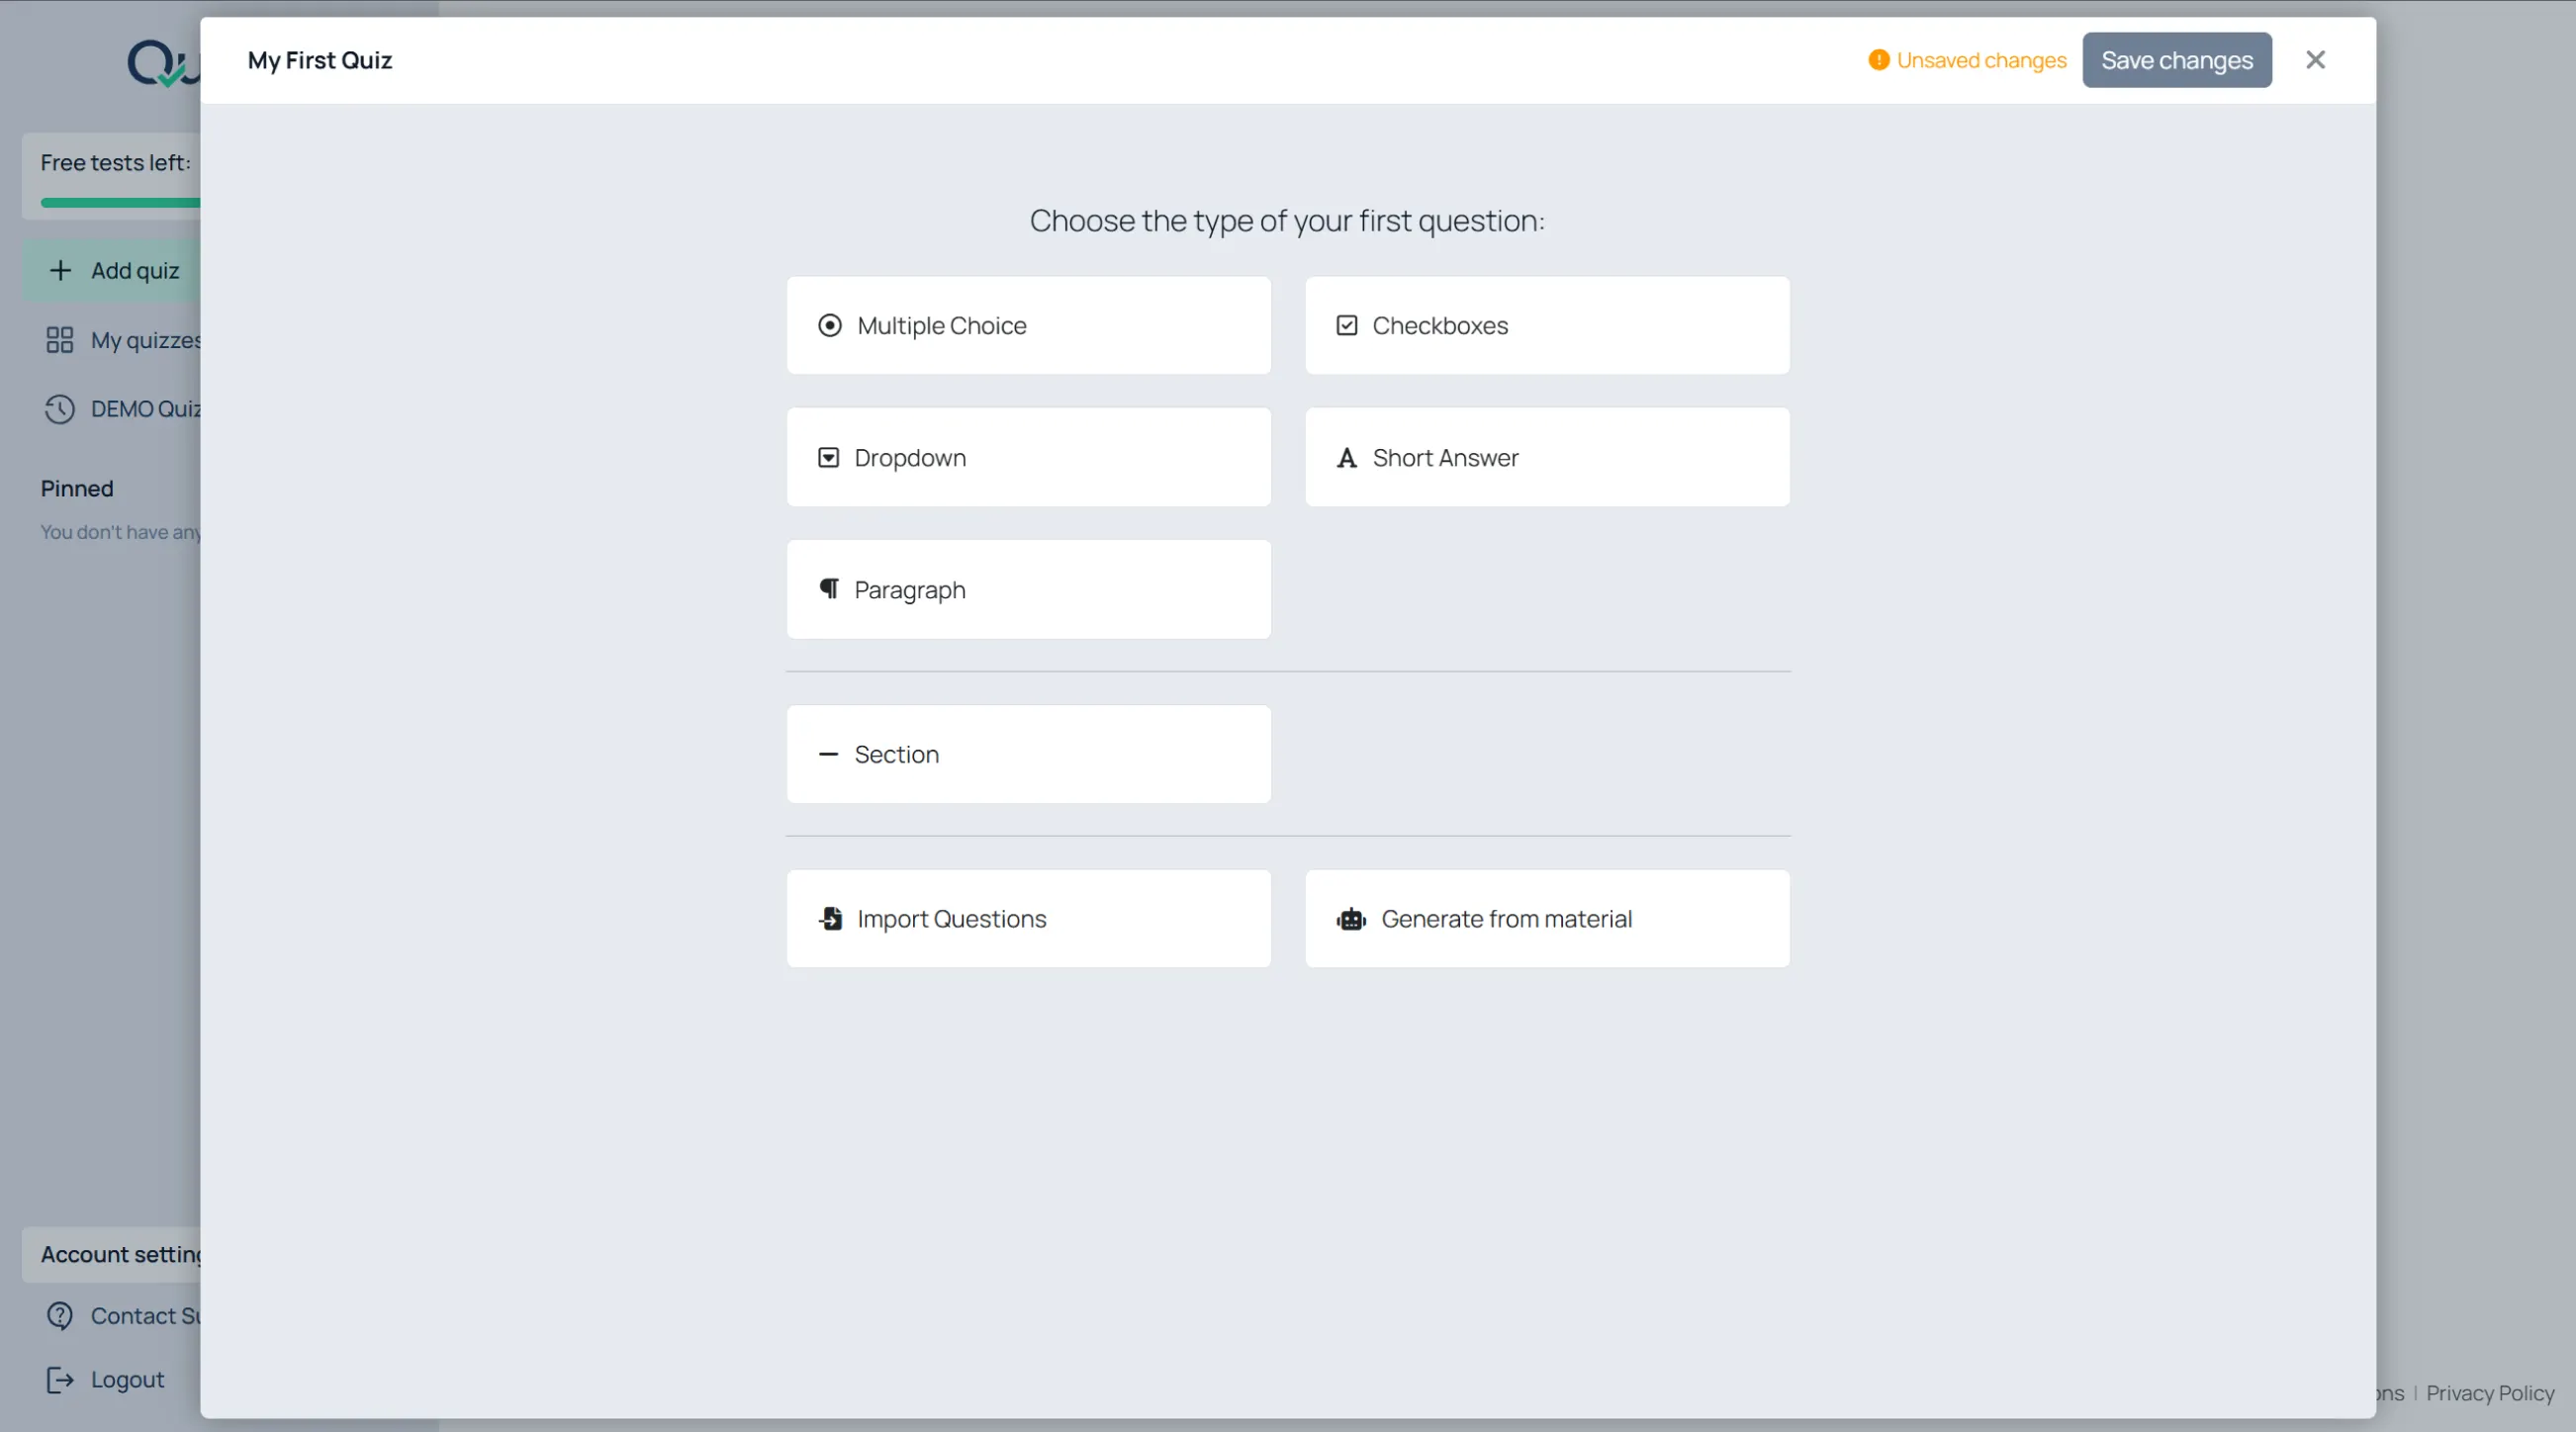
After entering the quiz title, Quilgo asks you to choose the first question type.

Supported question types:

  • “Multiple Choice”;
  • “Checkboxes”;
  • “Dropdown”;
  • “Short Answer”;
  • “Paragraph”;
  • “Section break”.

Additional actions:

  • “Import Questions”;
  • “Generate questions”.

Create Choice-Based Questions

Add the question text

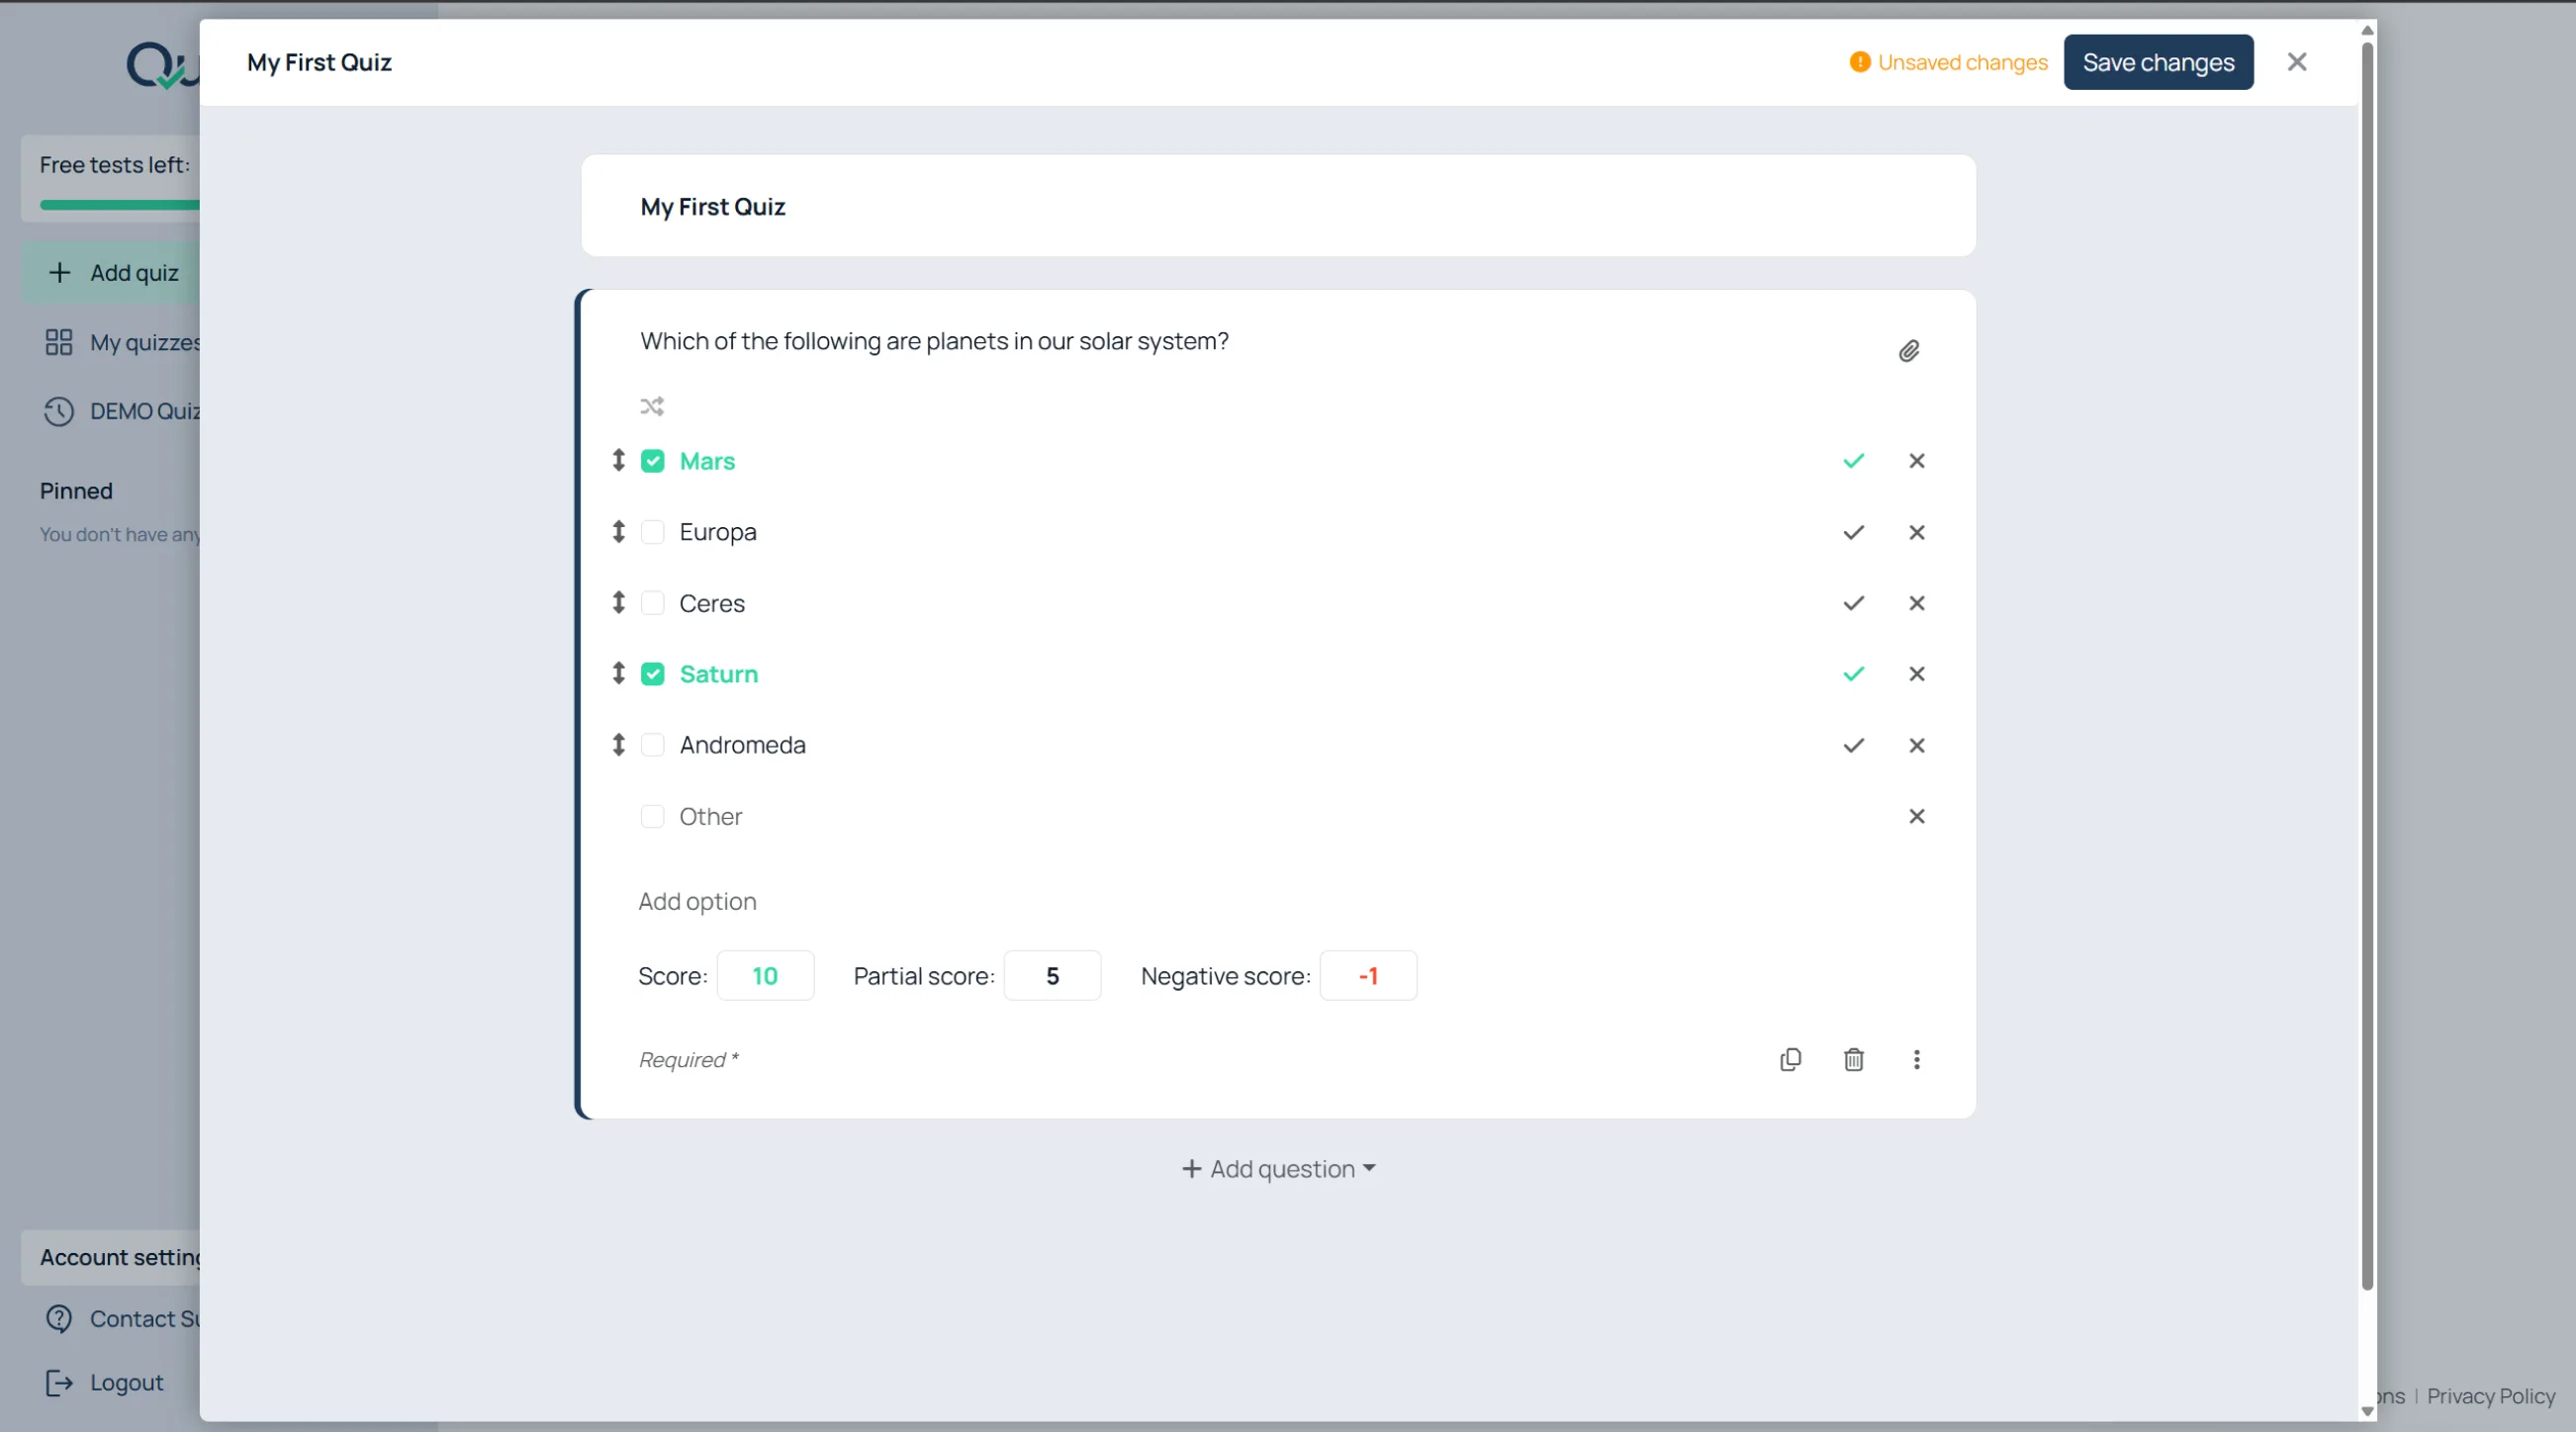
  1. Click inside the “Question” field;
  2. Enter the question.

Add answer options

  1. Click “Add option”;
  2. Enter the option text;
  3. Repeat for additional options.

Mark correct answers

  1. Find the correct option;
  2. Click the checkmark next to it.

→ For “Multiple Choice” and “Dropdown”, select one correct answer.

→ For “Checkboxes”, select multiple correct answers if needed.

Shuffle answer options

  1. Click the shuffle icon inside the question;
  2. Leave it enabled if respondents should see options in a different order.

Add Images or Audio

To attach media:

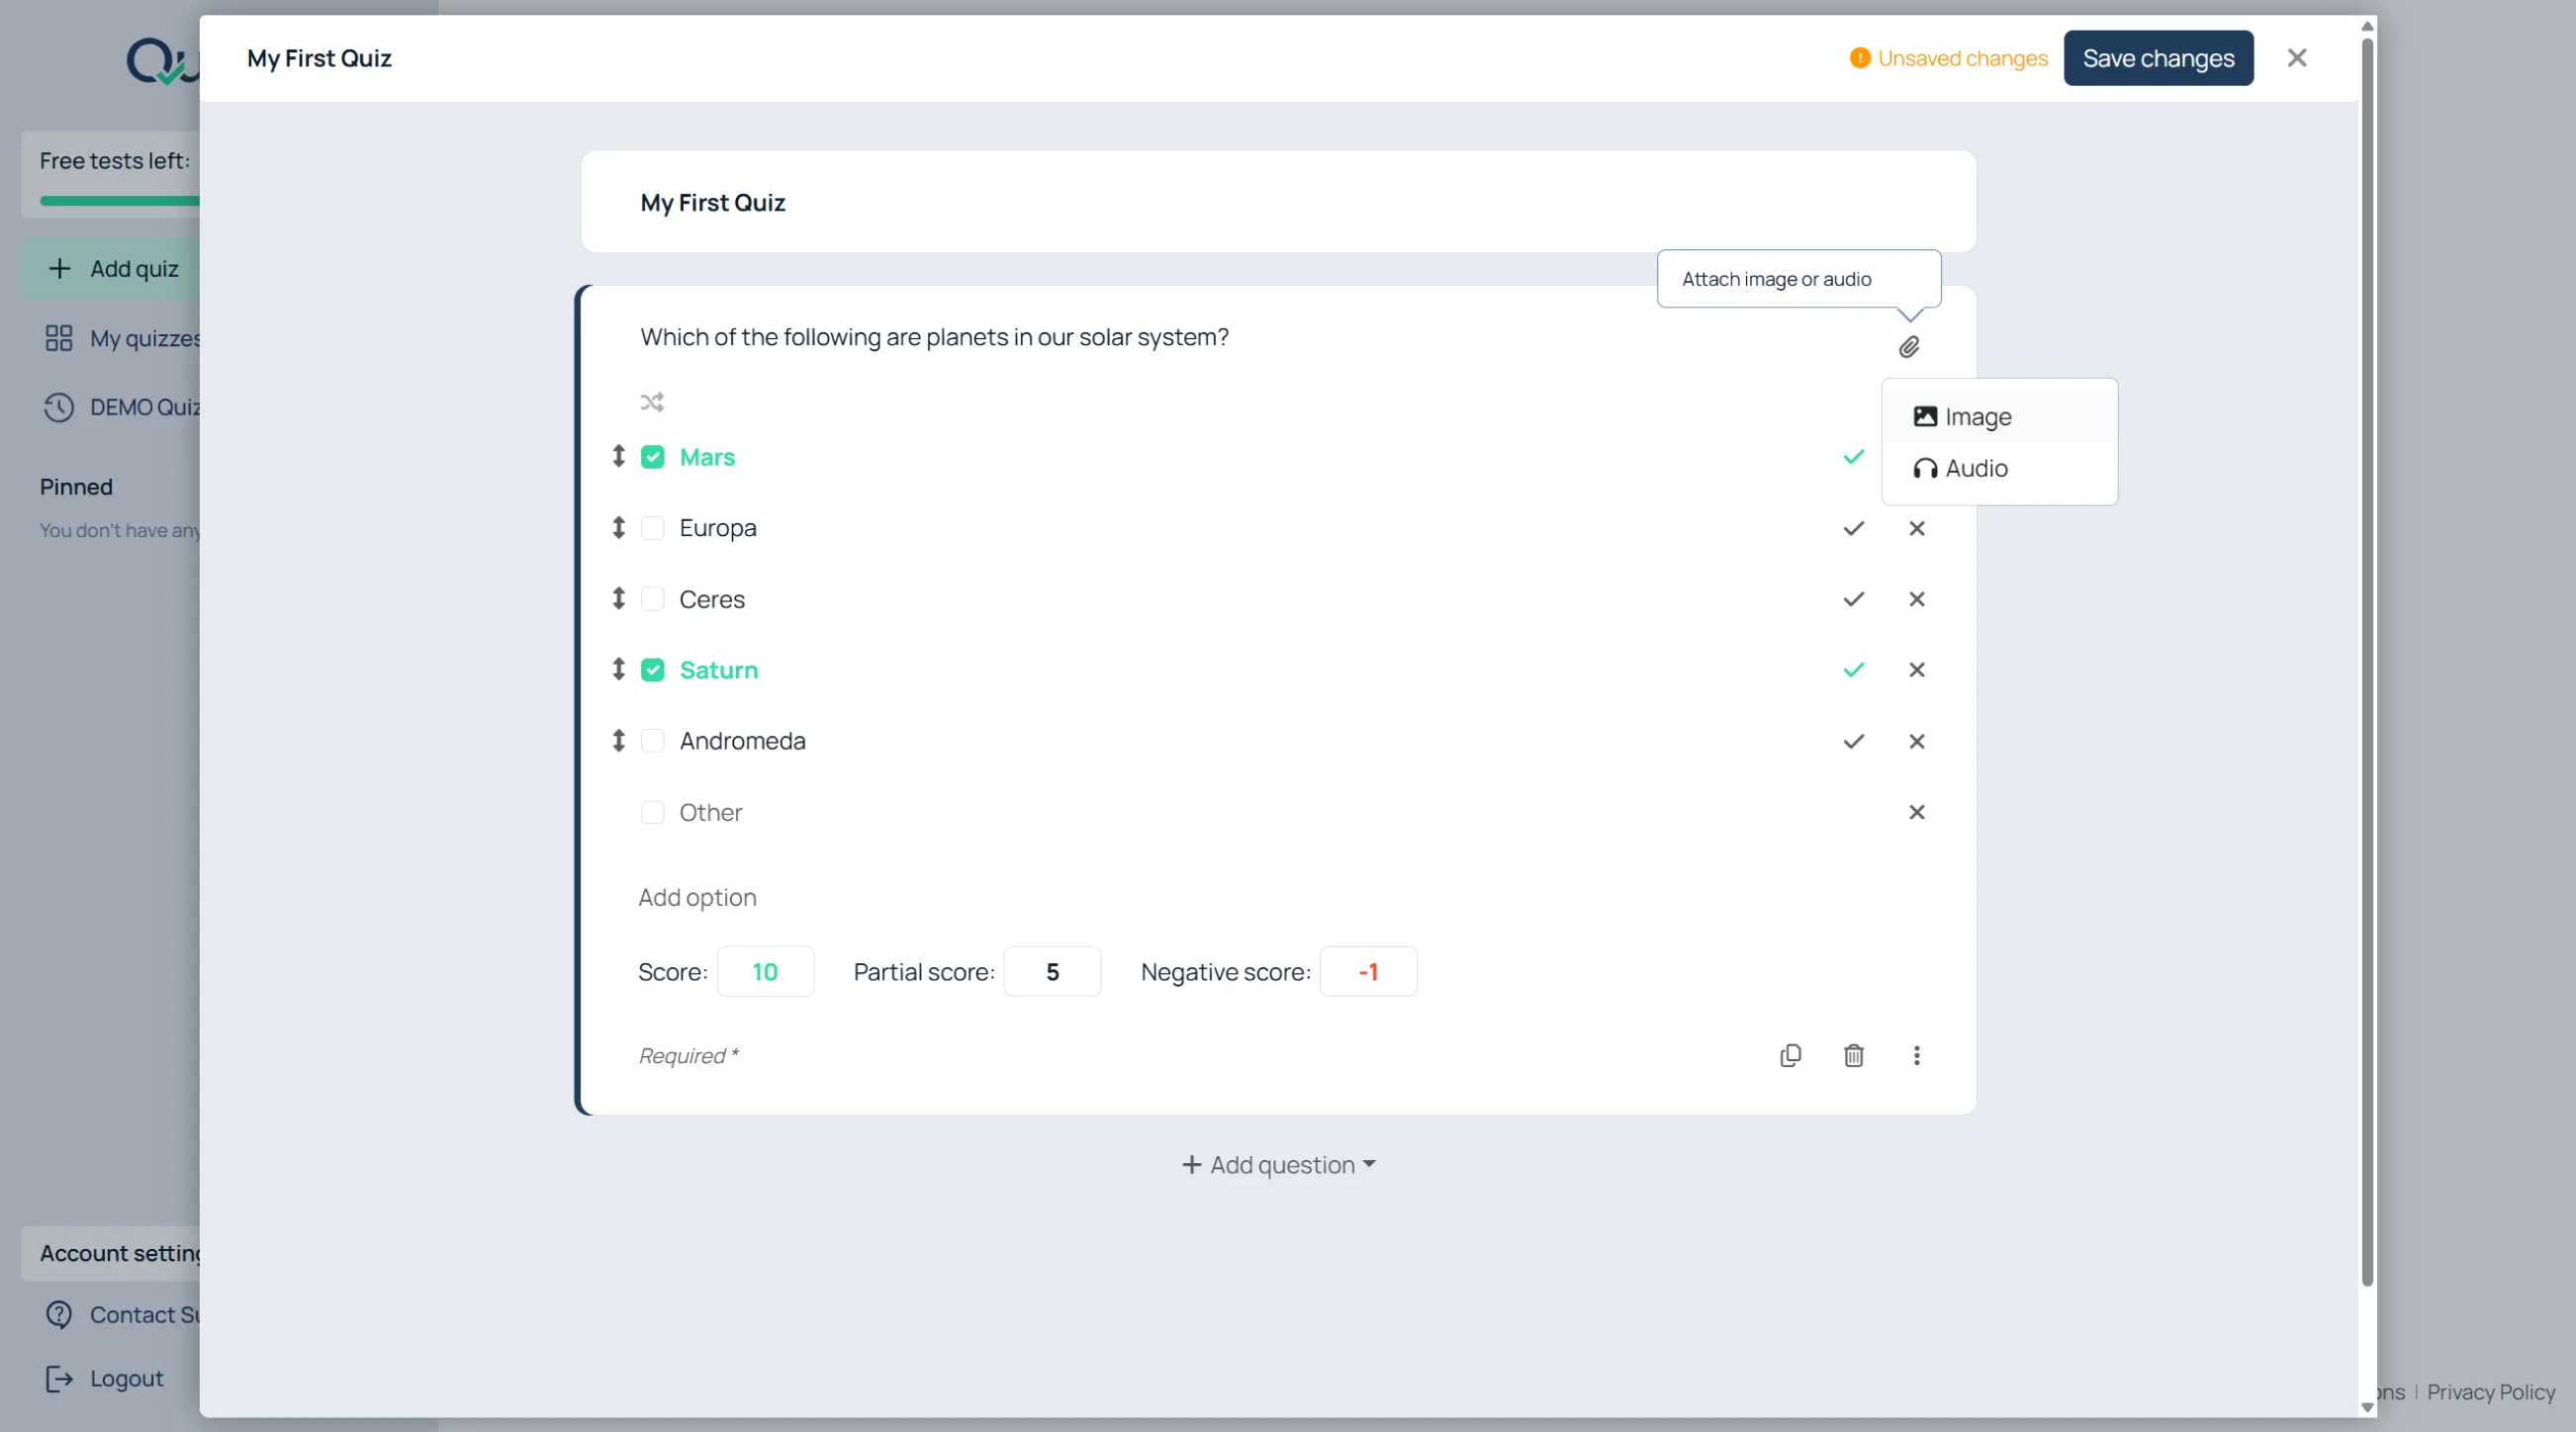
  1. Click the attachment icon inside the question;
  2. Choose “Image” or “Audio”;
  3. Upload the file.

Configure Scoring

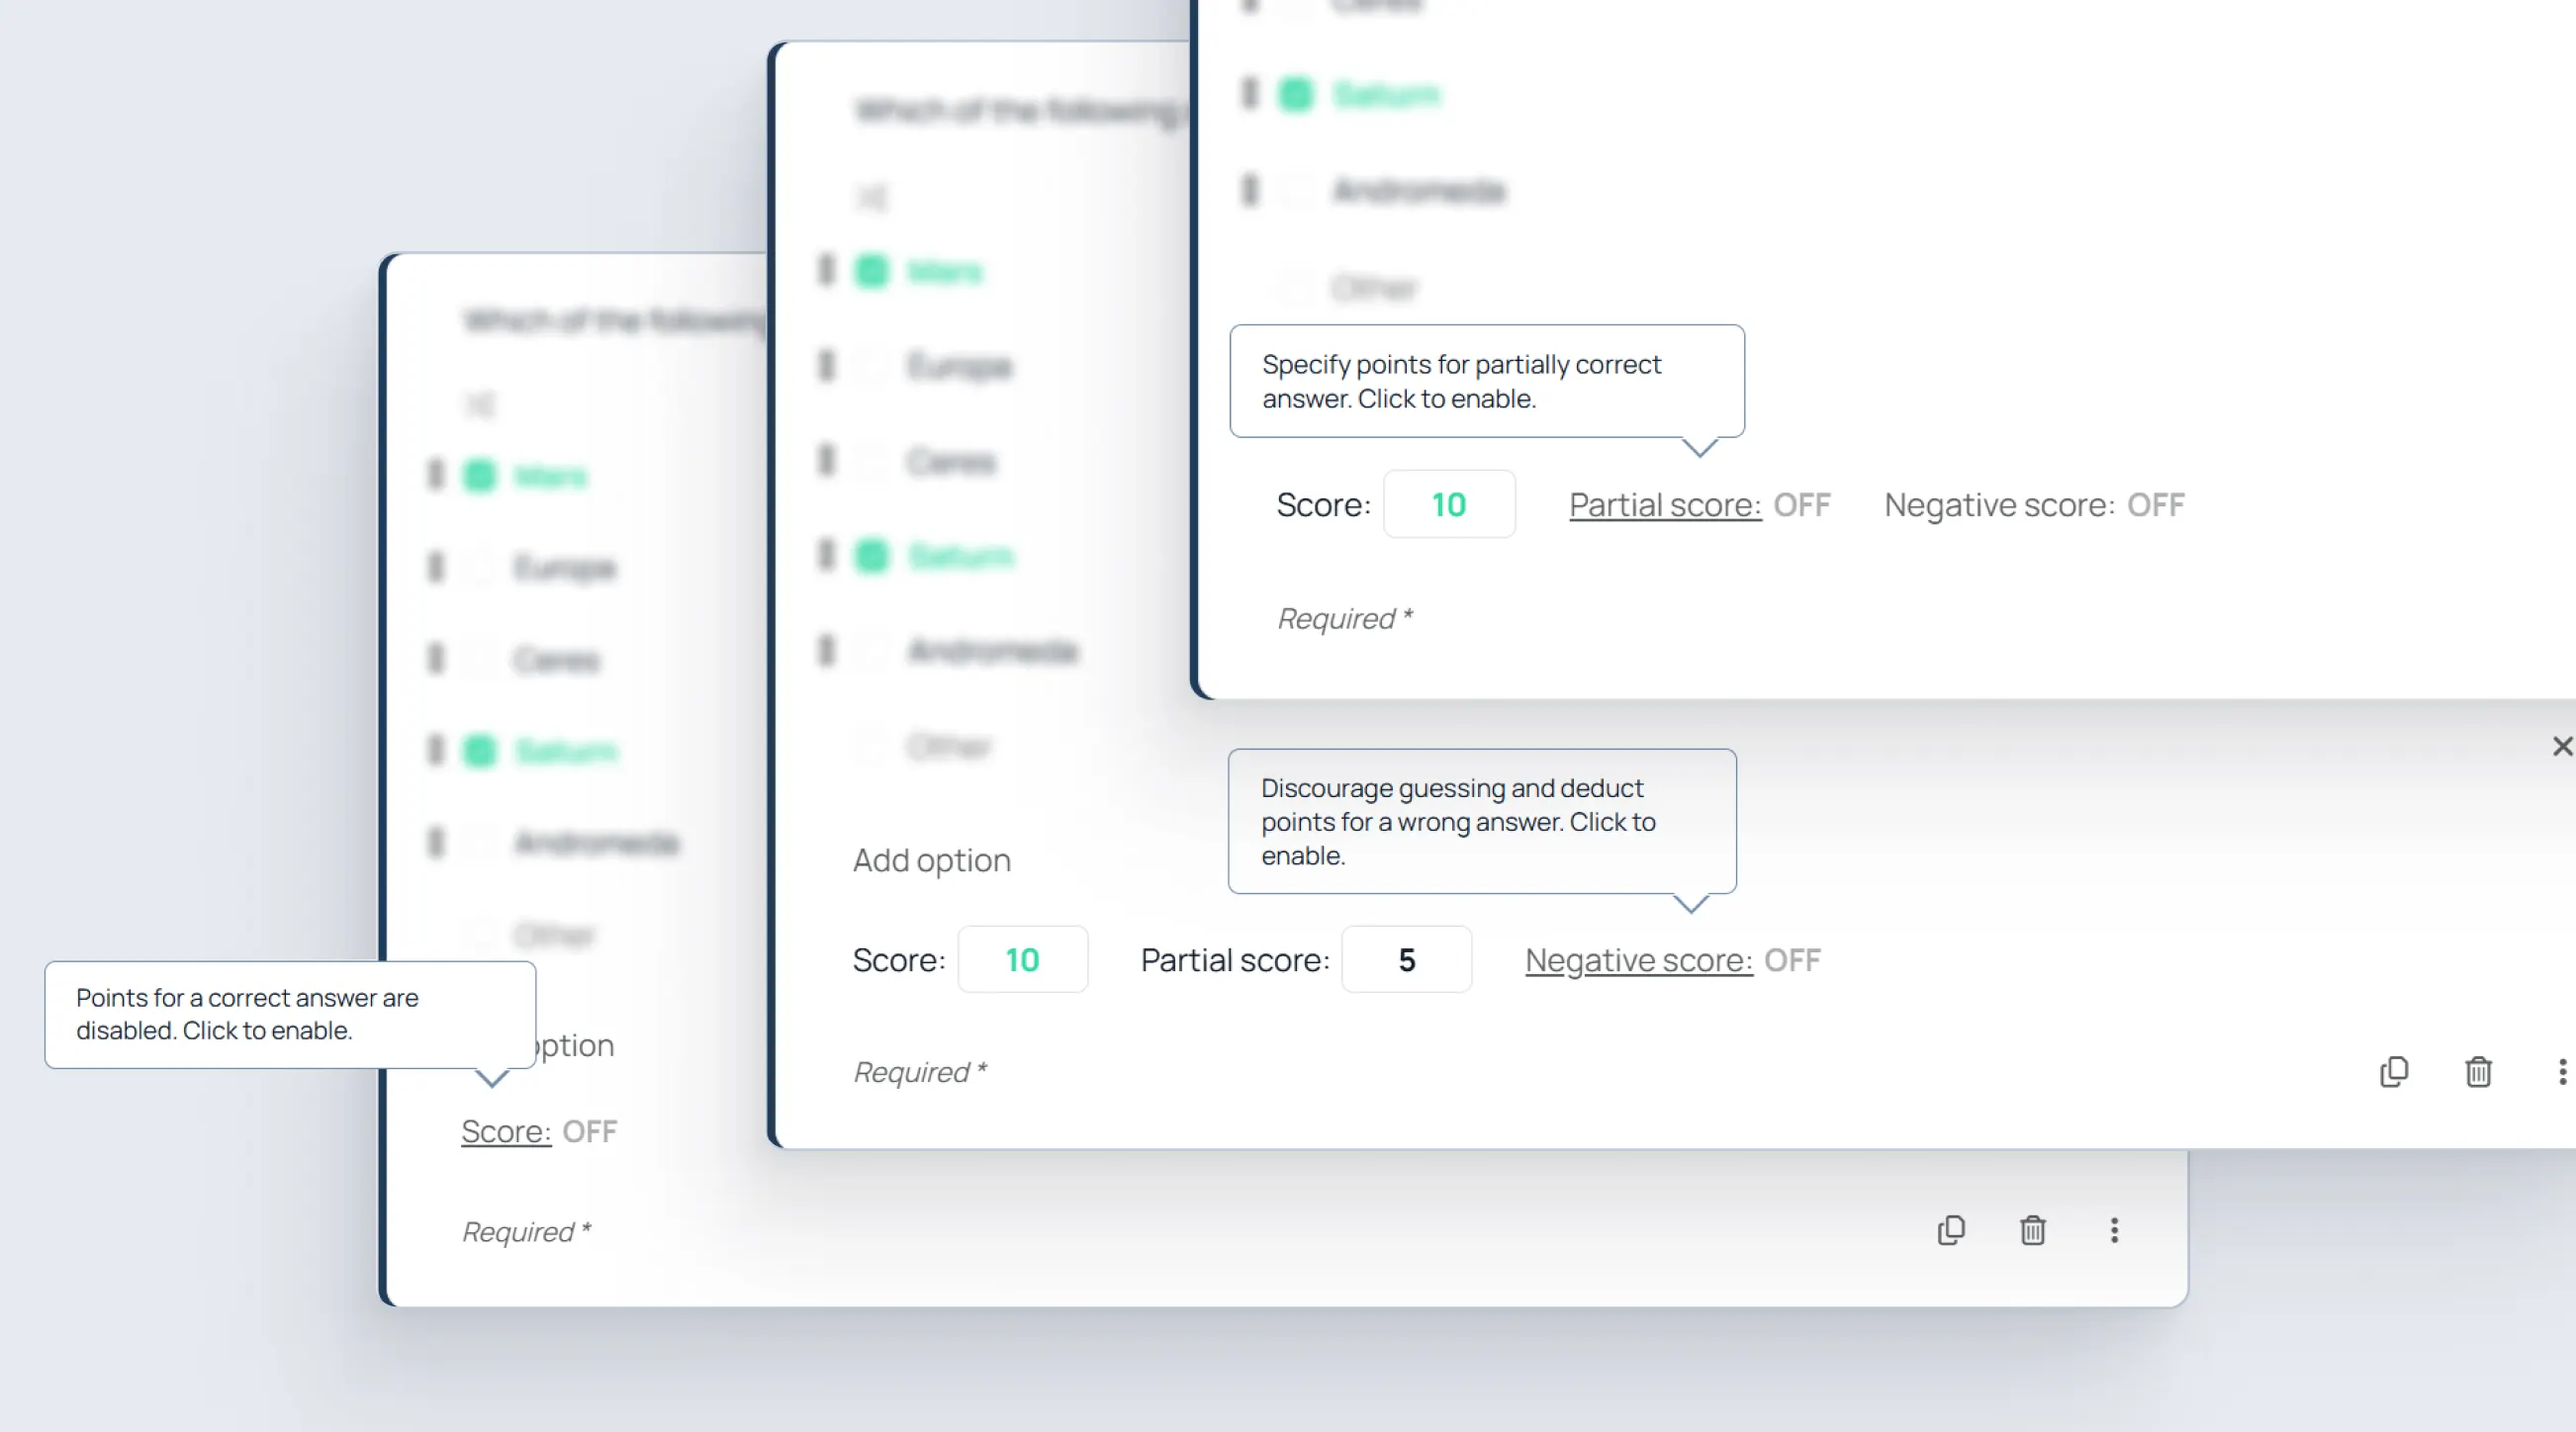
Scoring settings help control how respondents are evaluated. Use them to reward correct answers, allow partial credit, or discourage random guessing on exams and certifications.

Question scoring is configured directly inside each question.

Available scoring settings:

  • “Score”;
  • “Partial score”;
  • “Negative score”.

Set the main score

The “Score” input is enabled and expanded by default.

  1. Enter the number of points in the “Score” input.

If you do not want the question to be graded:

  1. Click the “Score” label to collapse or disable scoring for that question.

Enable partial score

Partial scoring is useful when a respondent gives a partially correct answer. This is especially valuable for checkbox questions where respondents may correctly identify some answers but miss others.

  1. Click “Partial score”;
  2. Enter the value.

Enable negative score

“Negative score” is disabled by default.

  1. Click “Negative score” to expand the setting;
  2. Enter the penalty value.

Negative scoring discourages guessing by subtracting points for incorrect answers. This is commonly used in exams and certifications where random guessing should reduce the final score.

Add Descriptions and Explanations

To add extra instructional text:

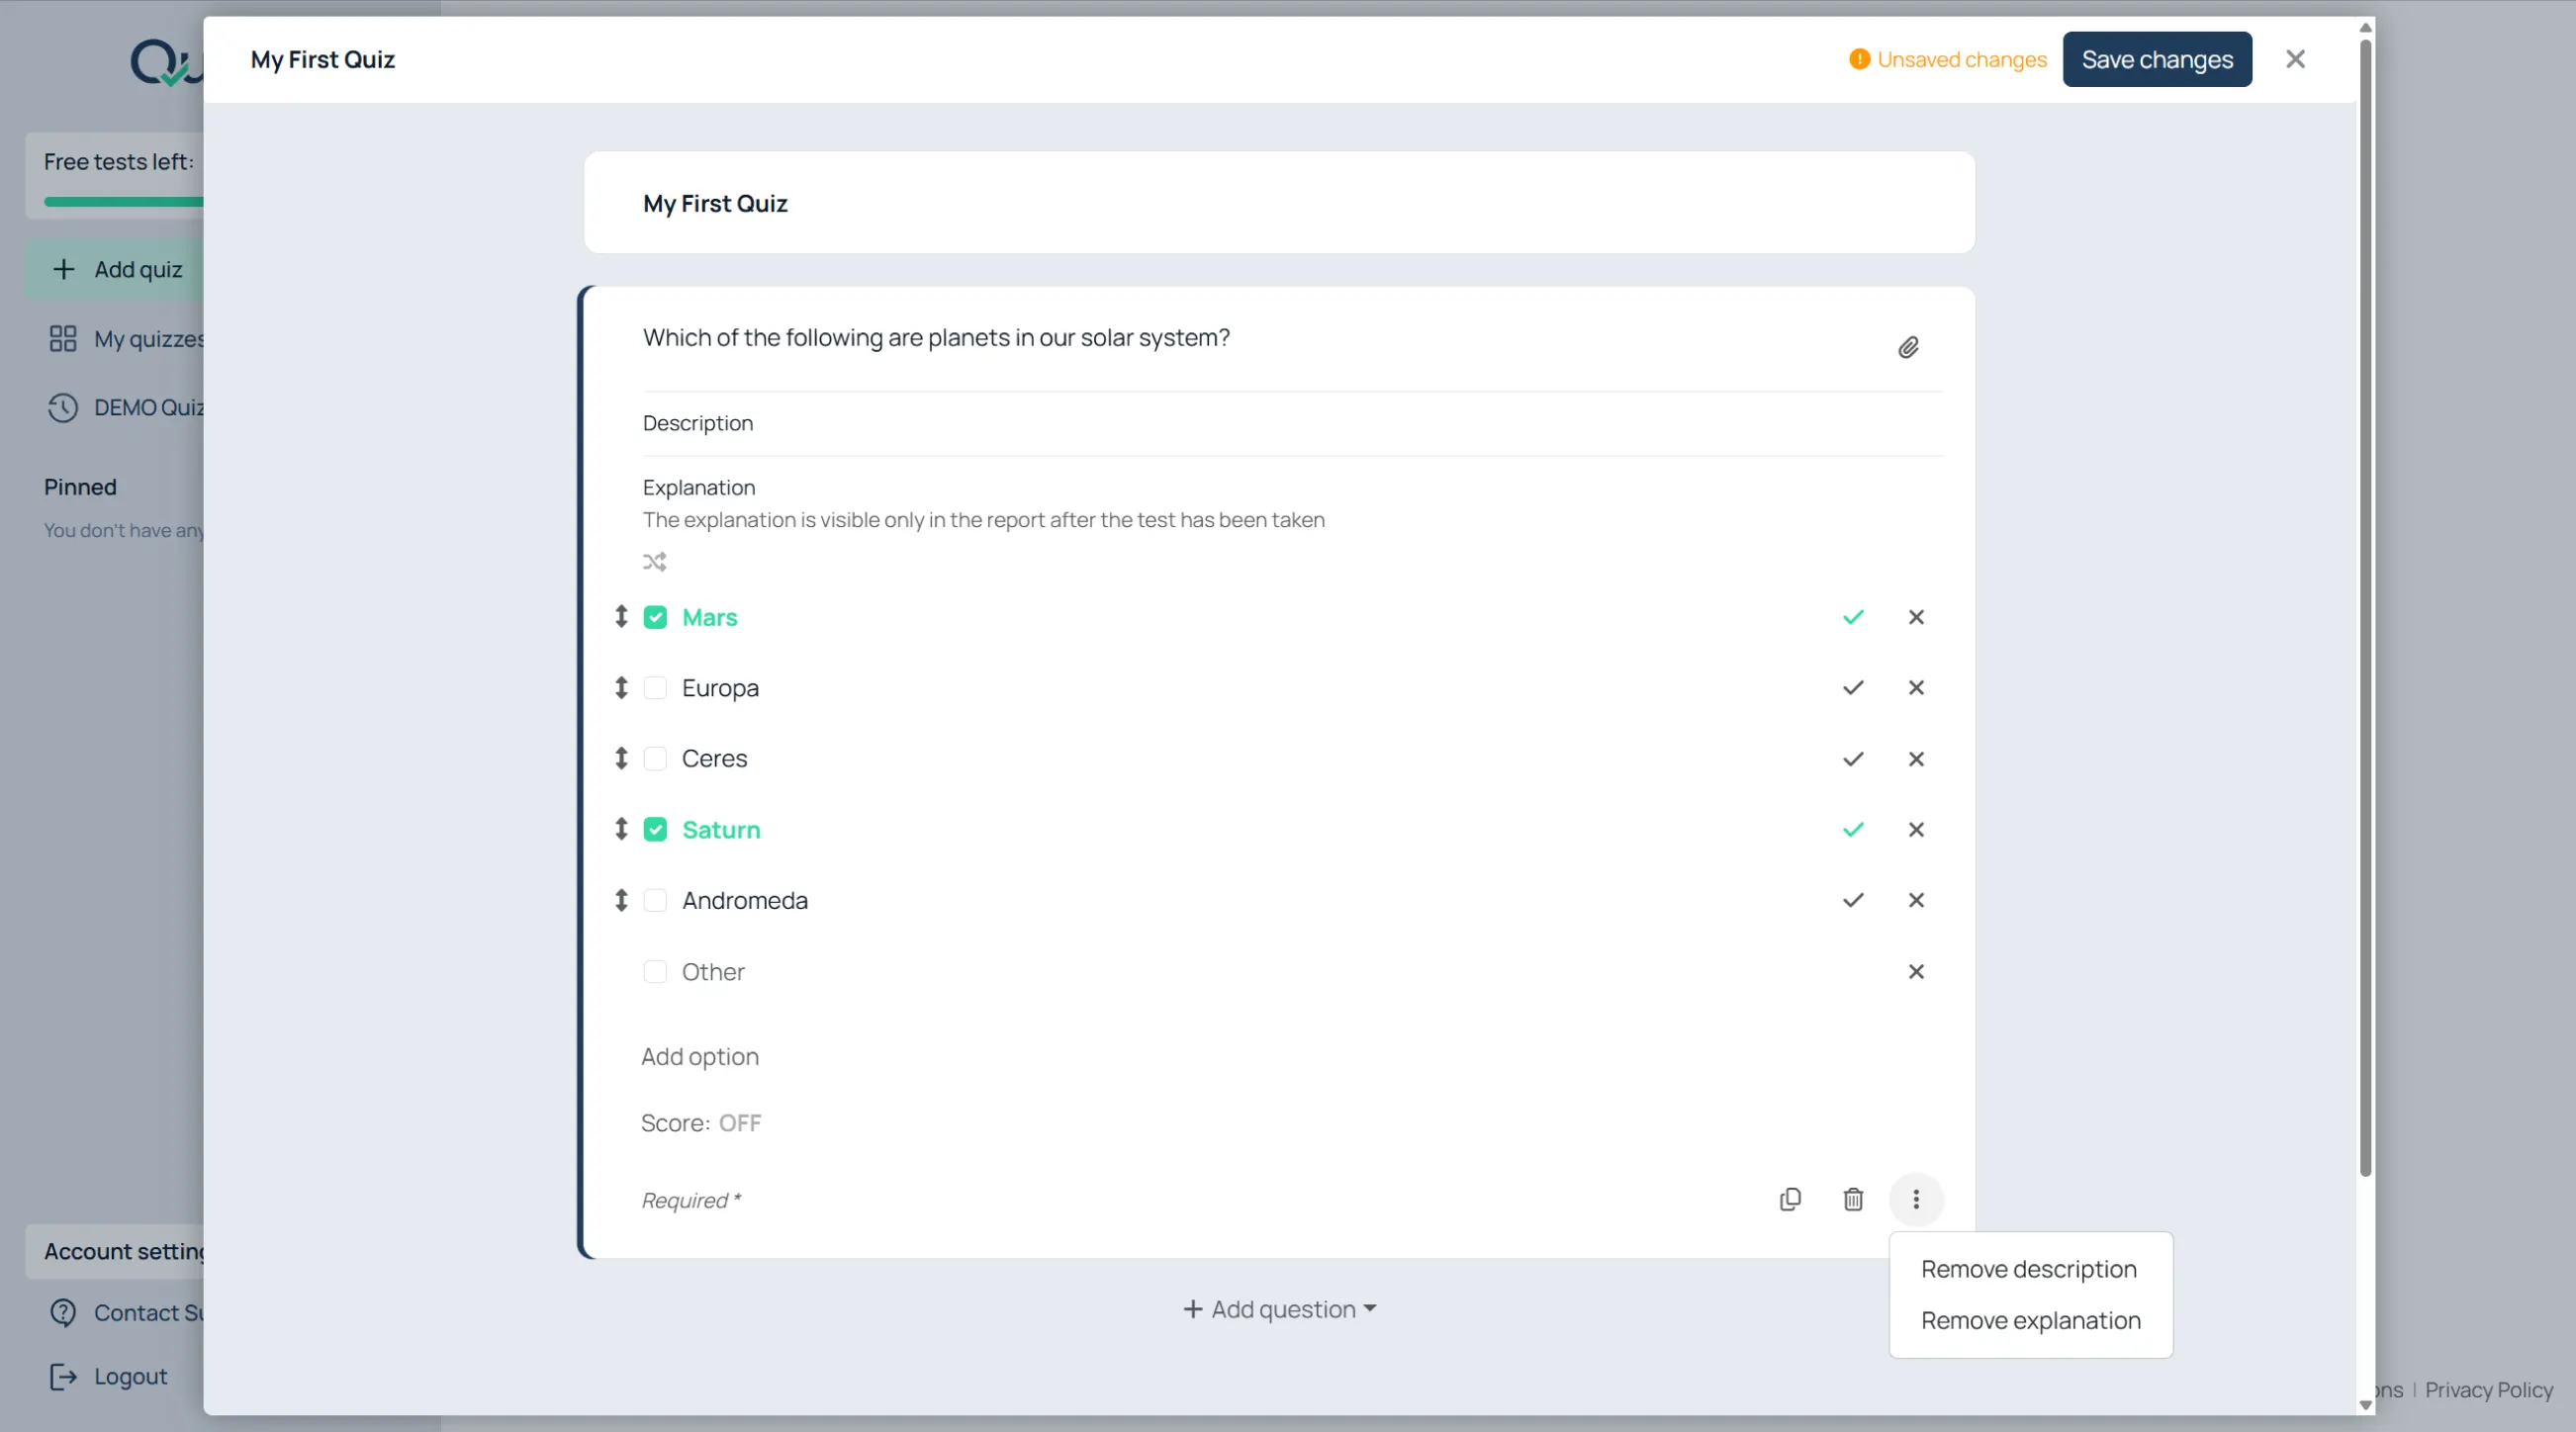
  1. Click the three-dot menu on the question;
  2. Click “Add description” or “Add explanation”.

Descriptions appear during the test.

Explanations appear later in reports or results.

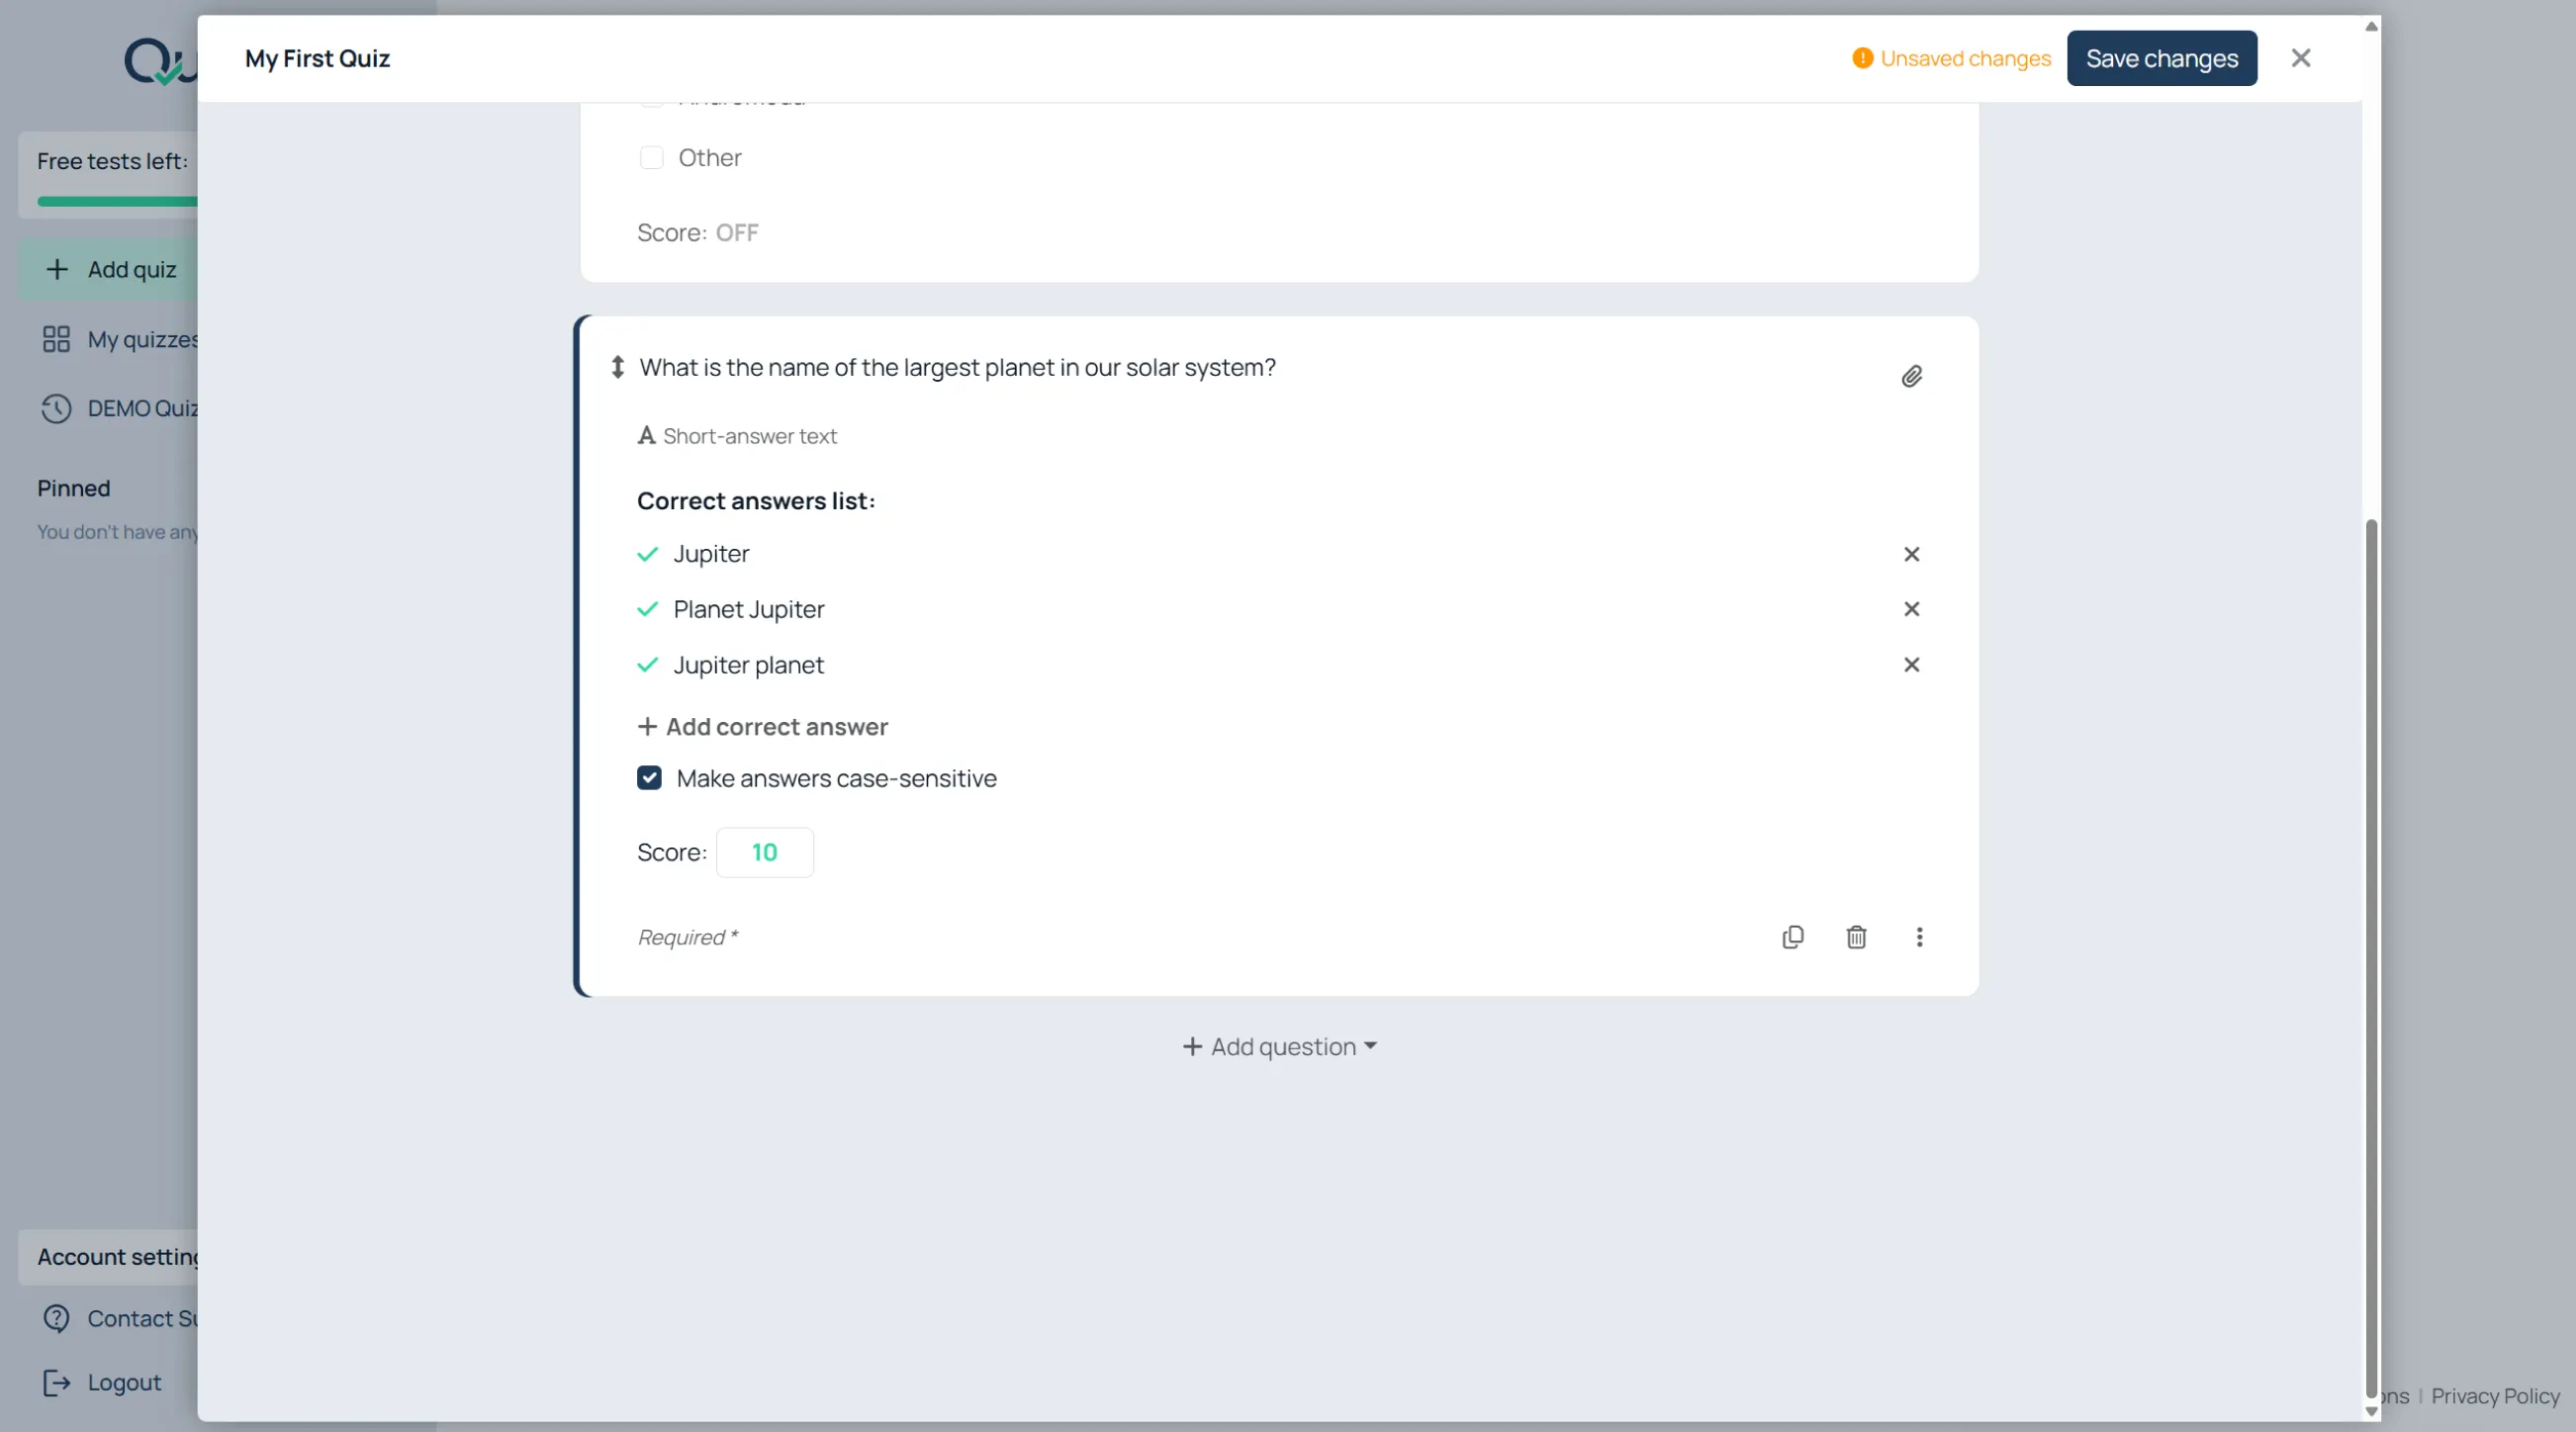
Create Short Answer Questions

To configure accepted answers:

  1. Add a “Short Answer” question;
  2. Click “Add correct answer”;
  3. Enter accepted answers.

Example accepted answers:

  • dad;
  • daddy;
  • father.

Create Paragraph Questions

Use “Paragraph” for essays, written explanations, and manually graded answers.

Organize Large Quizzes

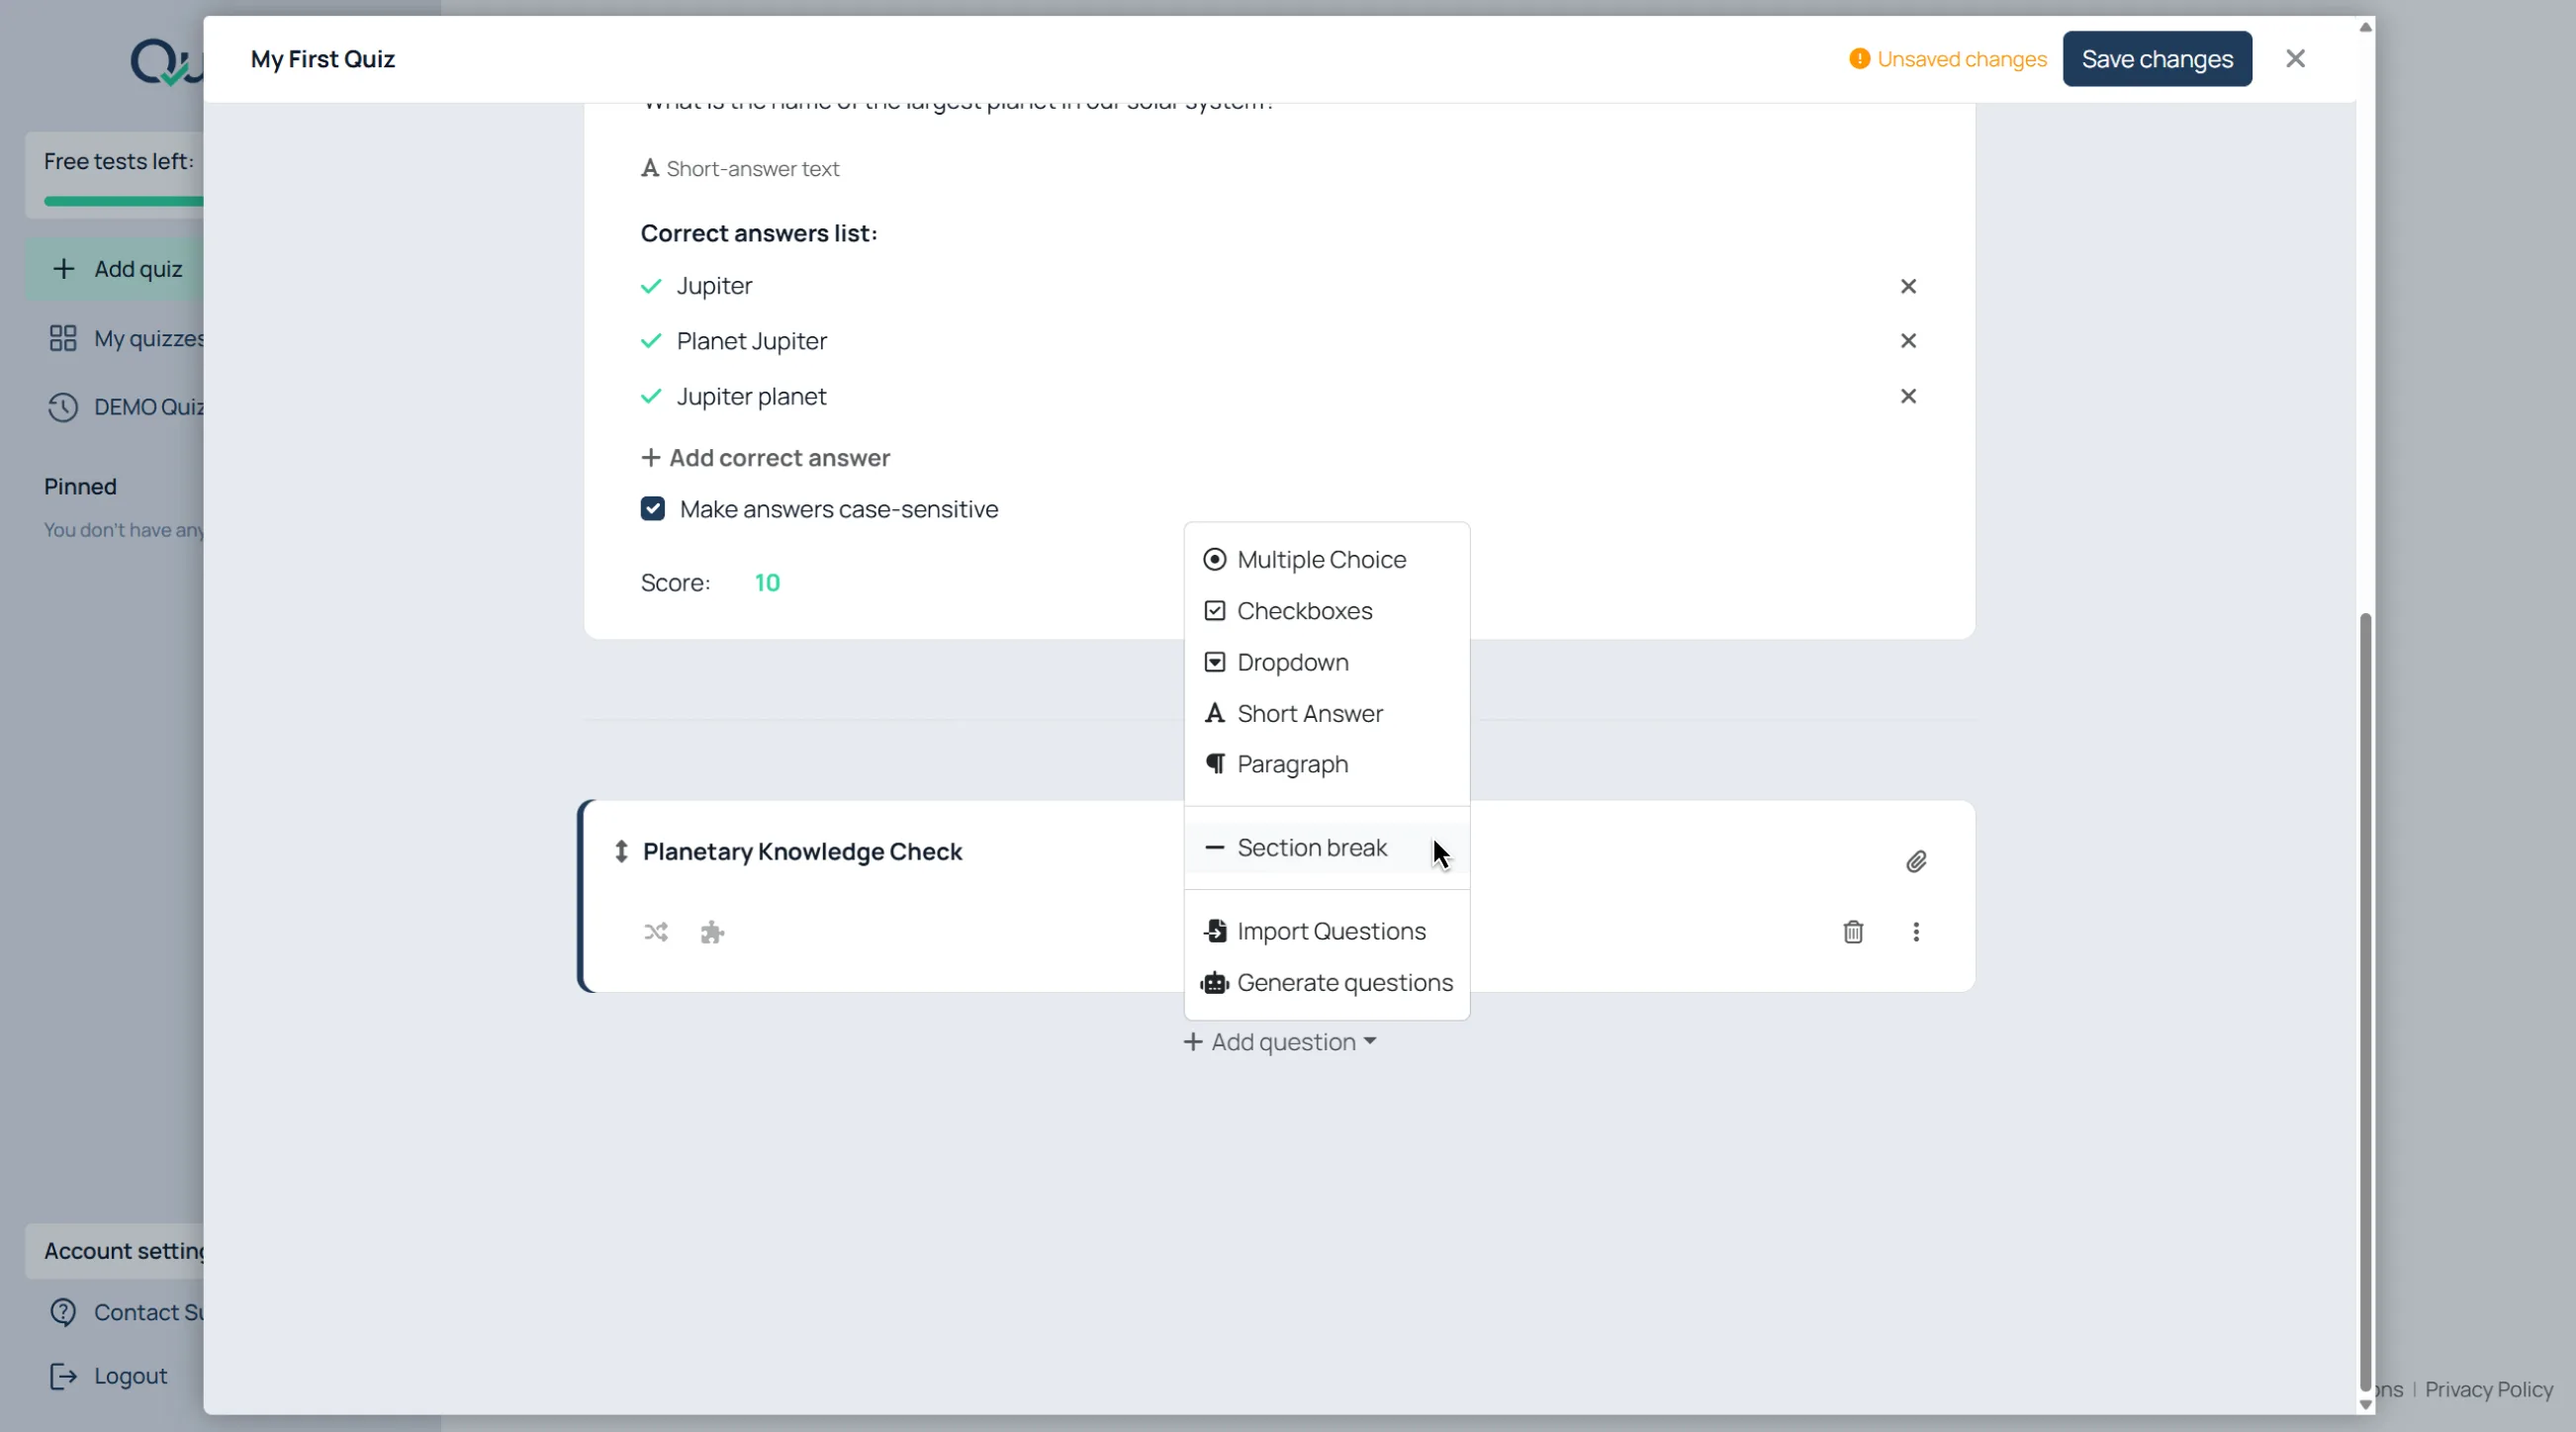
Use Sections

To add a section:

  1. Click “+ Add question”;
  2. Choose “Section break”;
  3. Enter the section title.

Use sections for:

  • chapters;
  • topics;
  • theory blocks;
  • practical tasks;
  • reading passages.

Add Section Content

Sections can contain:

  • descriptions;
  • images;
  • audio.

To add them:

  1. Click the section menu or attachment icon;
  2. Choose the content type;
  3. Upload or enter the content.

Shuffle Questions Inside a Section

To randomize question order:

  1. Click the shuffle icon on the section;
  2. Leave it enabled.

Use Question Pools

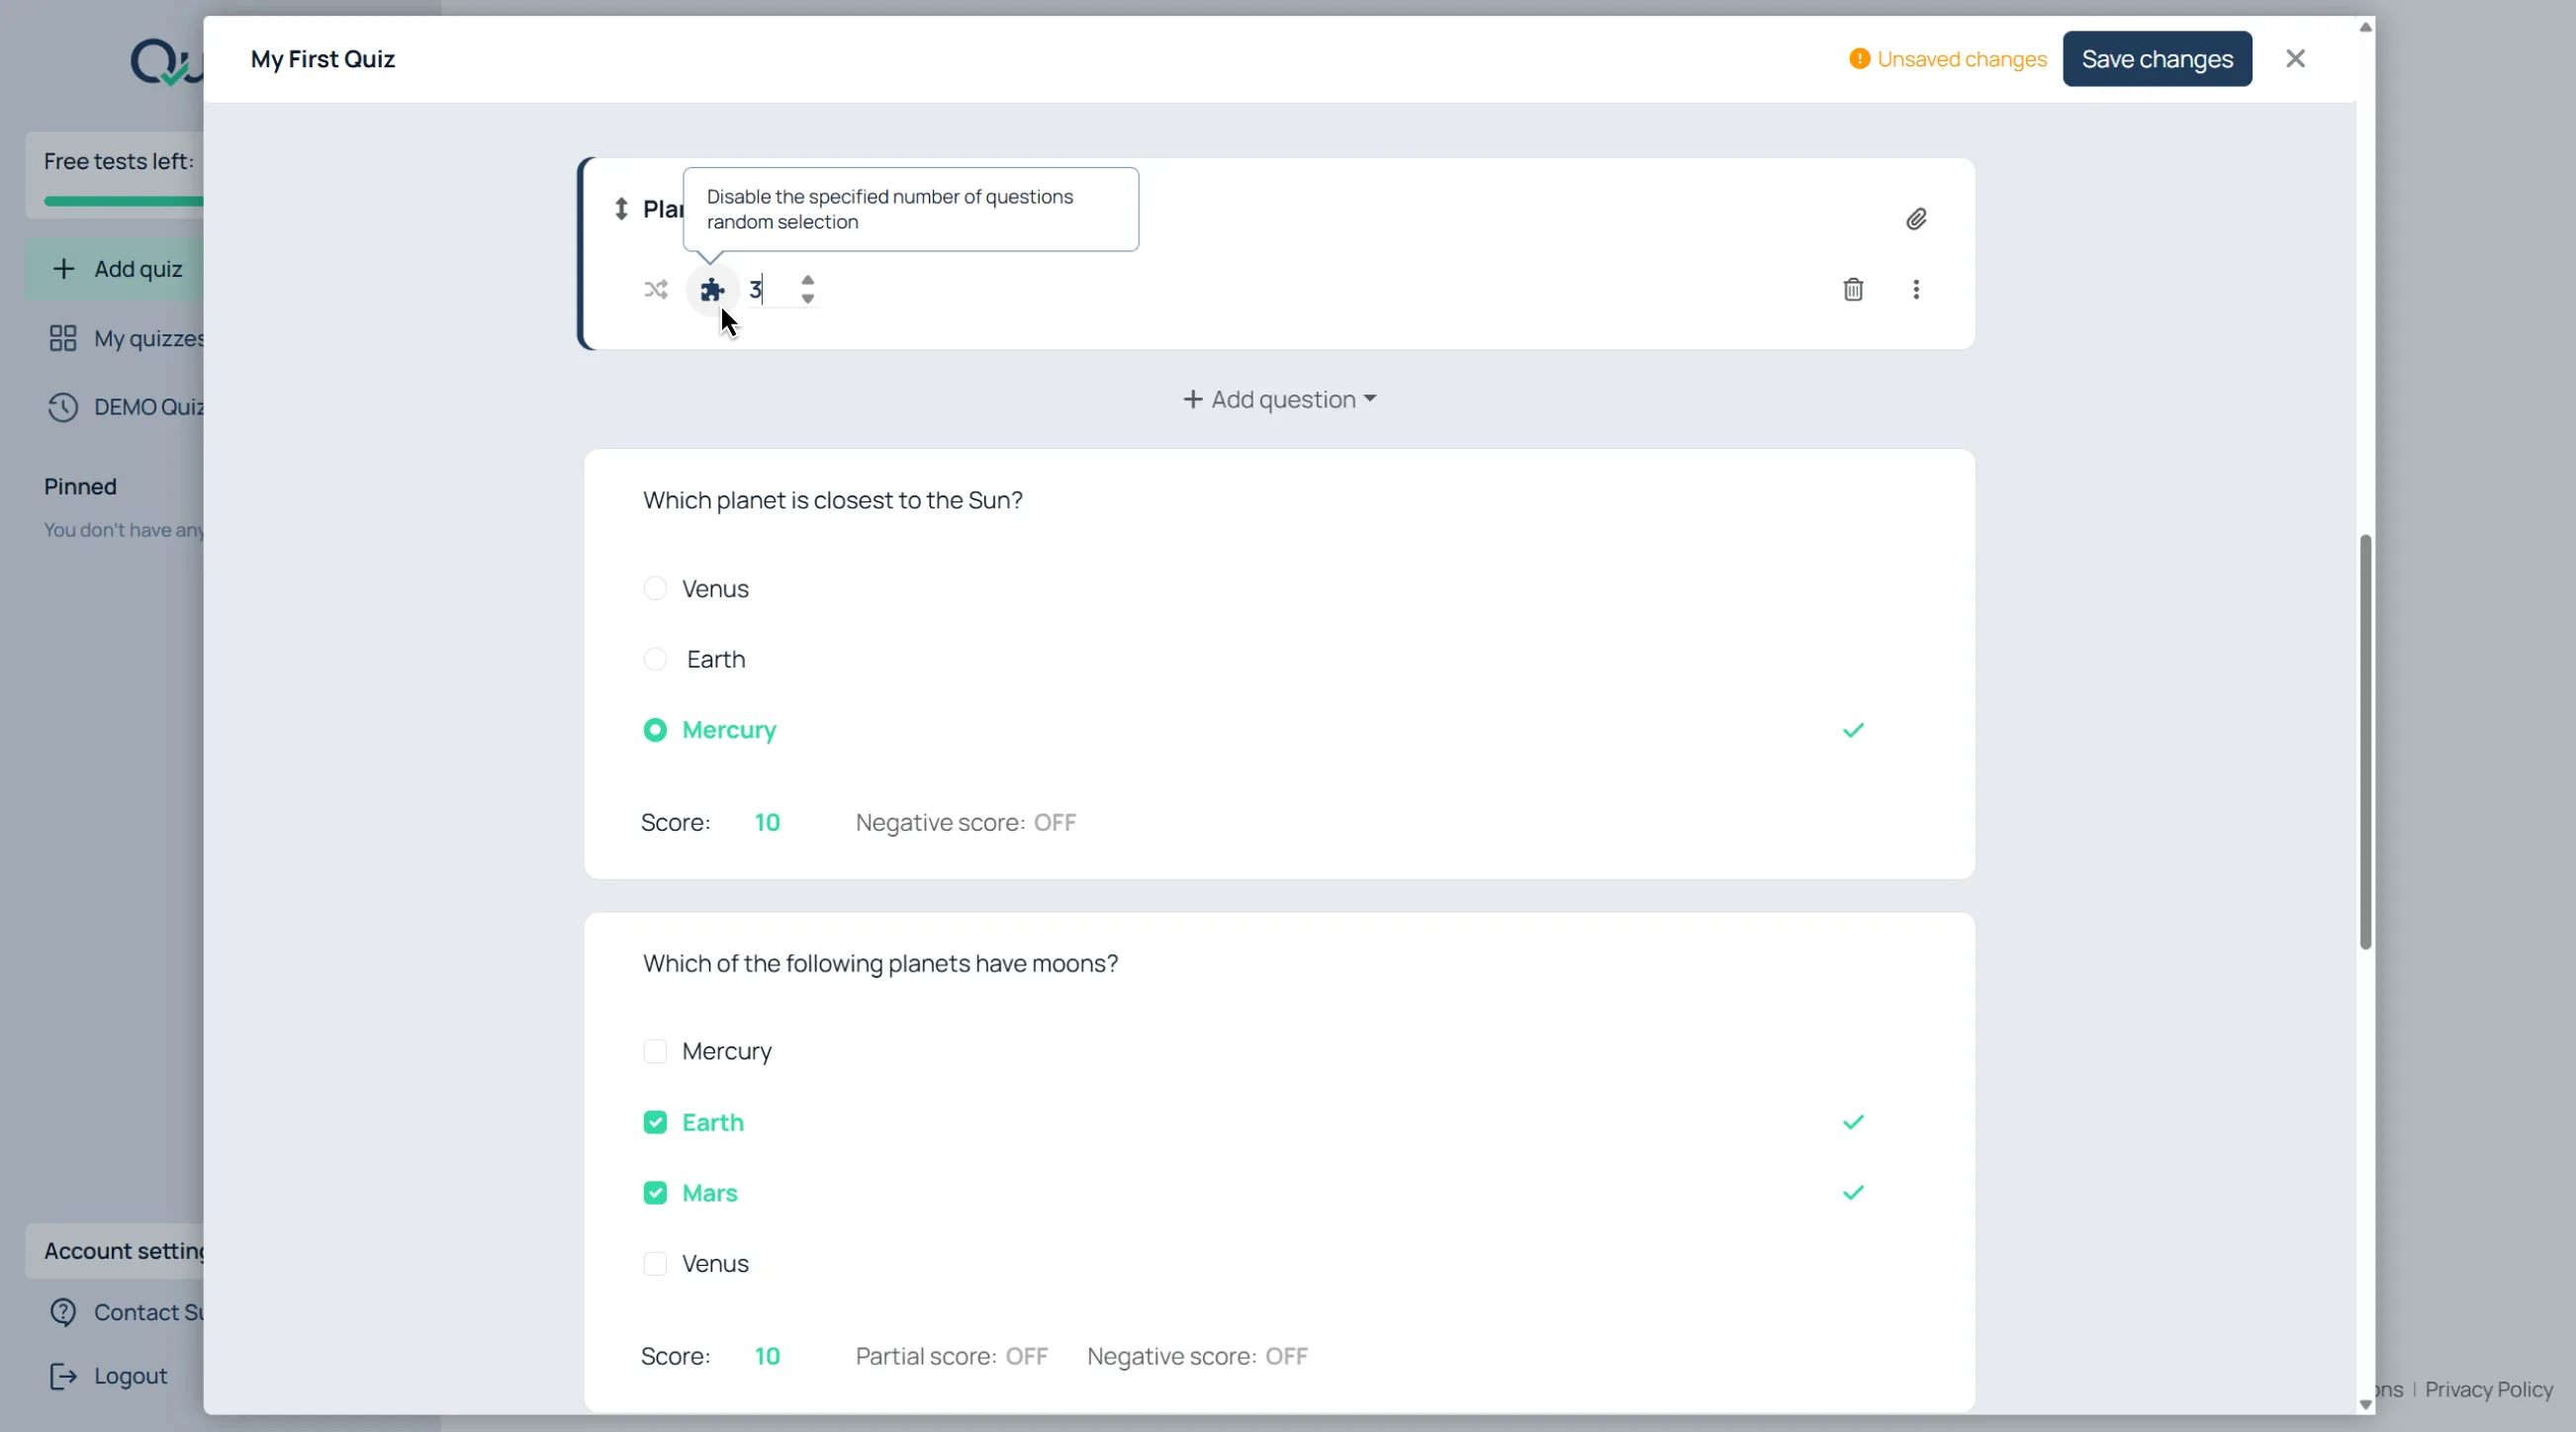
Question pools help generate different versions of the same assessment automatically. This reduces answer sharing and makes repeated testing more secure.

To randomly select questions from a section:

  1. Add many questions to the section;
  2. Open the random selection setting;
  3. Enter how many questions should be selected.

Example:

  • Add 100 questions;
  • Randomly select 10.

Each respondent receives a different subset.

Save and Configure the Quiz

Save the Quiz

Saving the quiz creates the initial delivery link and stores all question settings; scoring rules; and quiz structure.

When the quiz is ready:

  1. Click “Save changes”.

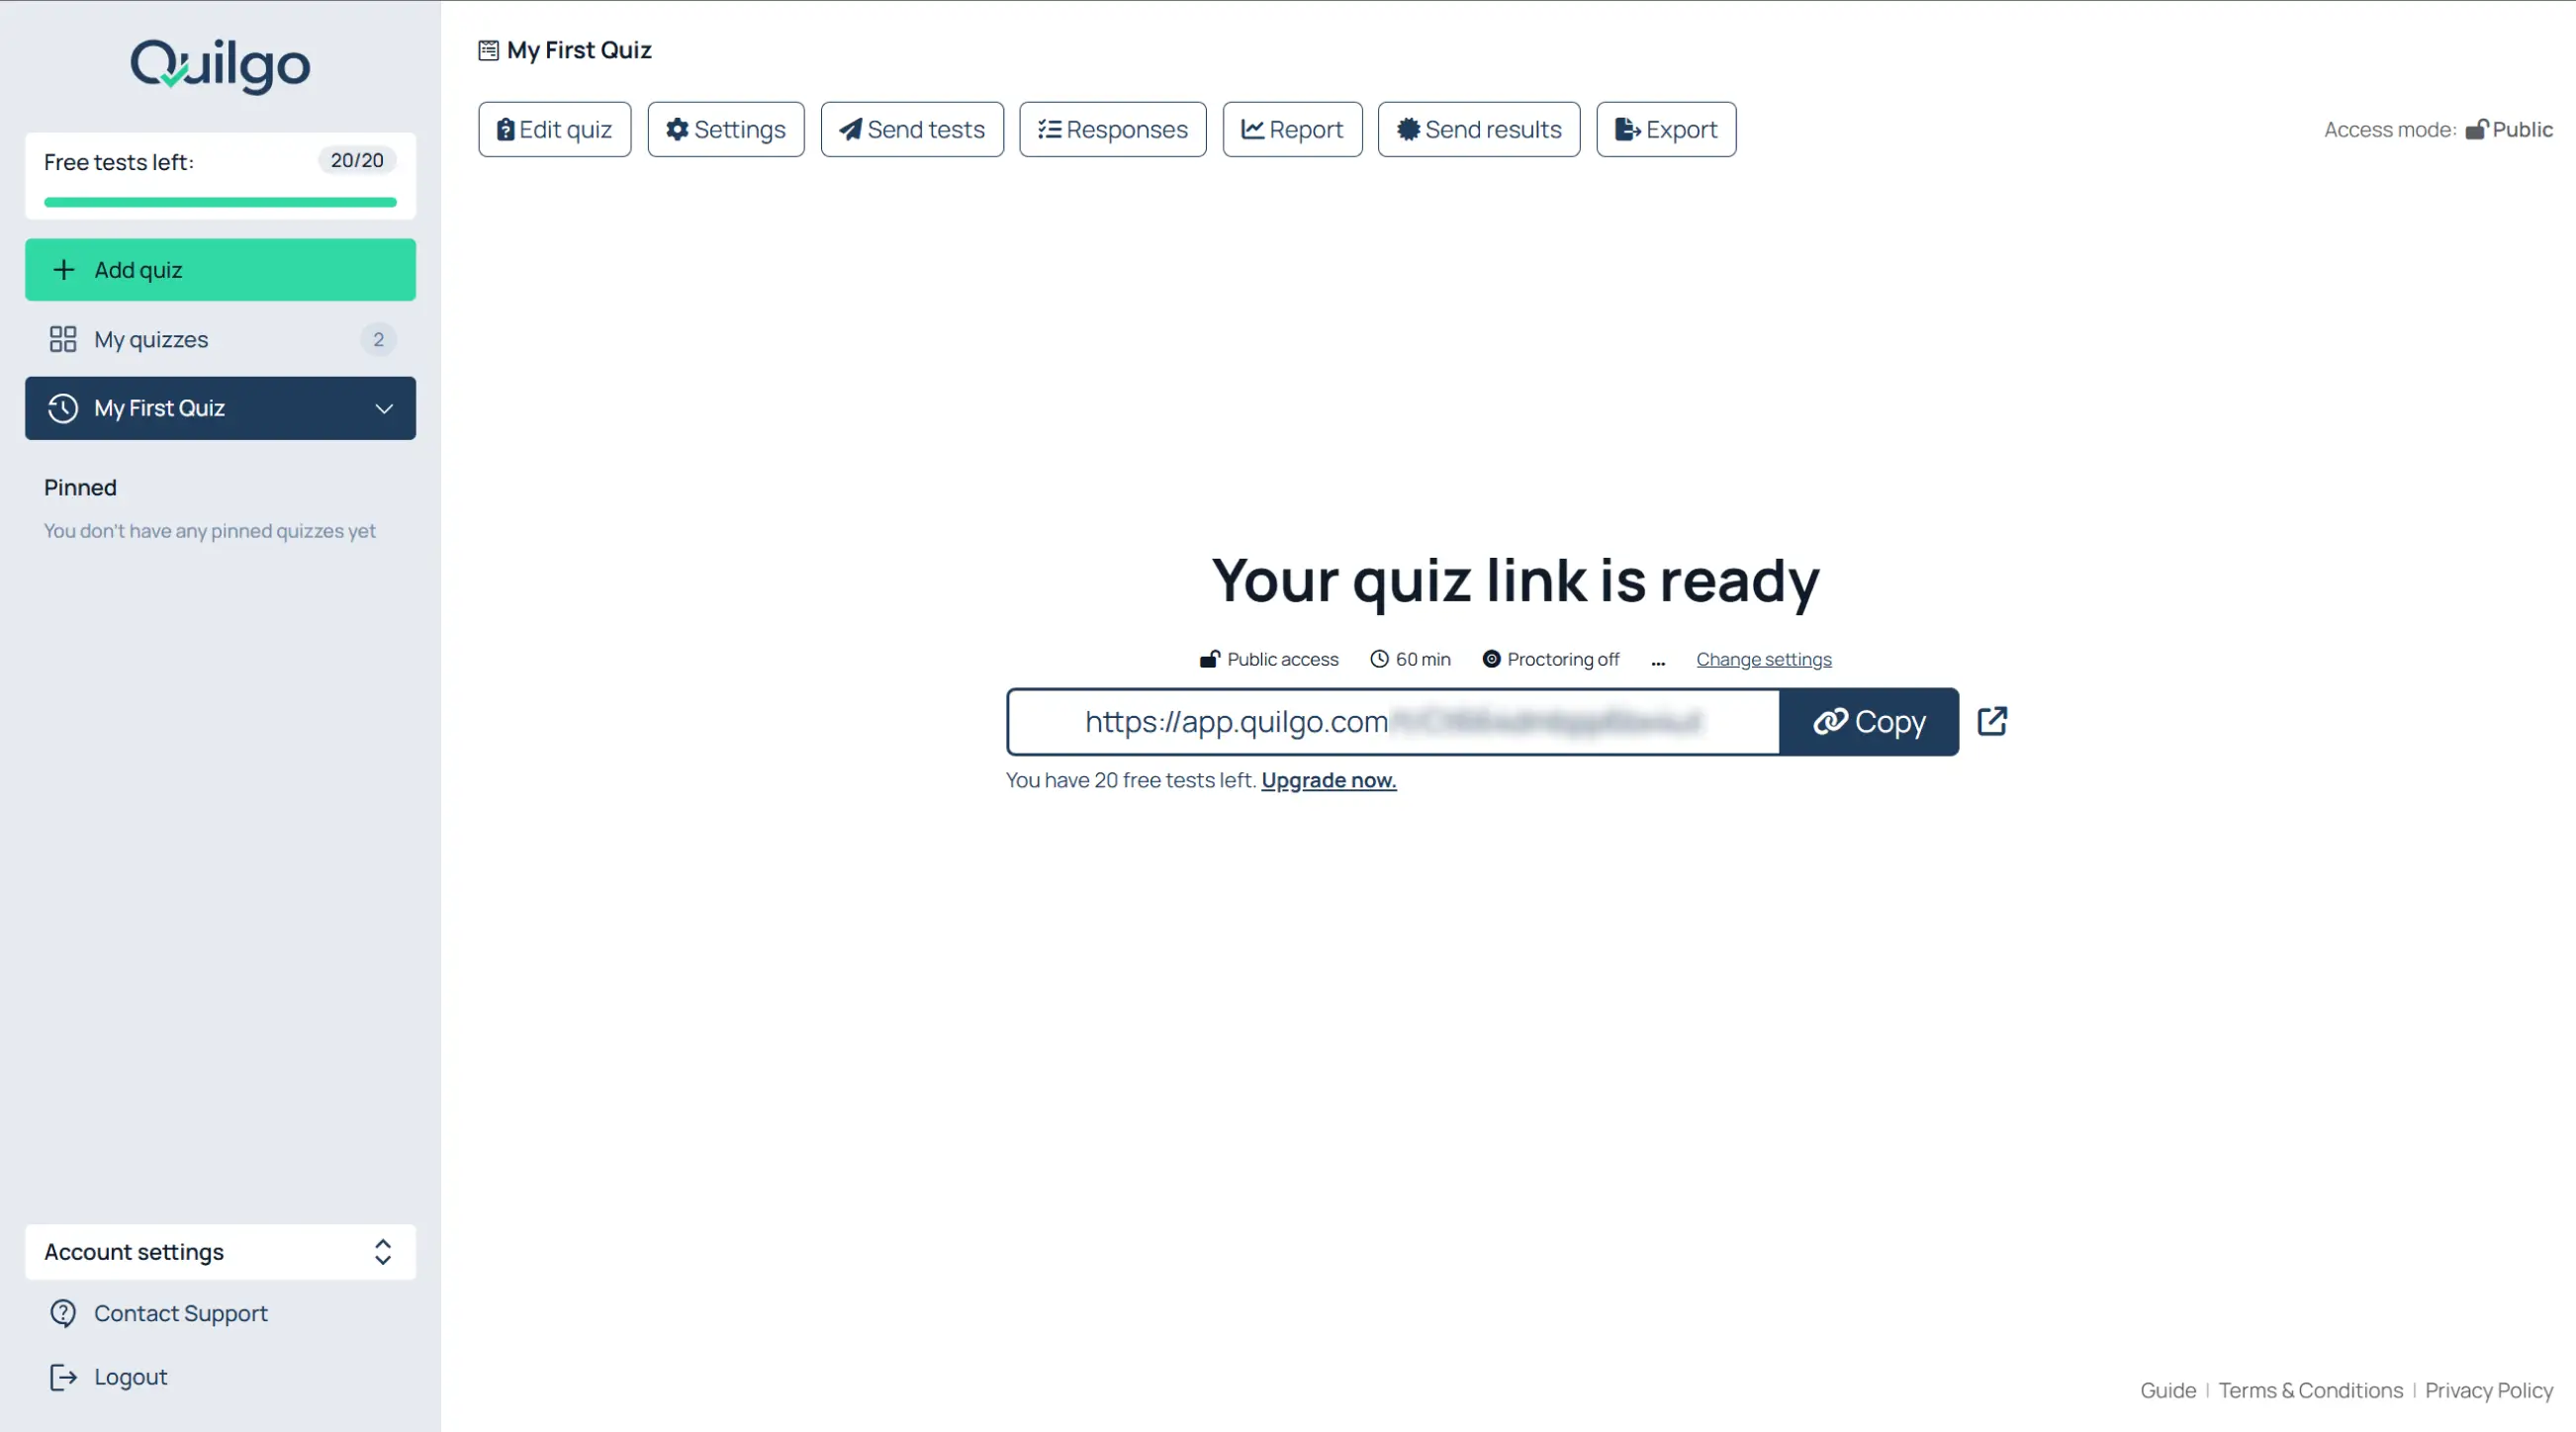
Quilgo automatically creates a ready-to-use quiz link.

Configure Test Delivery

Open Quiz Settings

To configure test behavior:

  1. Click “Settings” from the dashboard;
  2. Or click “Change settings” from the link screen.

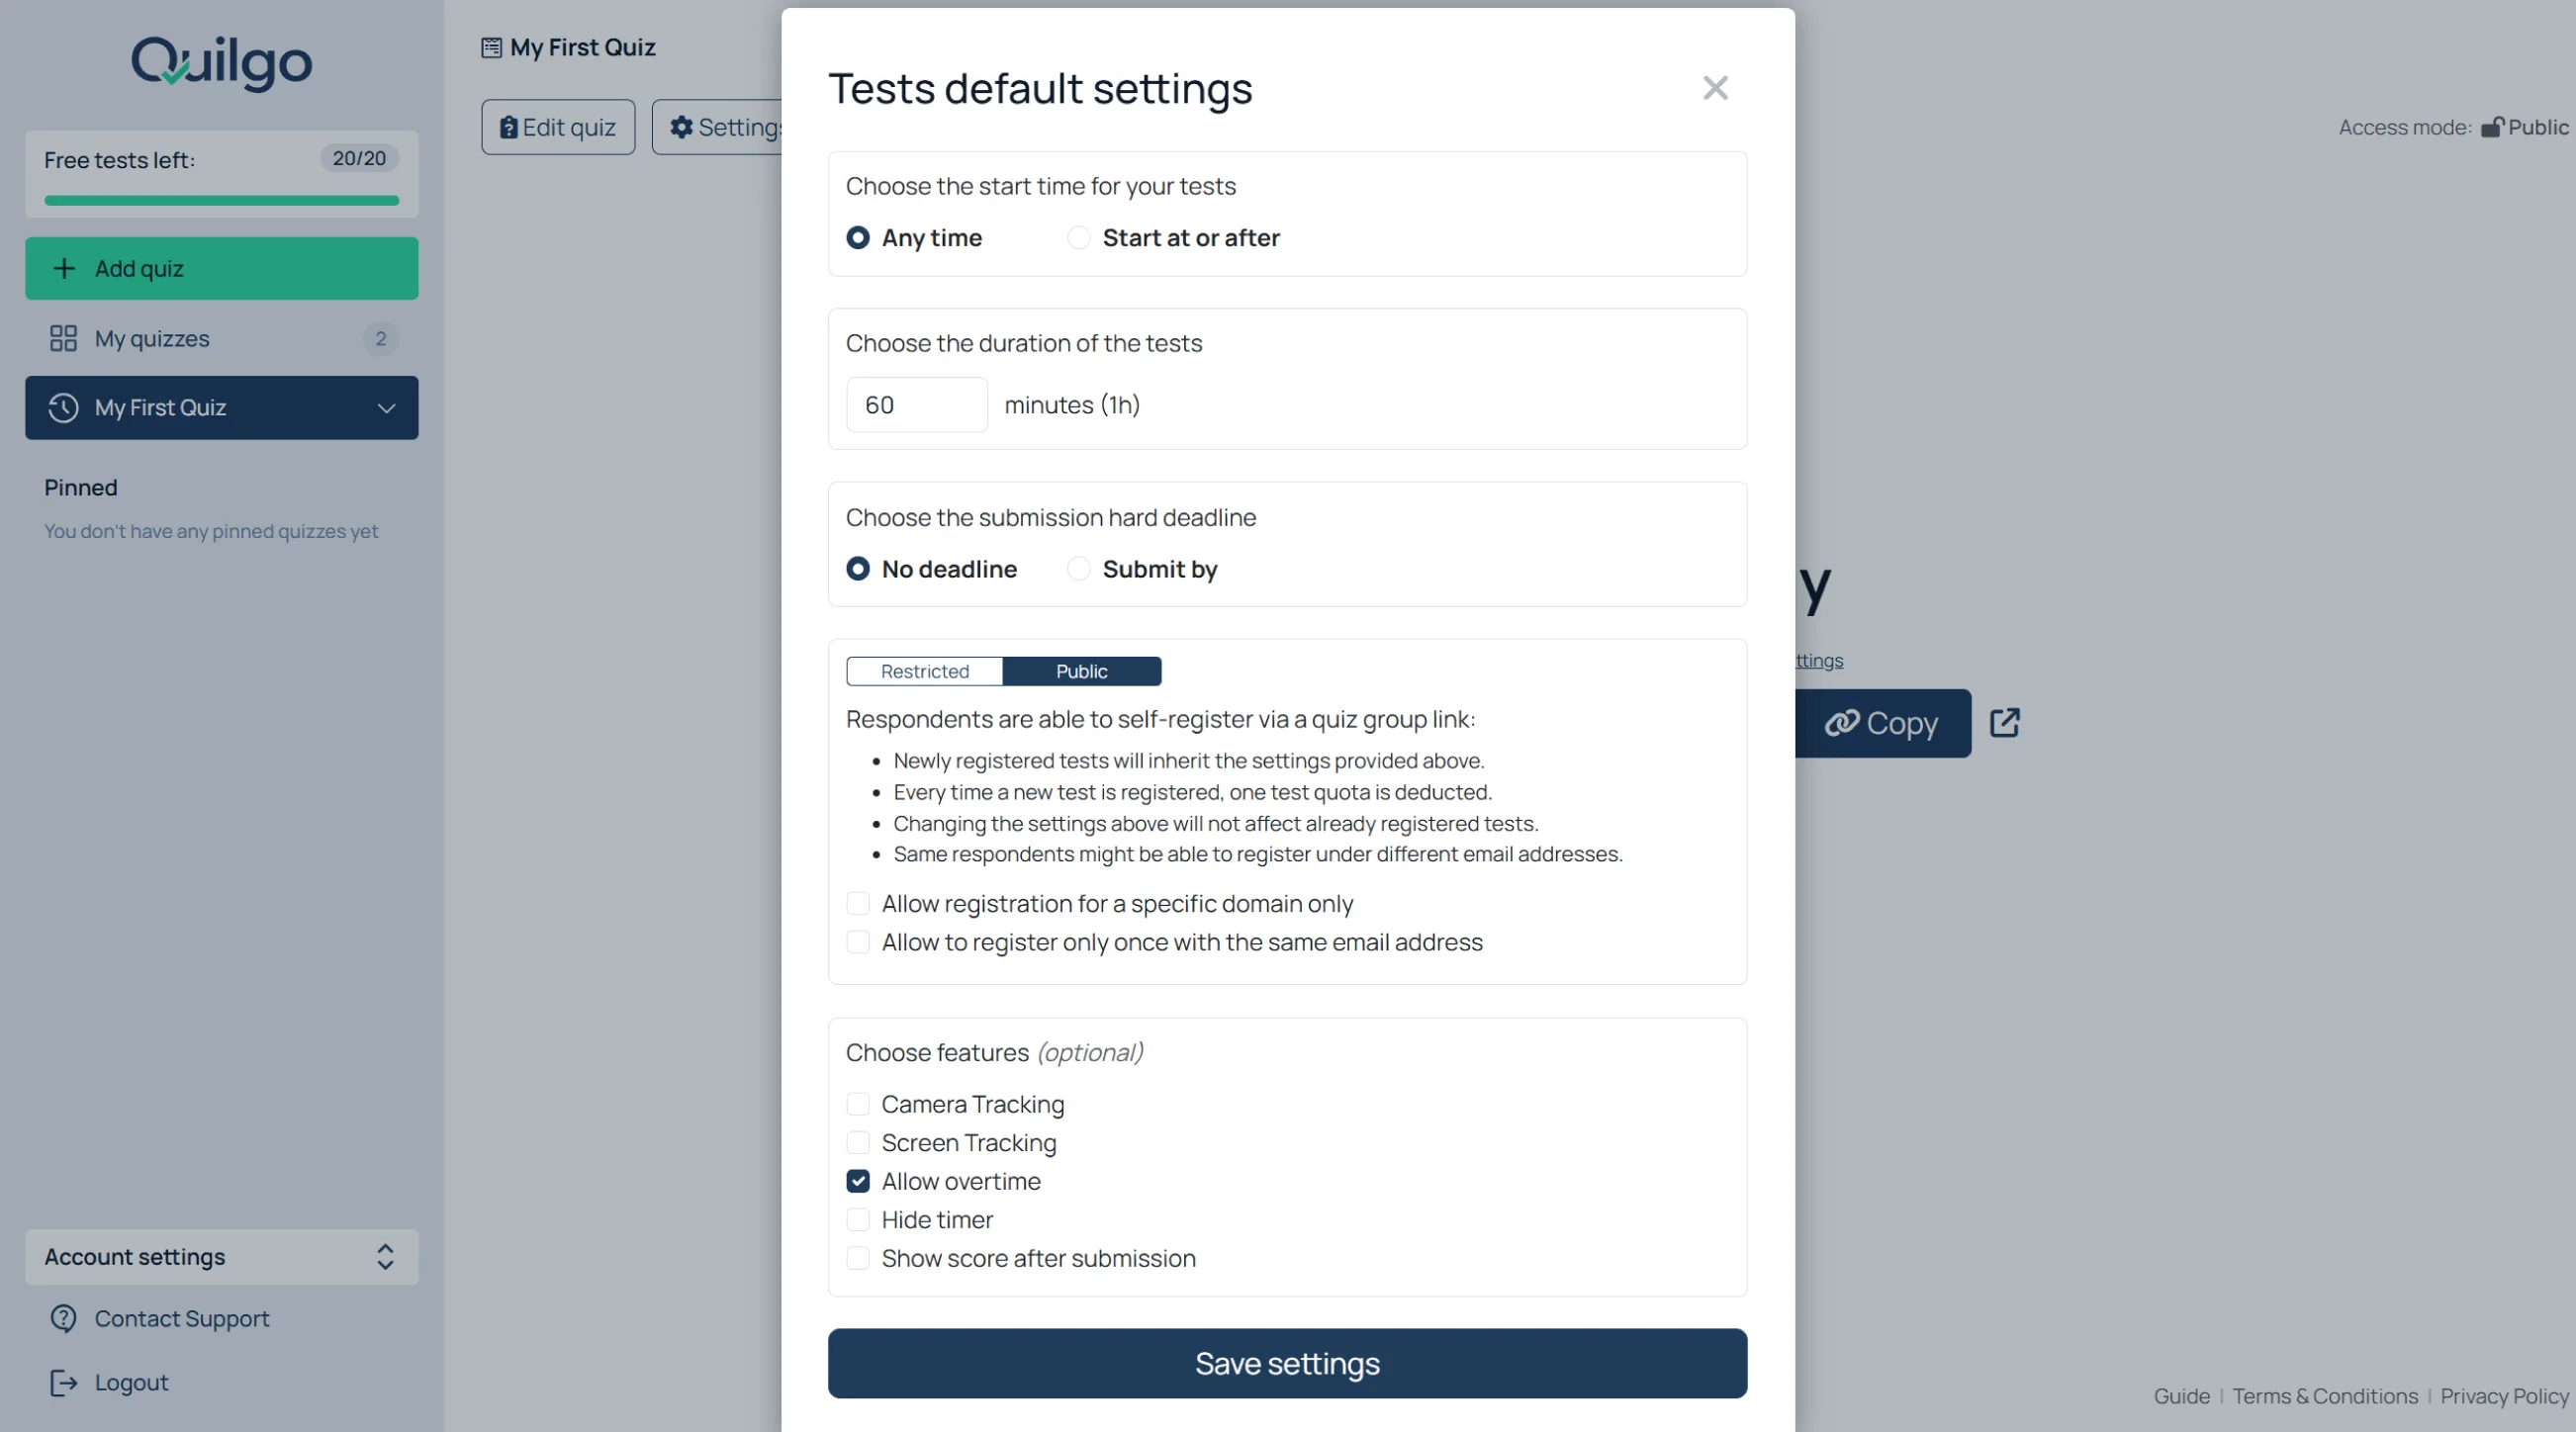
This opens “Tests default settings”.

Configure Timing

Set the start time

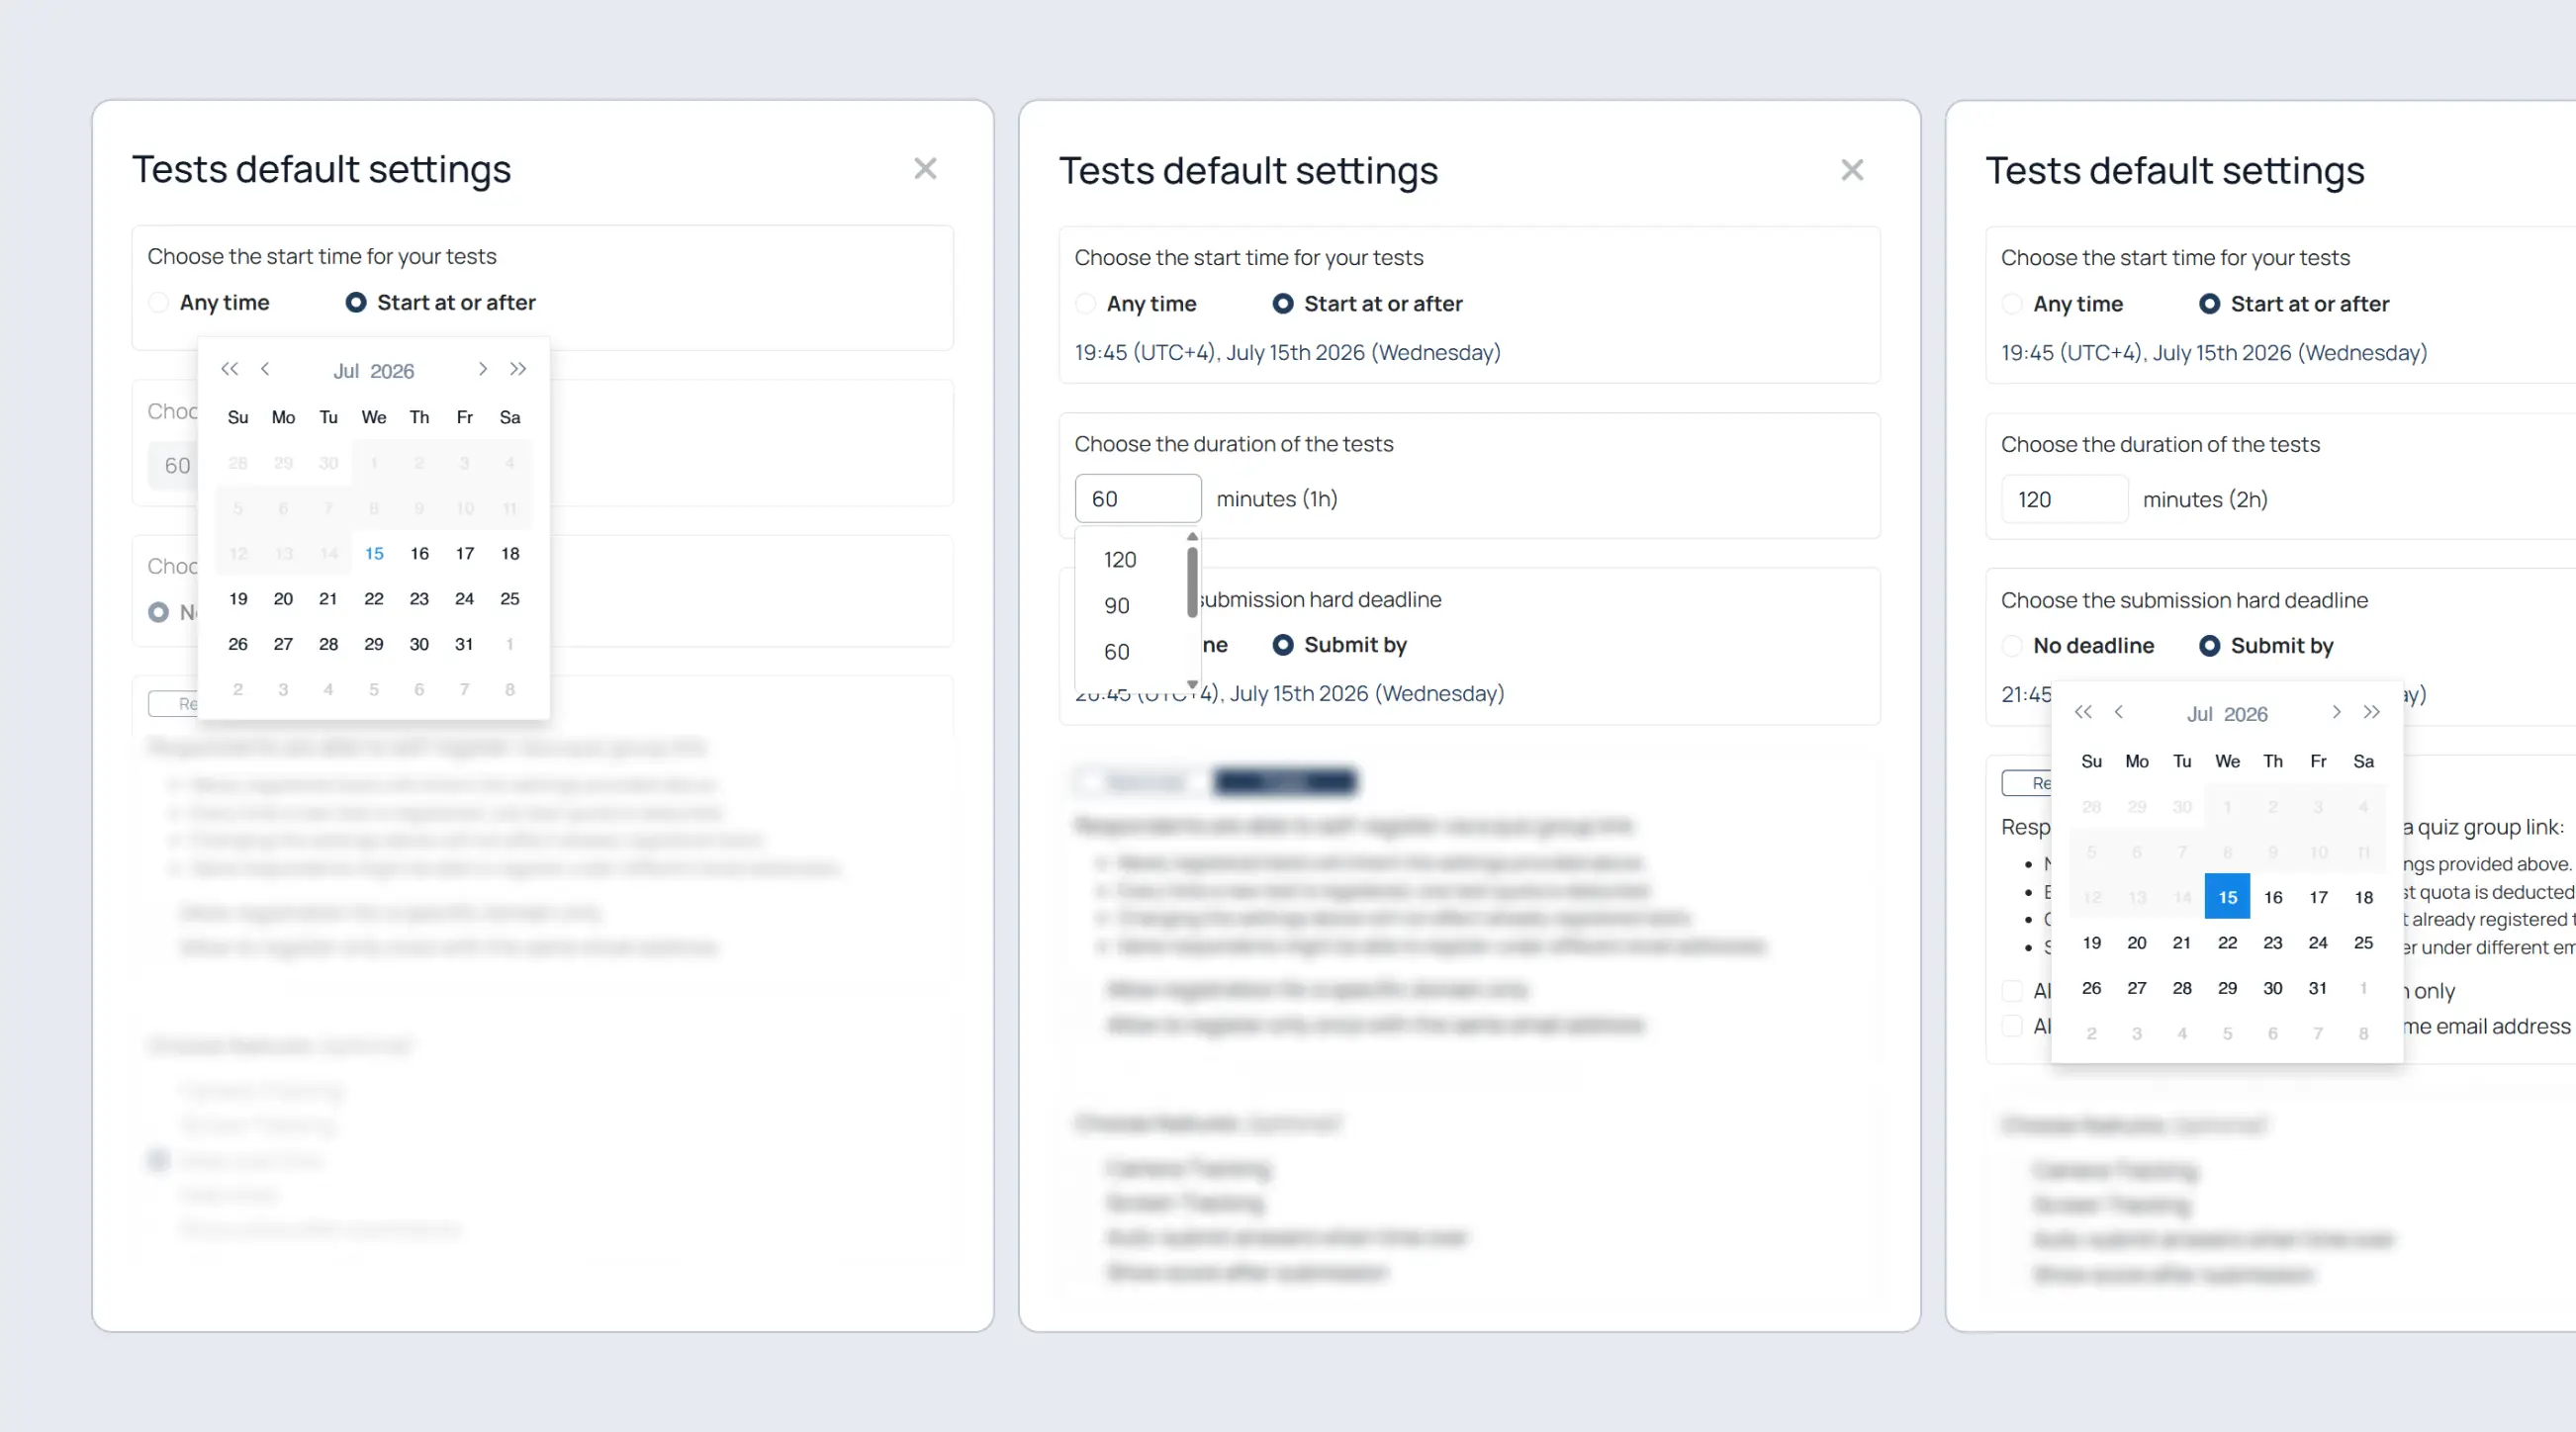
  1. Find “Choose the start time for your tests”;
  2. Select “Any time” or “Start at or after”;
  3. Choose the date and time if scheduling is enabled.

Set the duration

  1. Find “Choose the duration of the tests”;
  2. Enter the number of minutes.

Set the hard deadline

  1. Find “Choose the submission hard deadline”;
  2. Select “No deadline” or “Submit by”;
  3. Choose the date and time.
Configure Access Modes

Use Public Mode

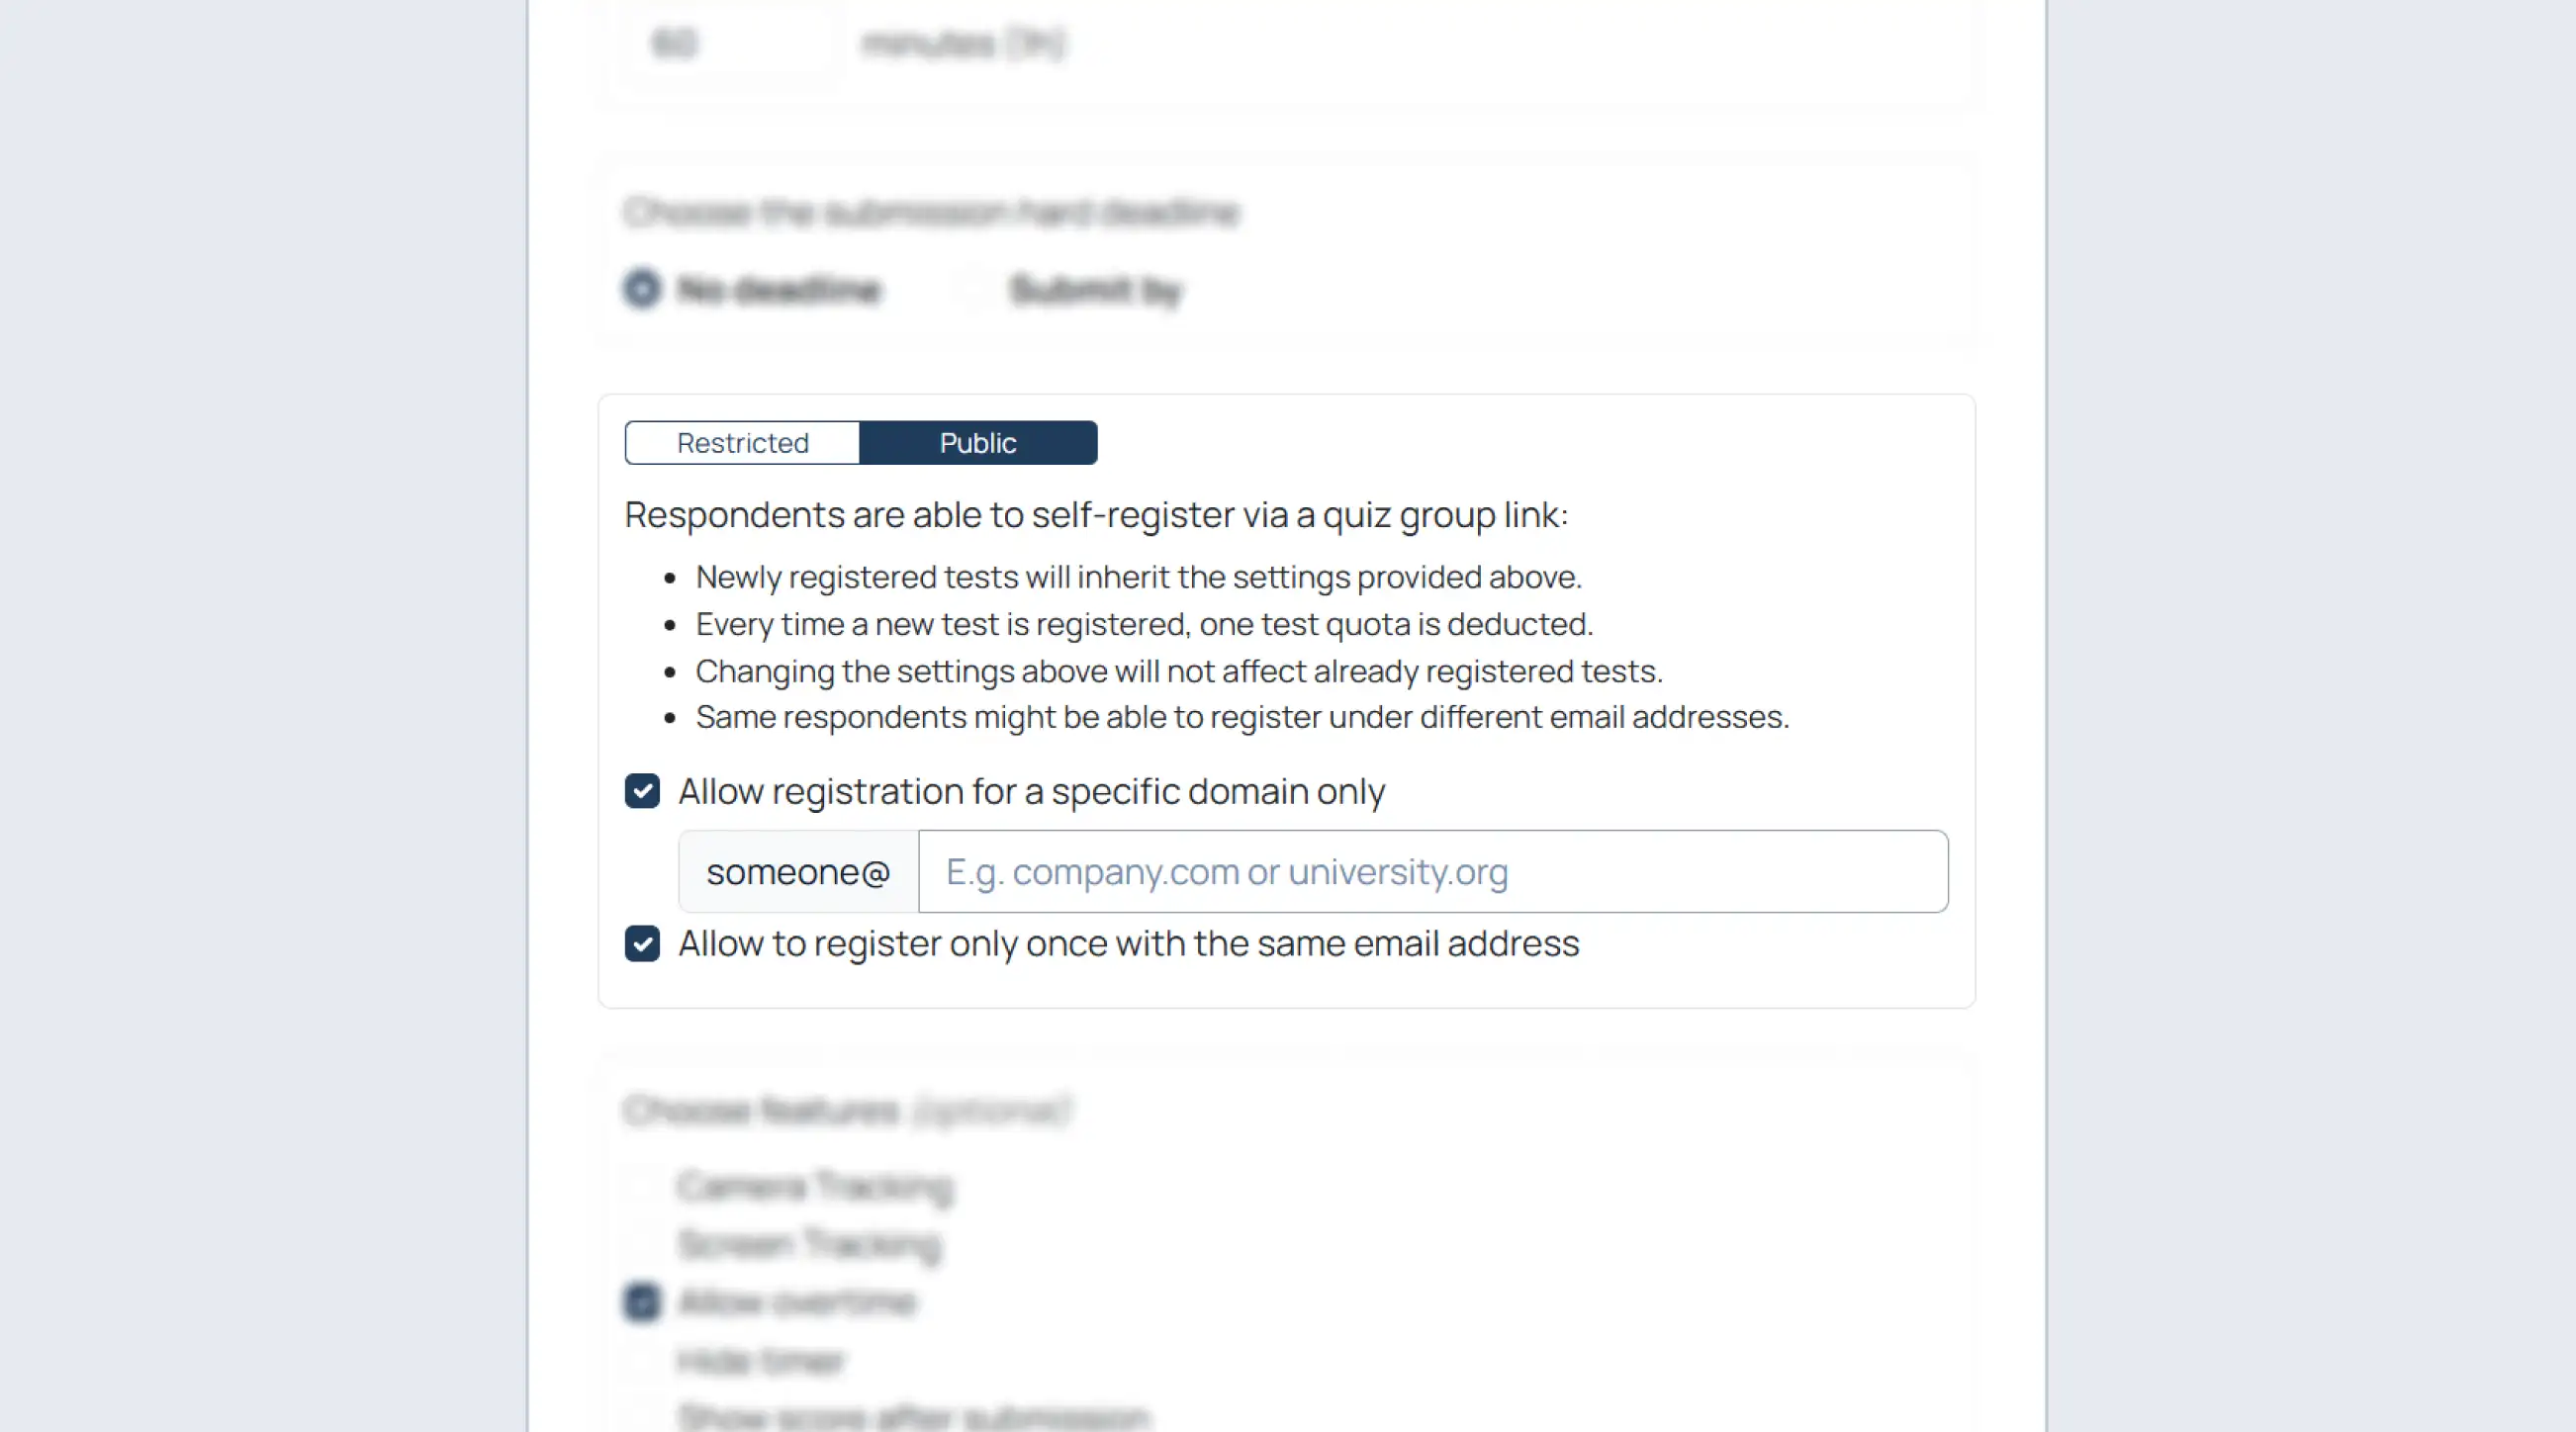
Public mode is designed for self-registration workflows. Instead of manually creating respondents one by one, you can distribute one shared link and let respondents register themselves.

Public mode allows respondents to self-register using a shared link.

Restrict registrations to one domain

Domain restriction limits registrations to specific email domains, such as those of schools, universities, or companies. This helps prevent external users from registering for private assessments.

  1. Enable “Allow registration for a specific domain only”;
  2. Enter the allowed domain.

Allow one registration per email

This setting prevents respondents from repeatedly registering with the same email address. It is especially useful for graded quizzes, certifications, and controlled assessments.

  1. Enable “Allow to register only once with the same email address”.

Use both restrictions together

Use both settings for stricter classroom or university workflows.

Use Restricted Mode

Restricted mode is designed for controlled assessments where you already know exactly who should take the test. Instead of self-registration, respondents receive individually assigned tests.

Restricted mode creates individually assigned tests.

Add respondents manually

  1. Switch to “Restricted”;
  2. Paste or type names and emails;
  3. Press Enter to separate entries.

Accepted formats:

  • John Snow;
  • john@example.com;
  • John Snow john@example.com.

Import respondents from another quiz

  1. Click “Import respondents from another quiz”;
  2. Choose the source quiz.

Connect Google Classroom

  1. Click “Connect your Google Classroom”;
  2. Import students.
Configure Proctoring

Enable Camera Tracking

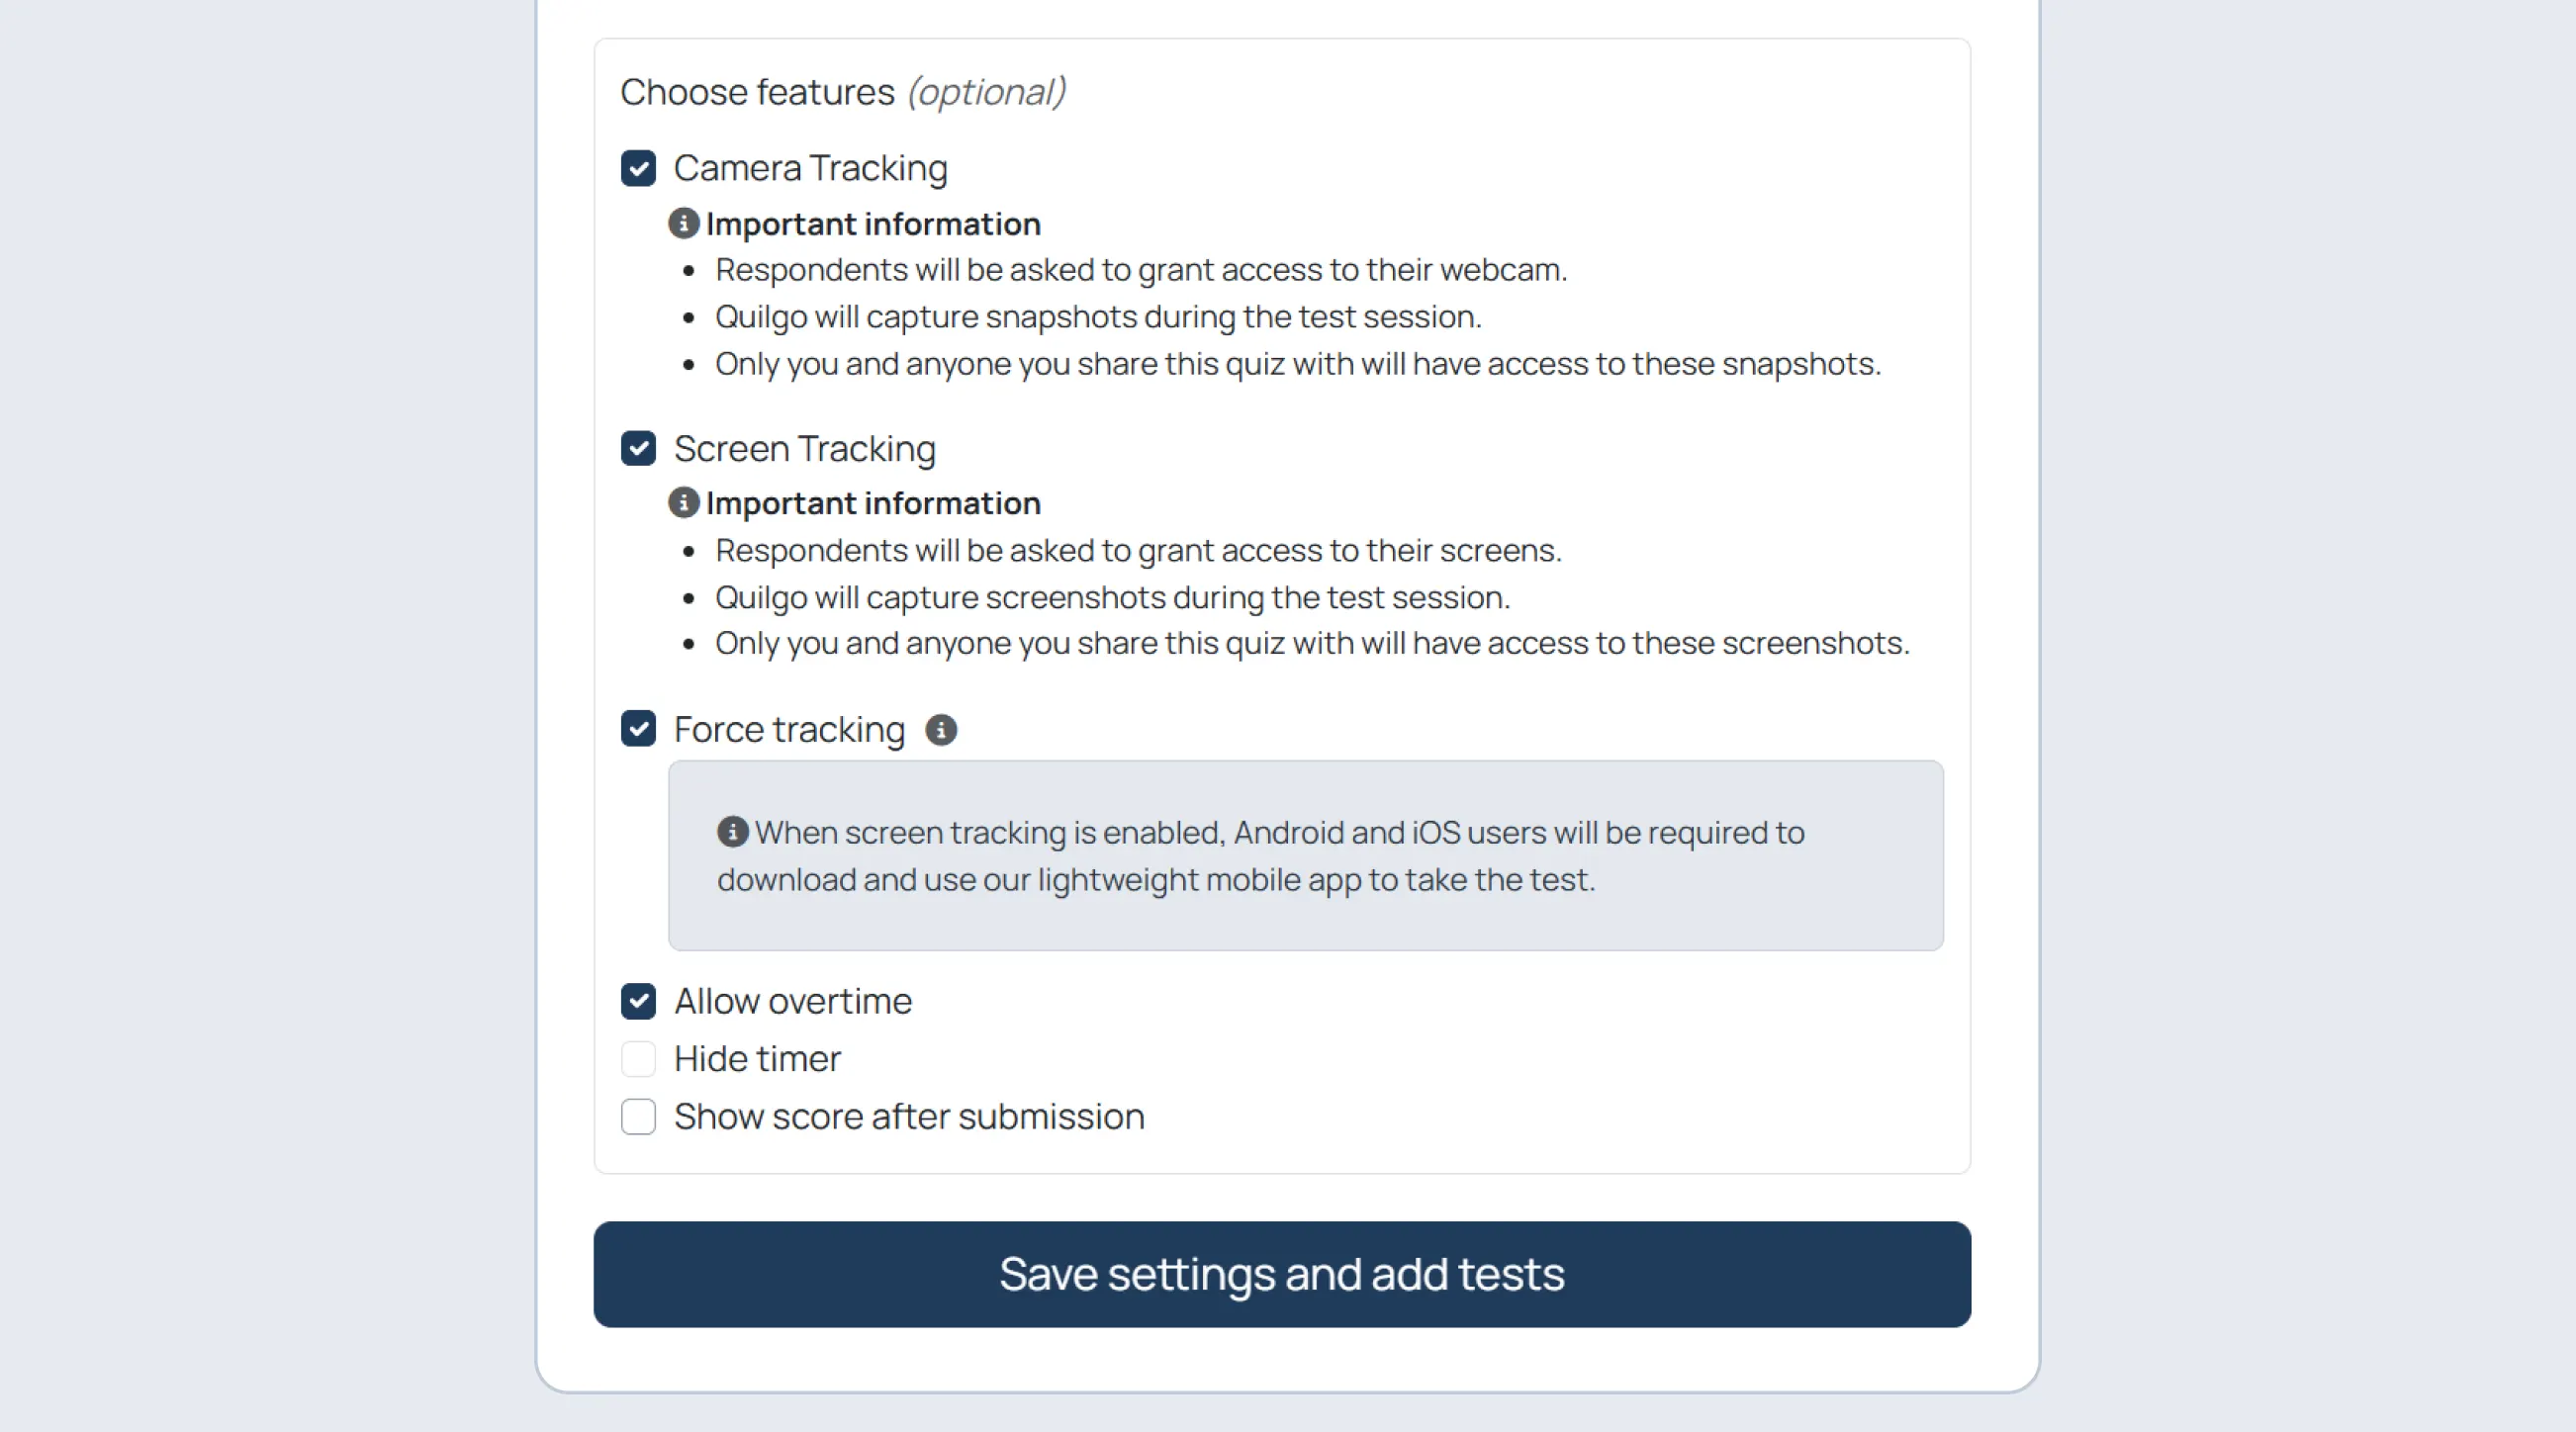
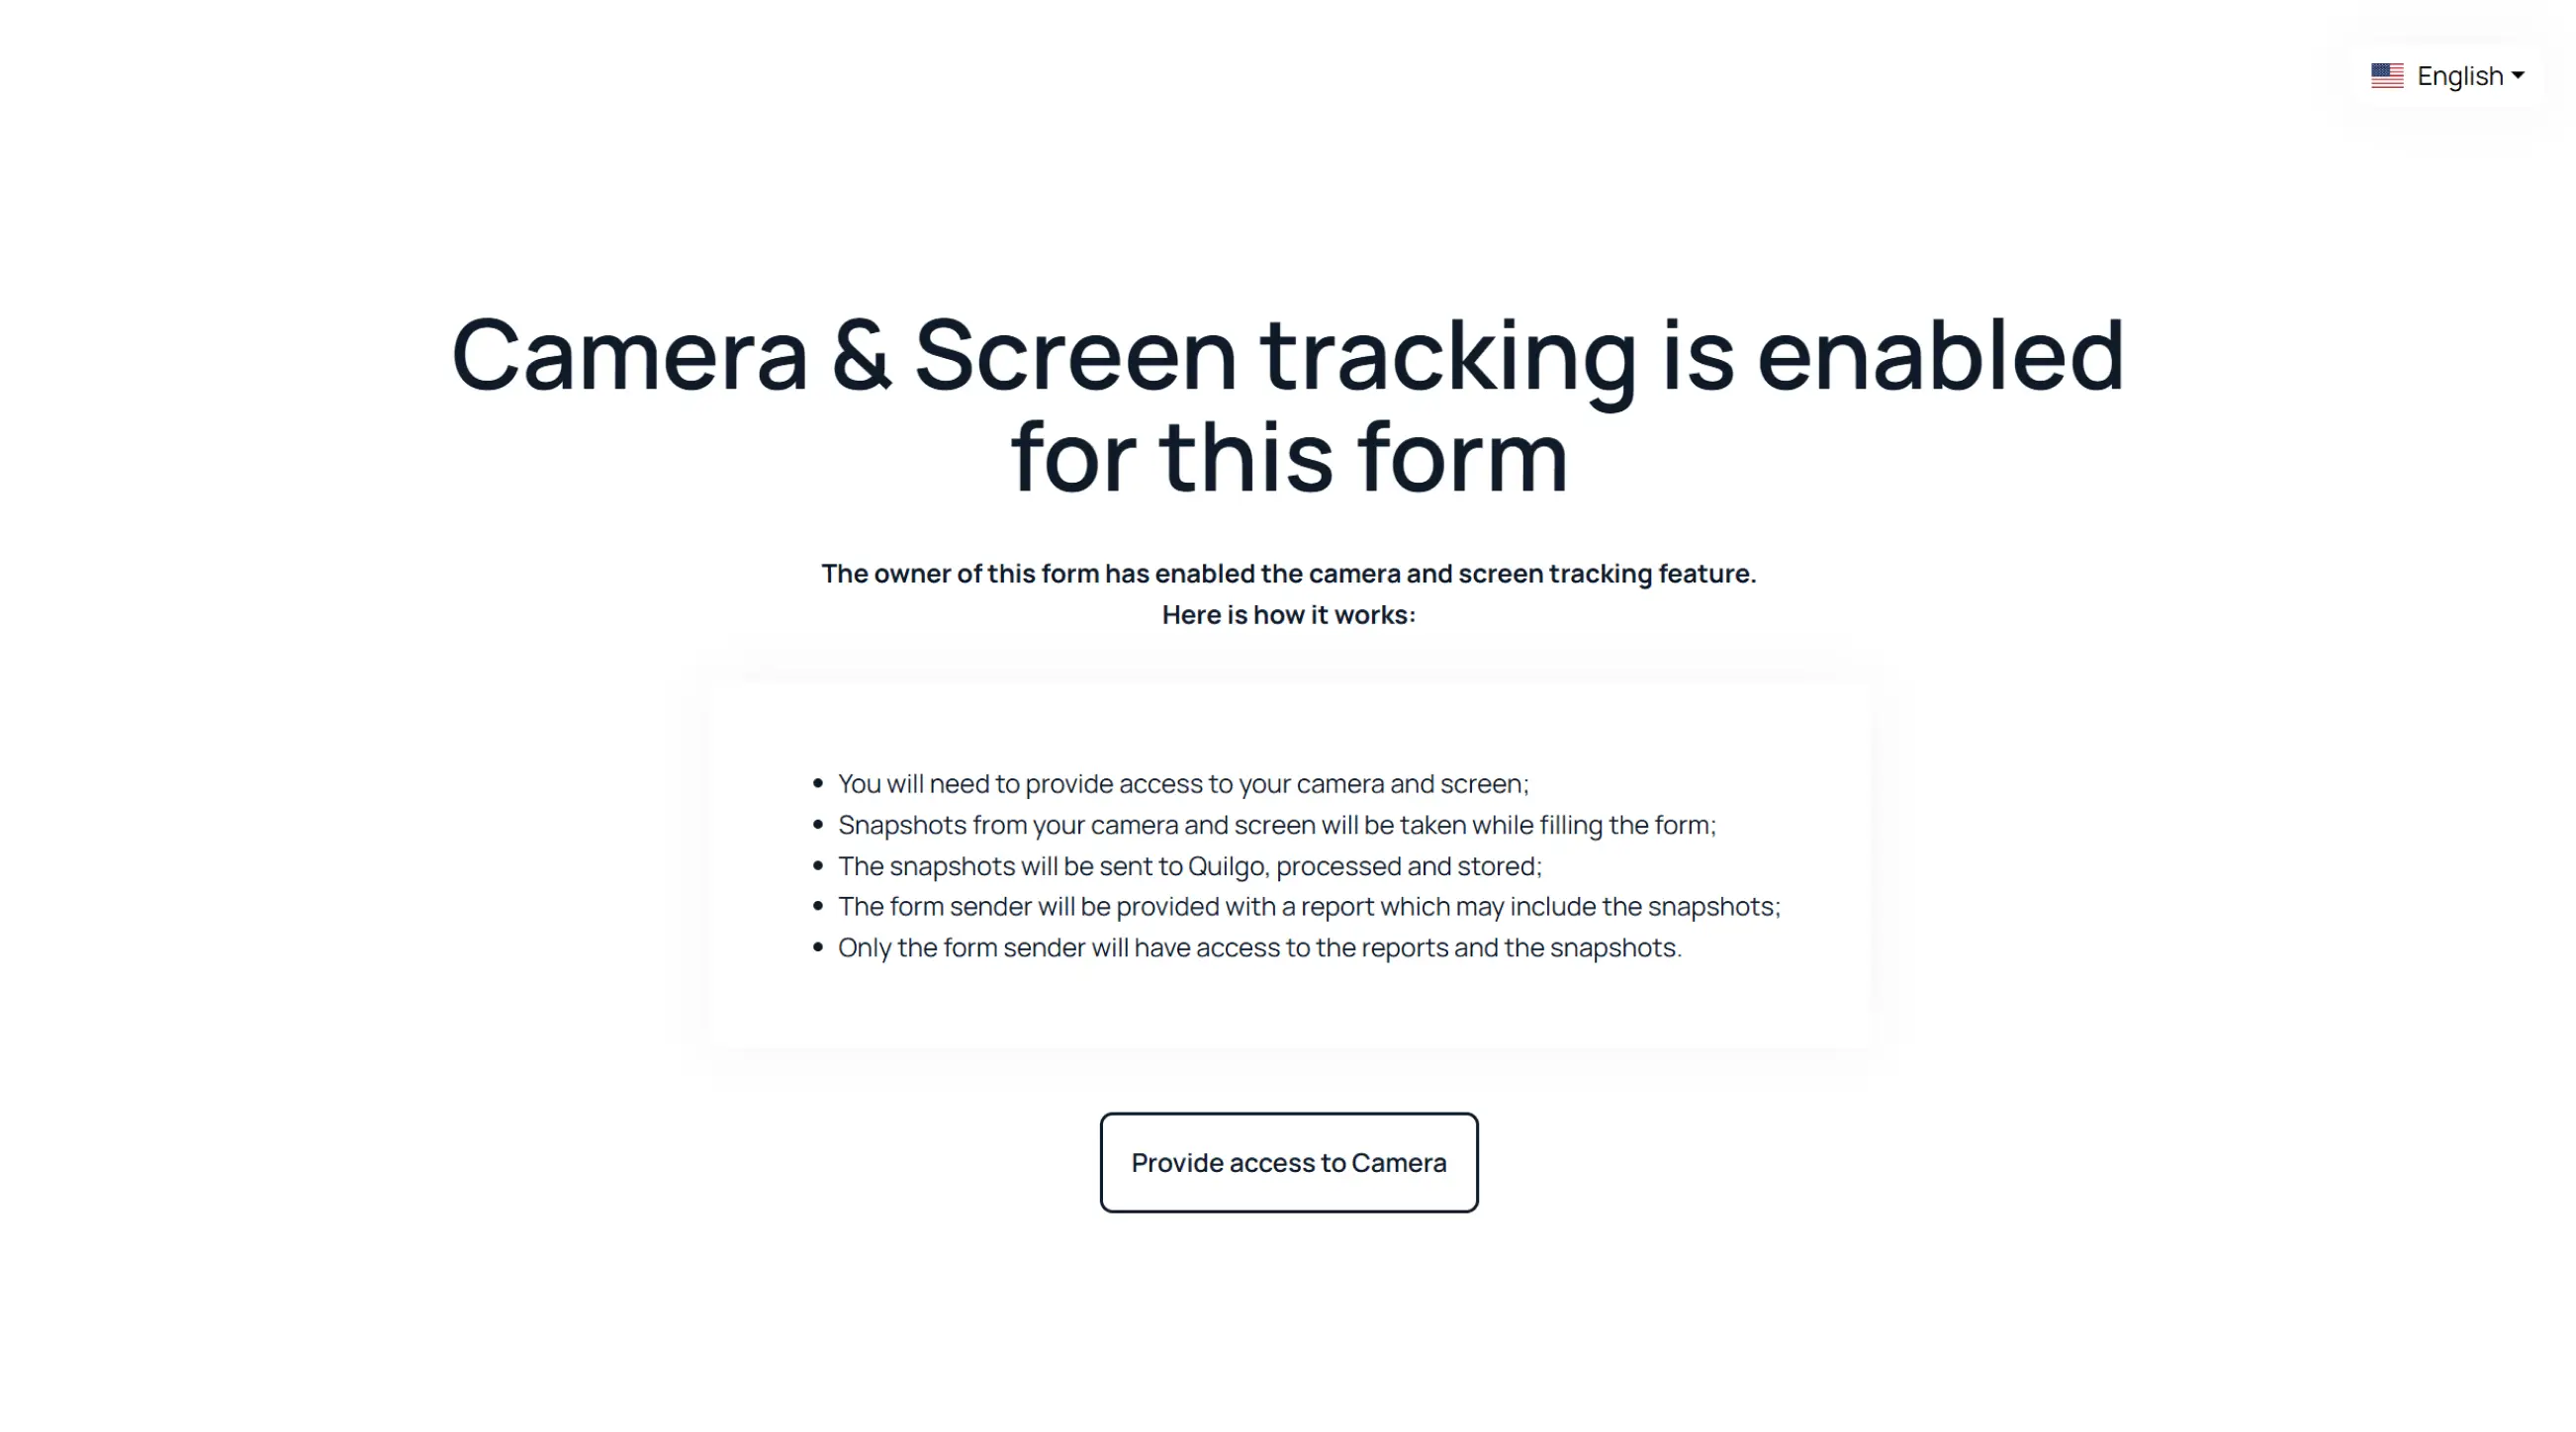
Camera Tracking adds webcam monitoring to the assessment workflow. Quilgo captures snapshots during the session and includes them in reports for later review.

  1. Enable “Camera Tracking”.

Enable Screen Tracking

Screen Tracking captures snapshots of the respondent’s shared screen during the assessment. Use it when you need stronger evidence of integrity or want to review on-screen activity during the test.

  1. Enable “Screen Tracking”.

Enable Force Tracking

Force Tracking ensures that tracking remains active throughout the test session. This is useful for high-control exams and certification-style assessments.

  1. Enable “Force tracking”.

Configure Overtime and Auto-Submit

Allow overtime

  1. Enable “Allow overtime” if respondents may continue after the timer ends.

Auto-submit answers when time is over

  1. Enable “Auto-submit answers when time over” if Quilgo should submit the test automatically.

Show score after submission

  1. Enable “Show score after submission” if respondents should see their score immediately after submission.

Save settings

  1. Click “Save settings”.
Send and Deliver Tests

Share the Group Link

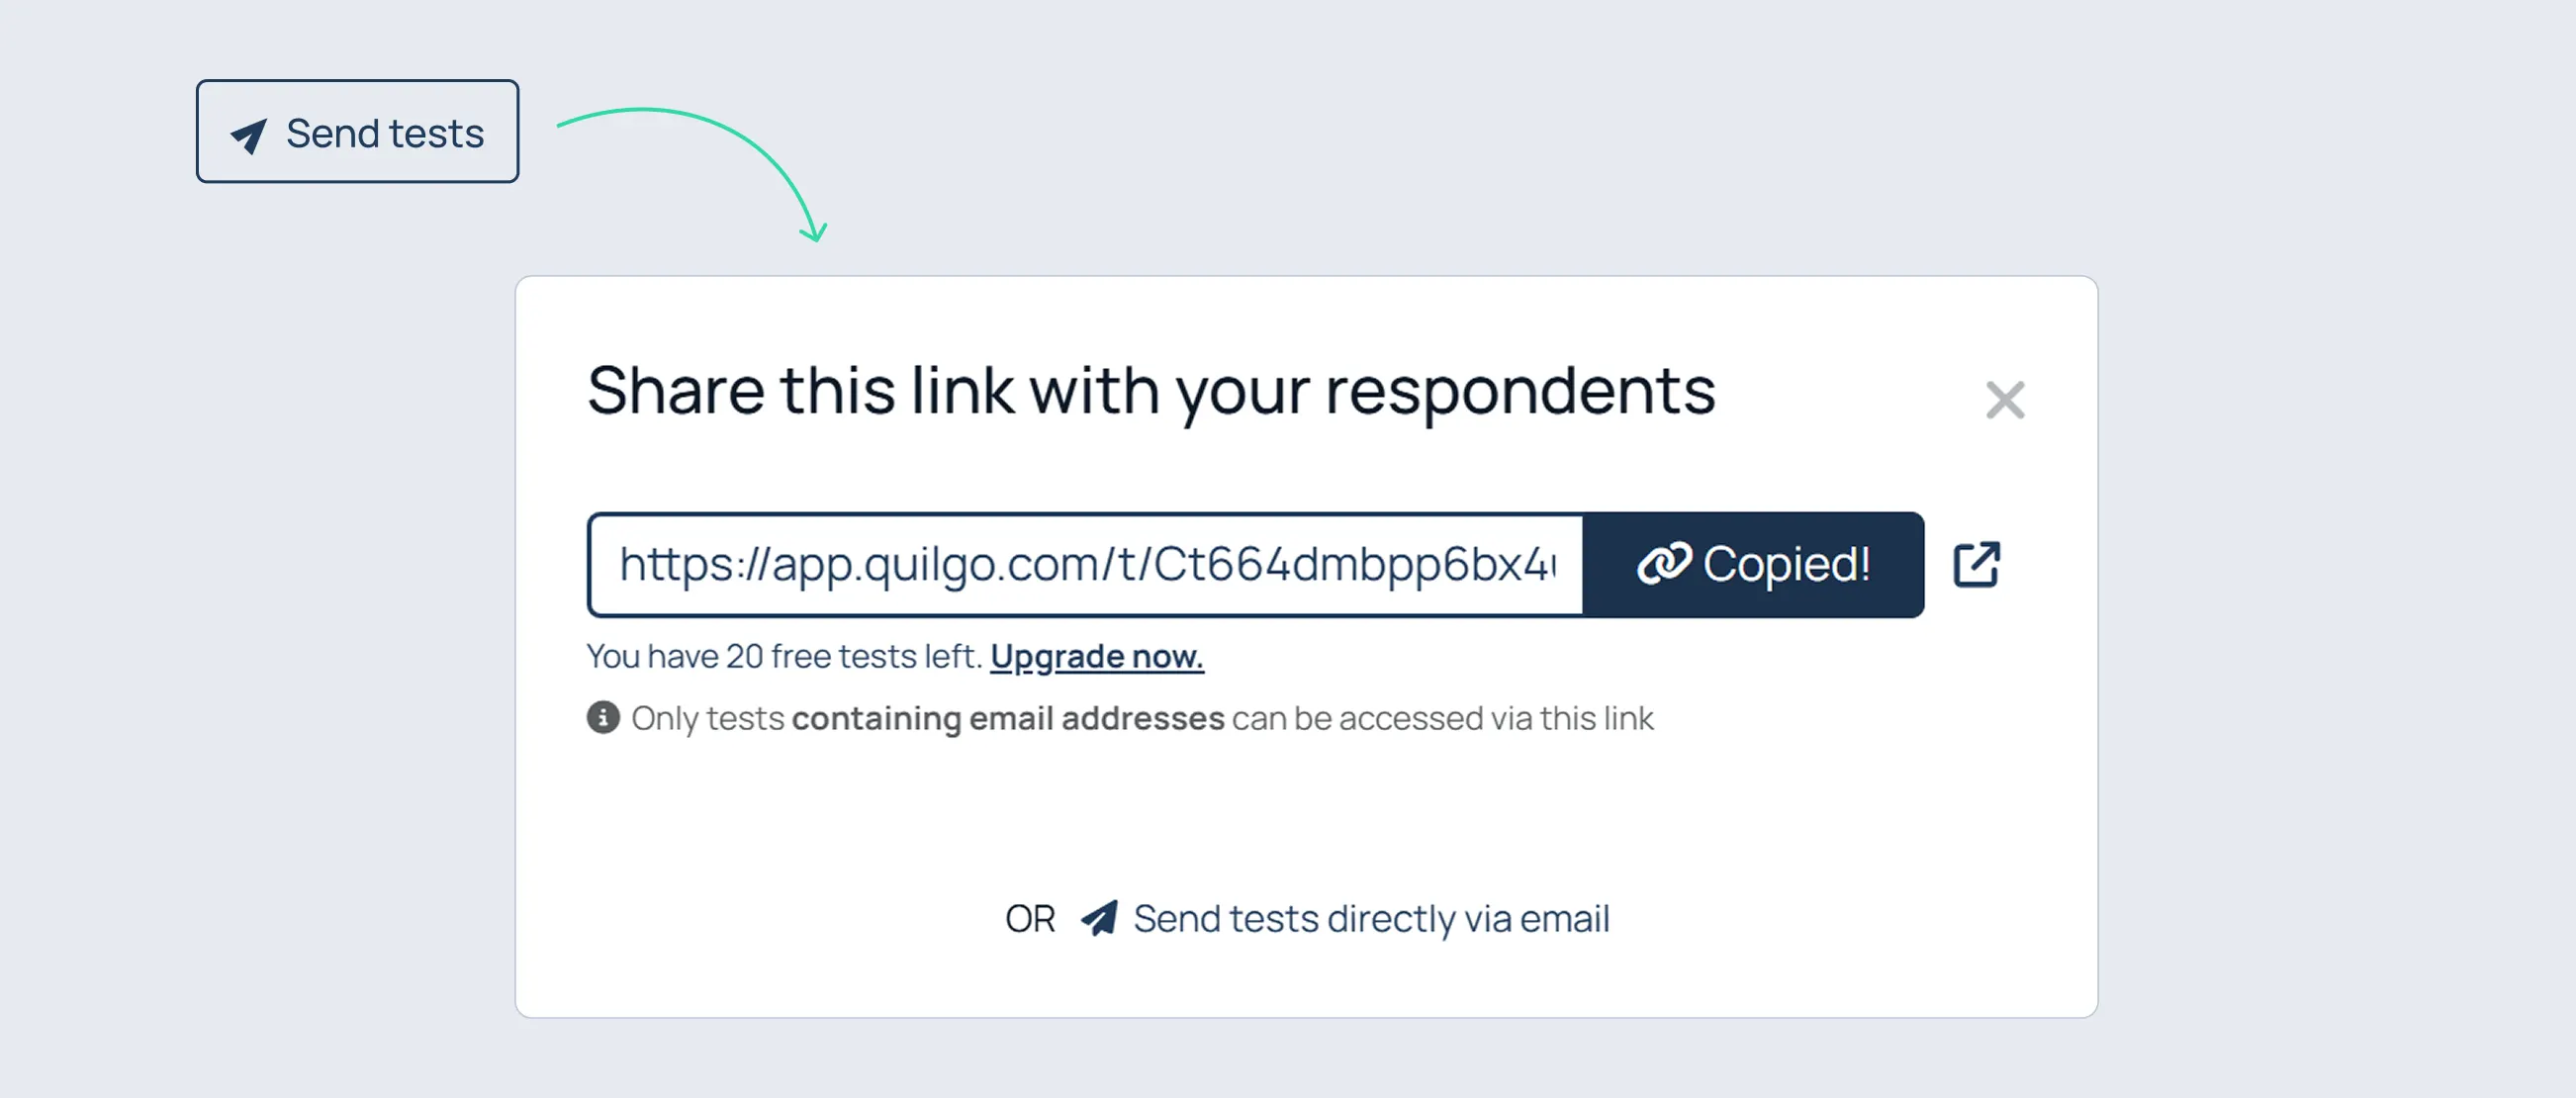
The group link is the main entry point respondents use to access the assessment. Its behavior changes depending on whether the quiz uses Public or Restricted mode.

To open the delivery window:

  1. Click “Send tests”.

Public mode behavior

In Public mode, the group link is used for self-registration.

Restricted mode behavior

In Restricted mode, the group link is used for authentication.

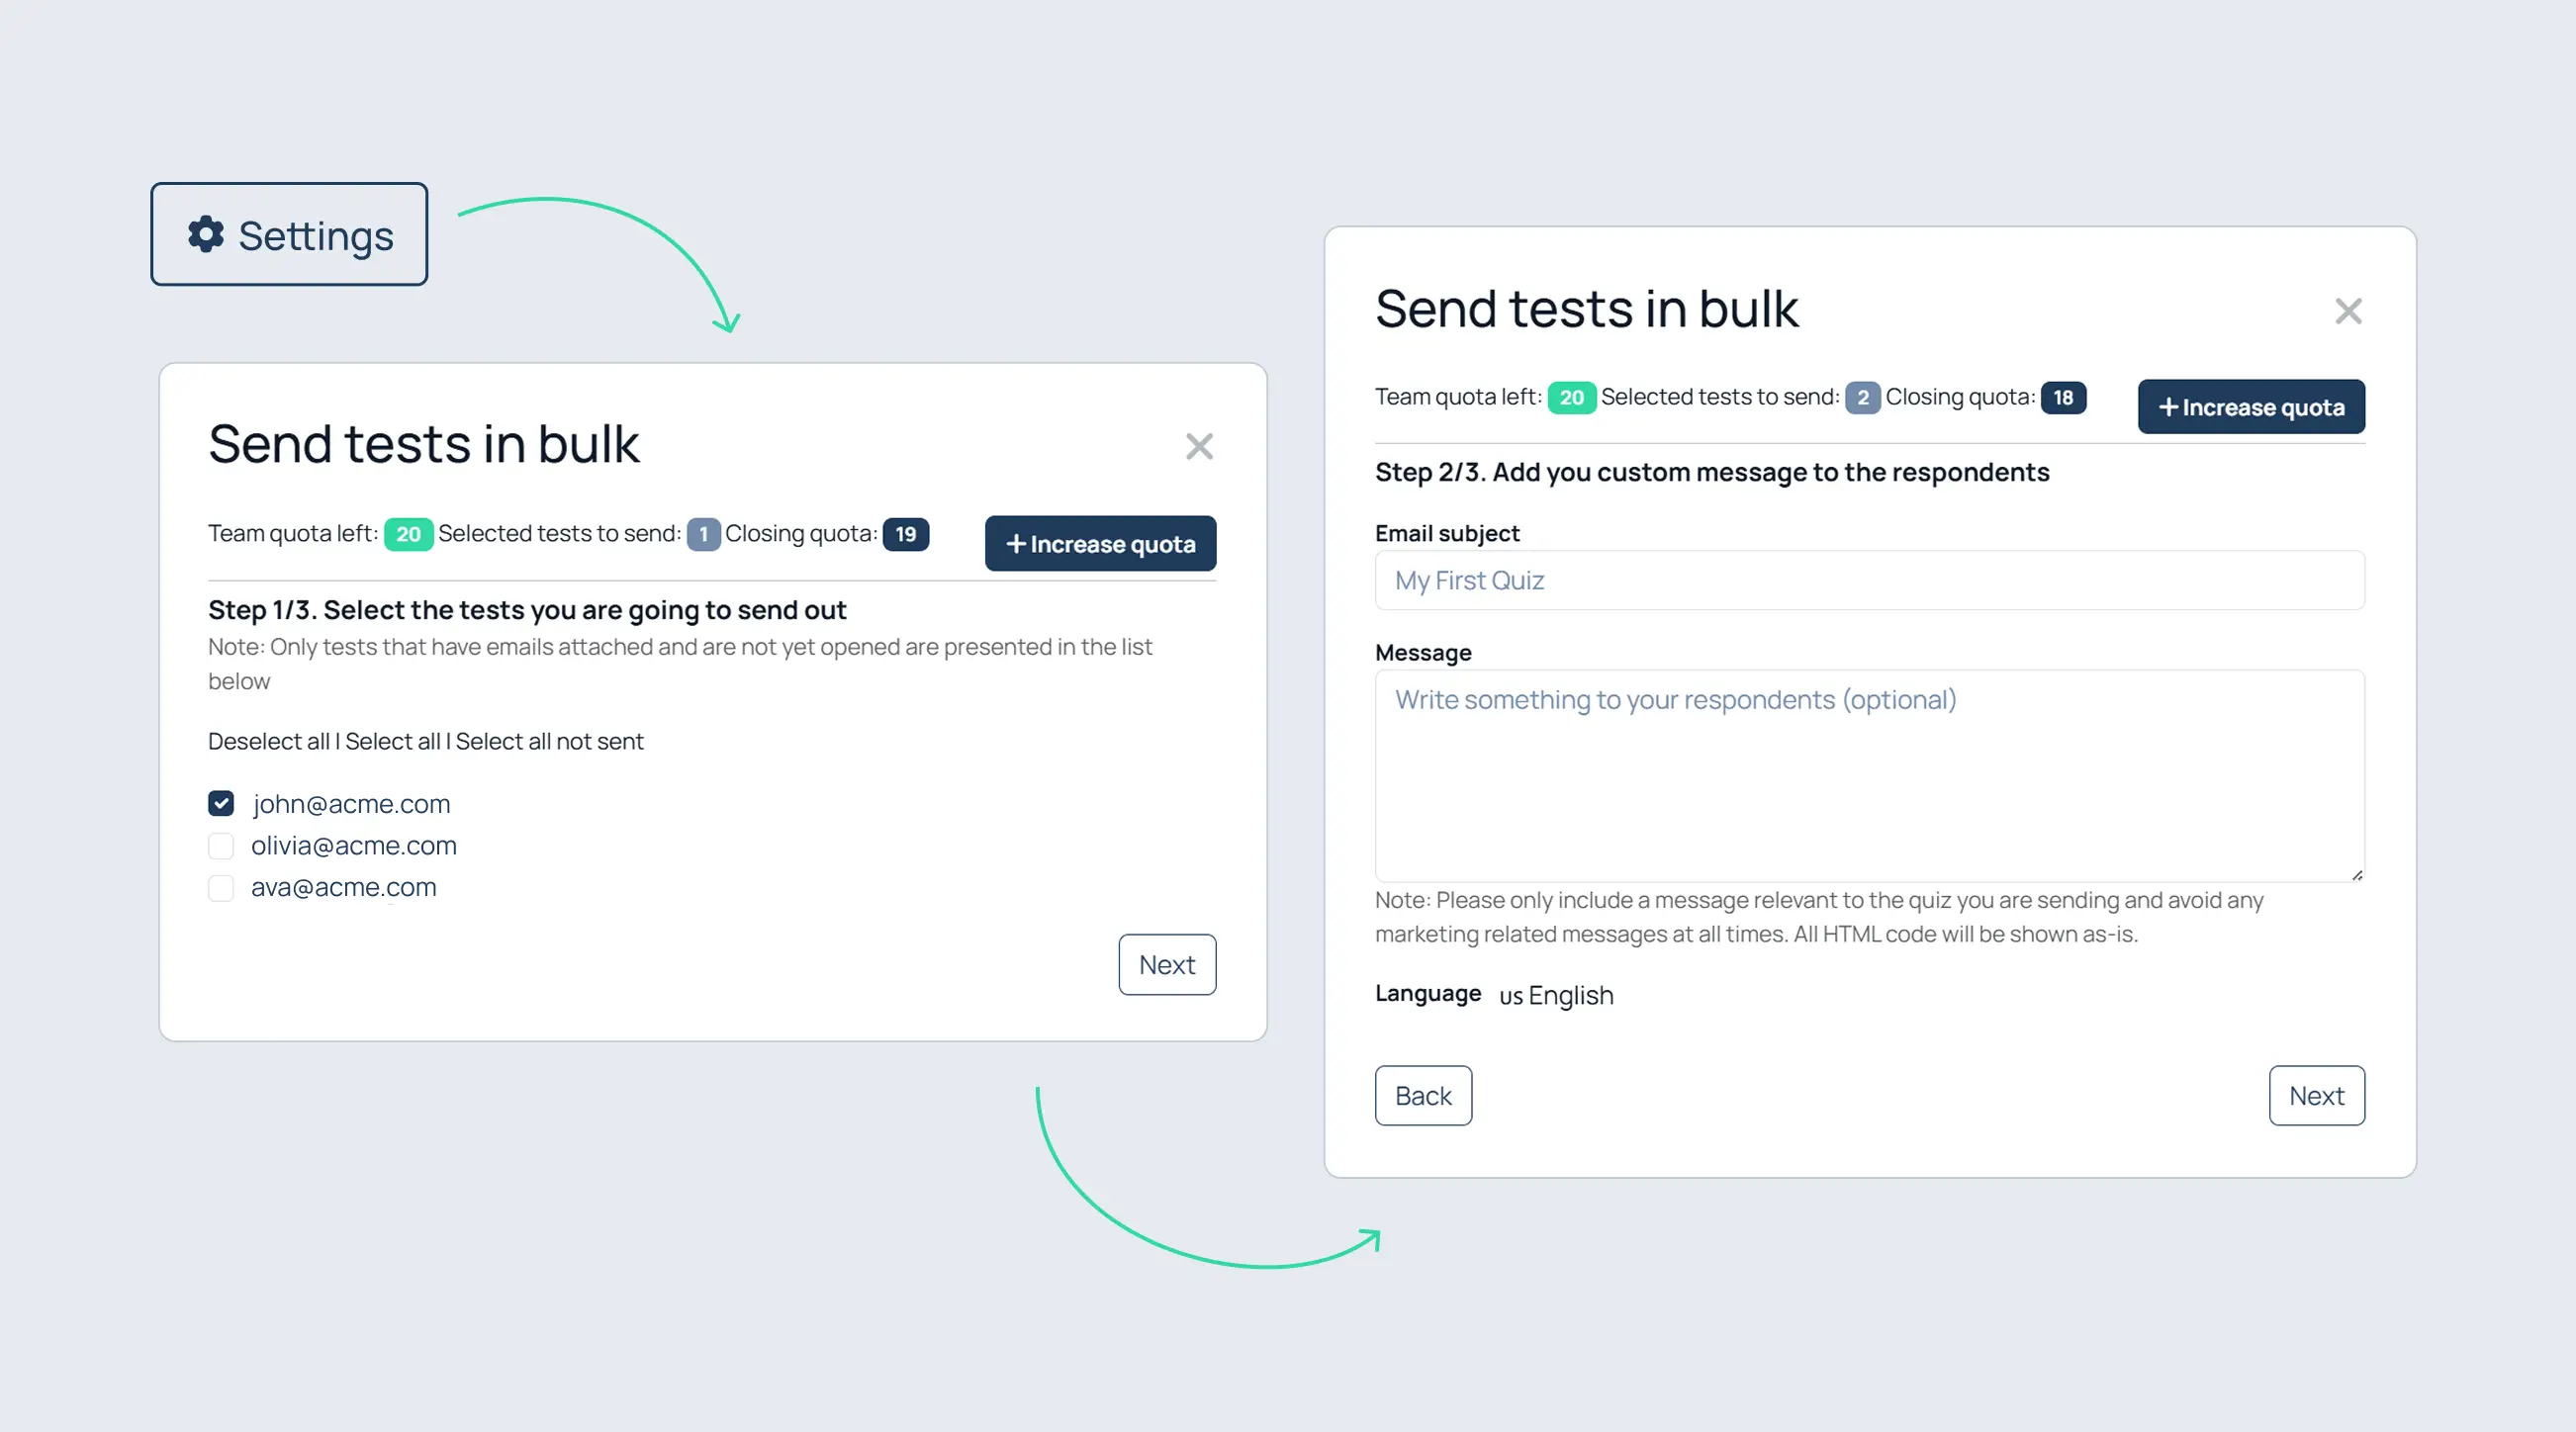
Send Tests by Email

To send invitations:

  1. Click “Send tests”;
  2. Click “Send tests directly via email”.

Select respondents

  1. Select the respondents;
  2. Click “Next”.

Configure the email

  1. Enter the subject;
  2. Optionally enter a message;
  3. Choose the language;
  4. Click “Next”.

Review and send

  1. Review the settings;
  2. Optionally click “Send a test email”;
  3. Click “Send tests”.
Respondent Experience

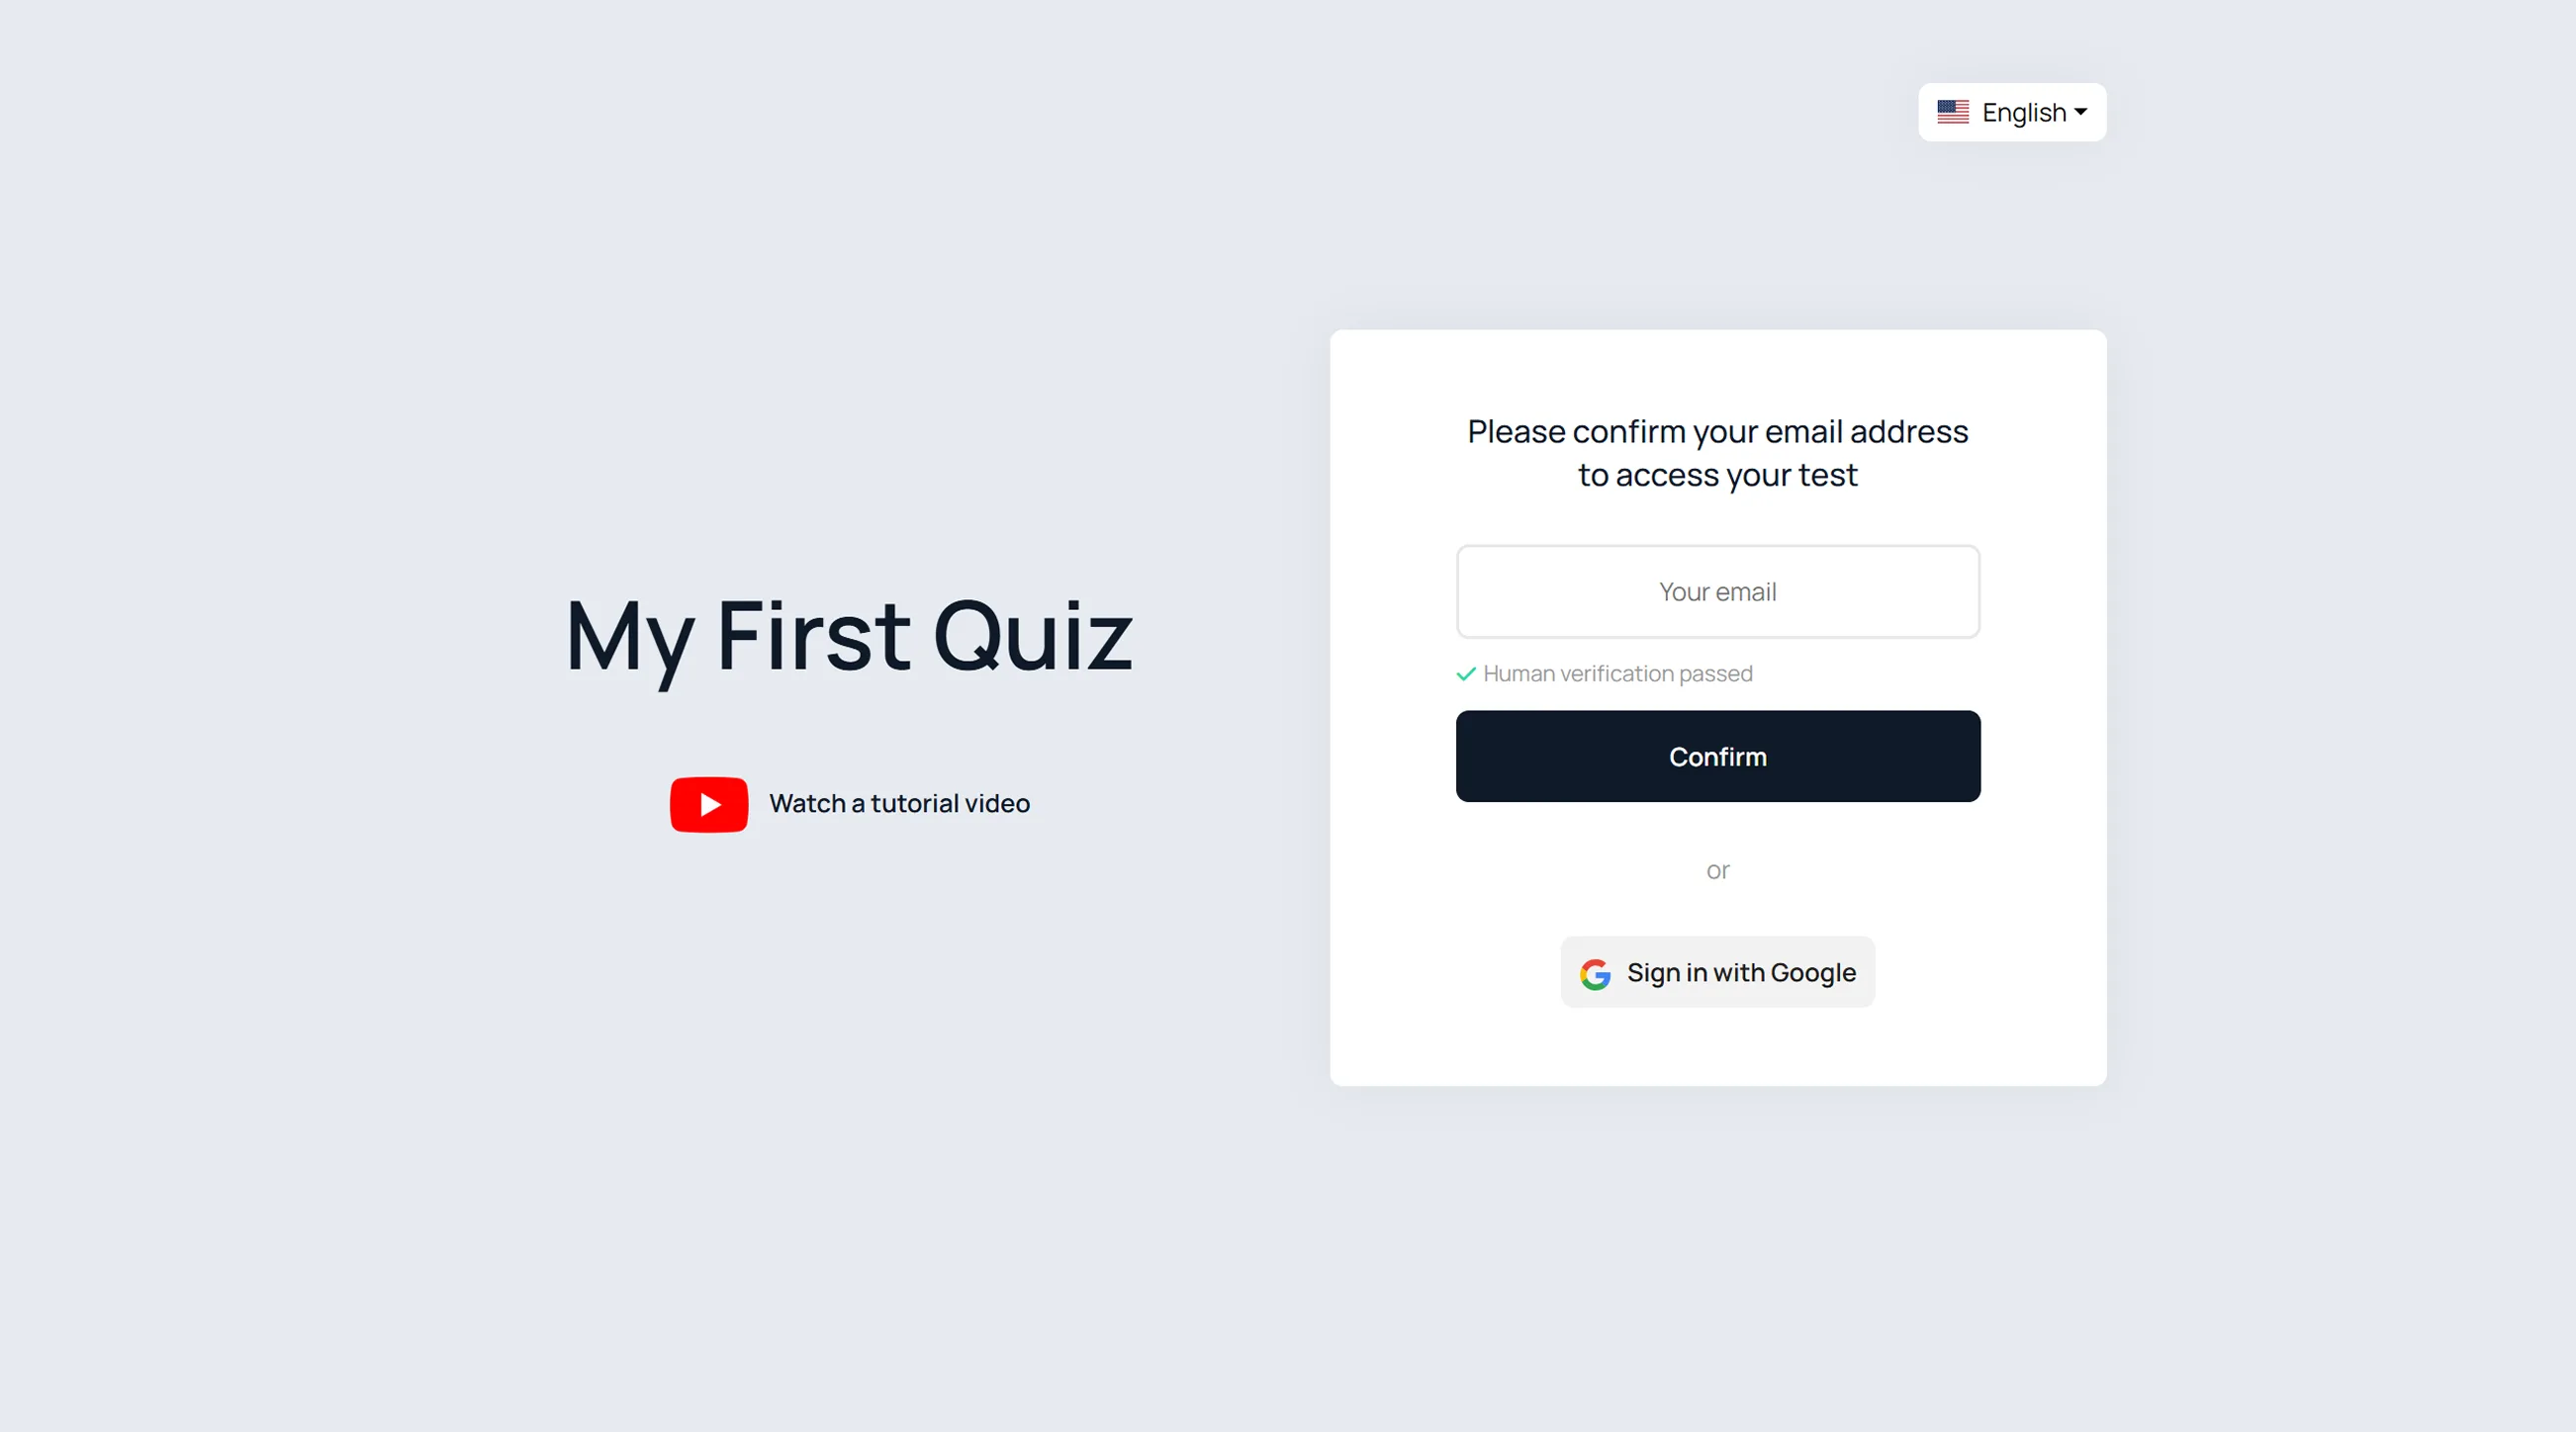
Open the Group Link

Respondents may:

  1. Enter their email;
  2. Click “Confirm”;
  3. Or click “Sign in with Google”.

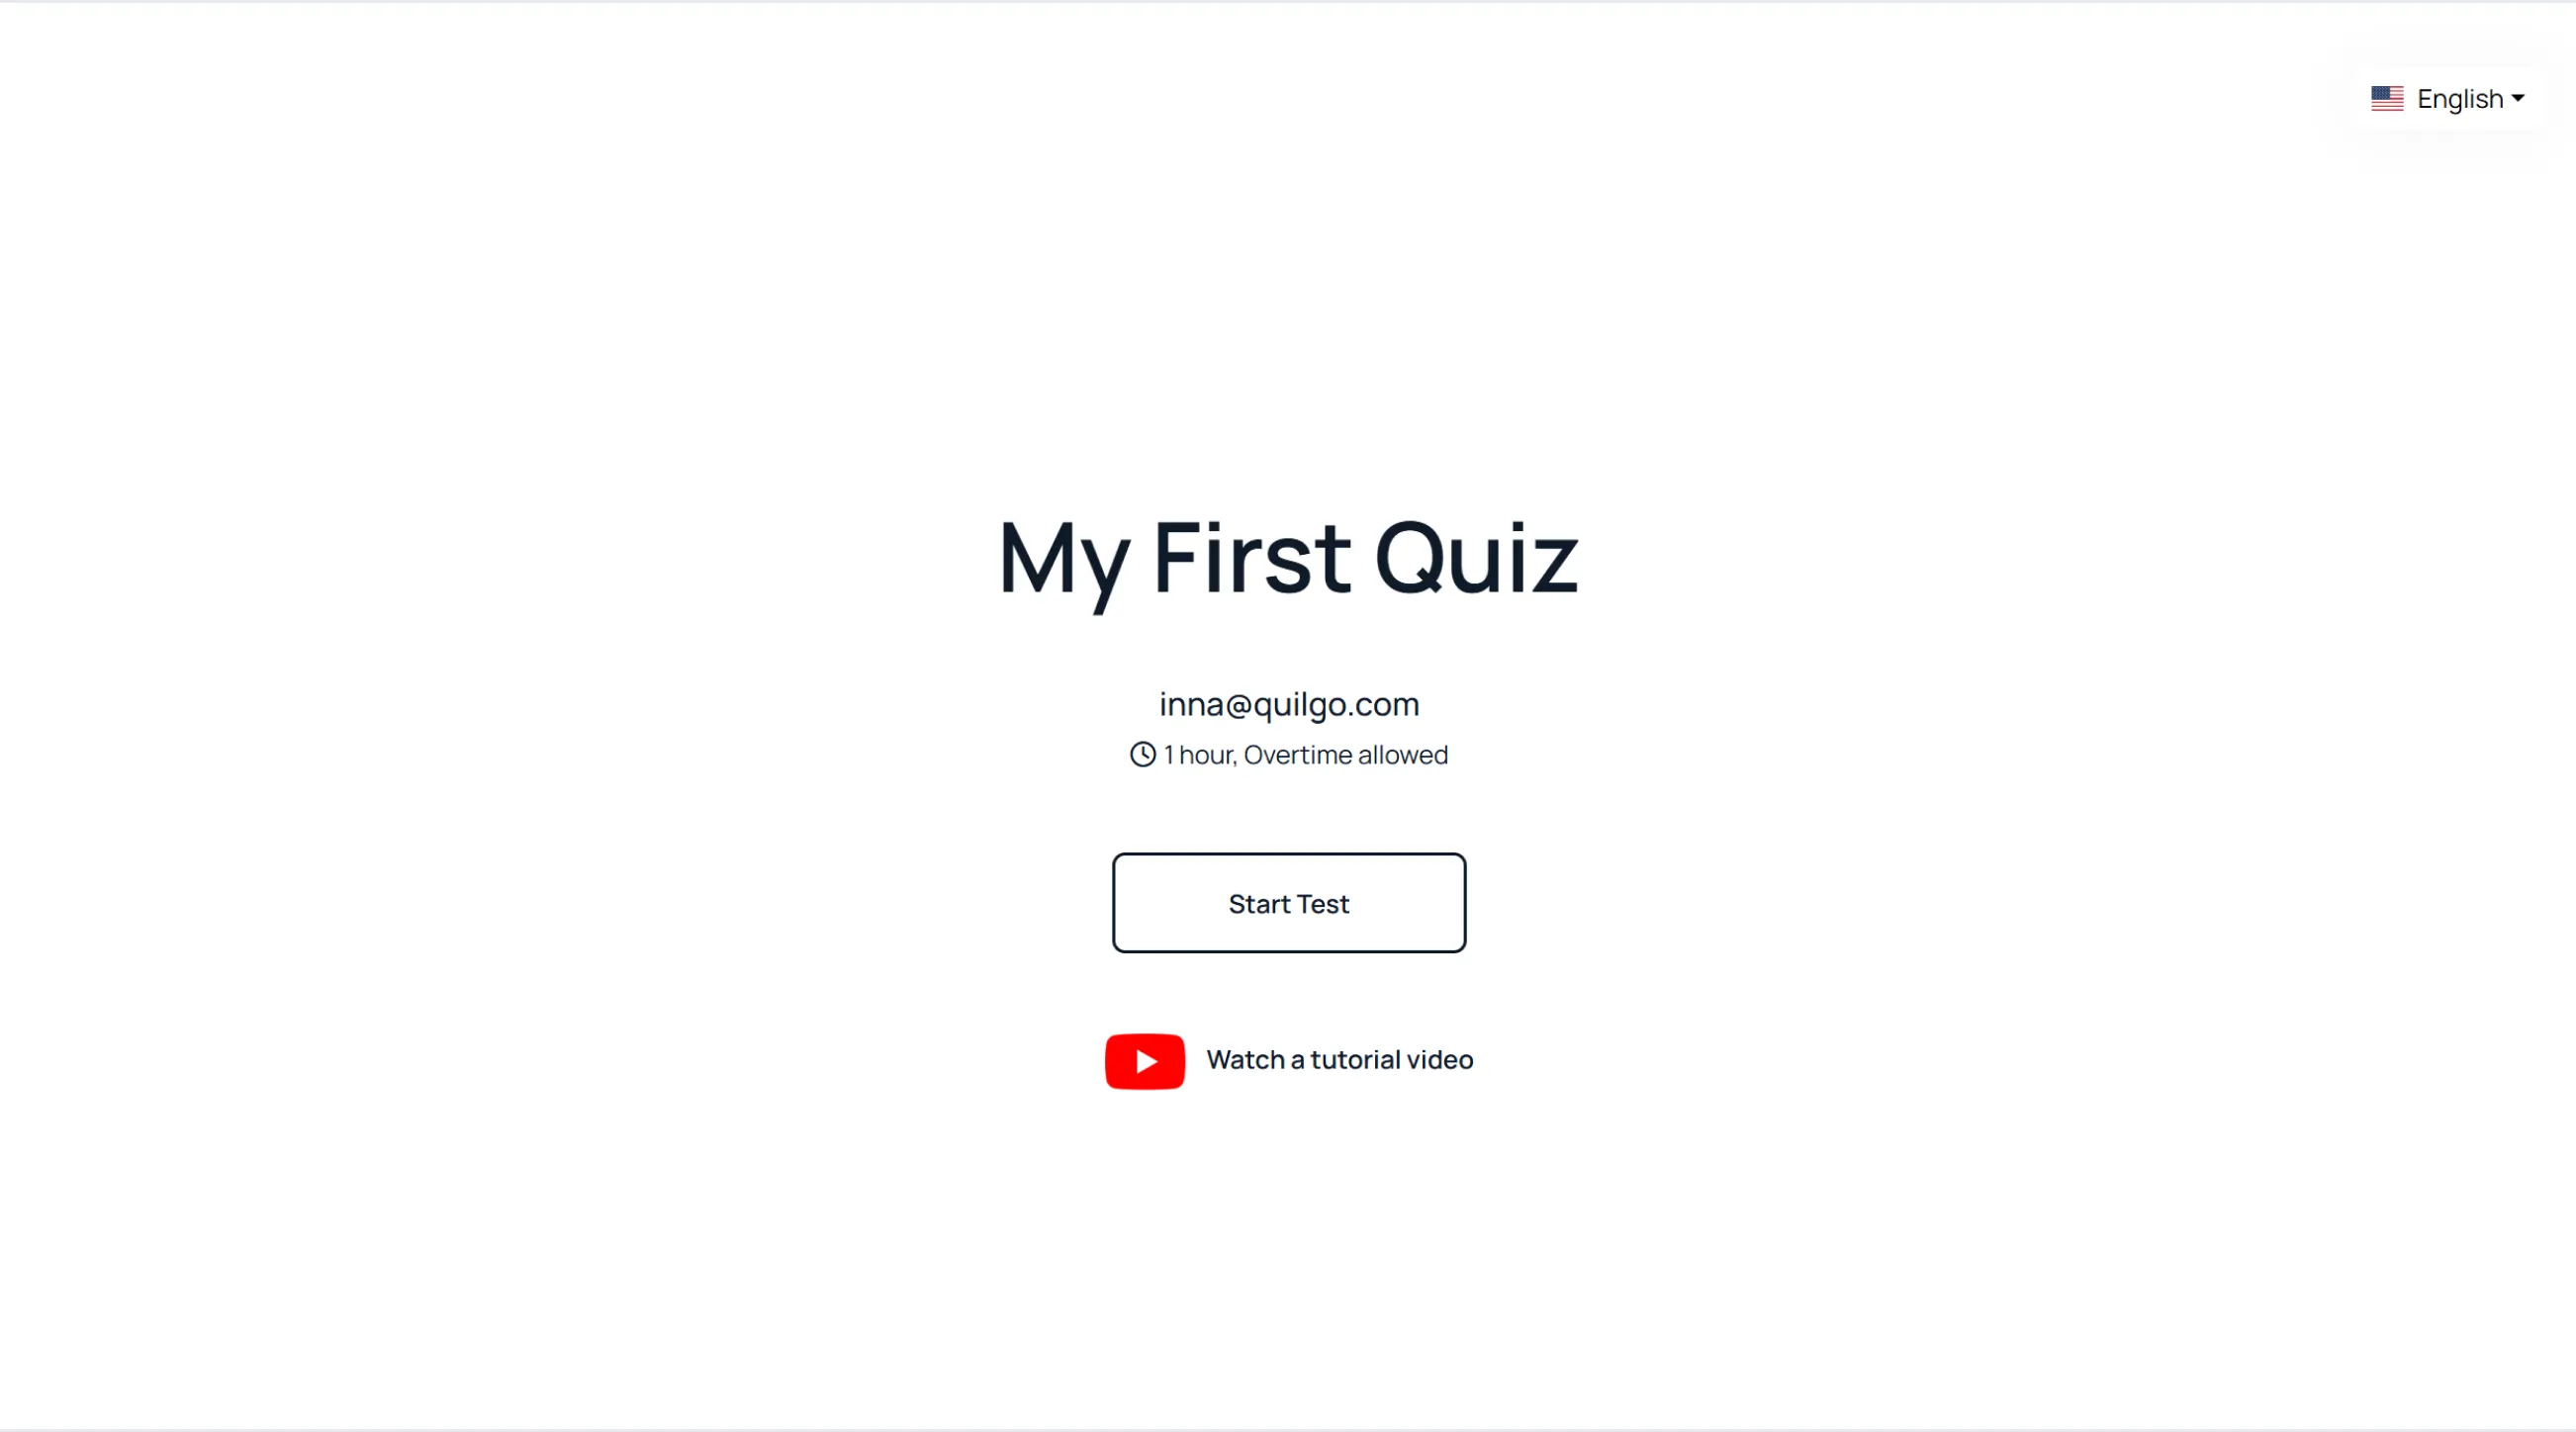
Start the Test

After authentication:

  1. Review the timing and instructions;
  2. Click “Start Test”.

Grant Camera Access

  1. Click “Provide access to Camera”;
  2. Allow camera access in the browser.

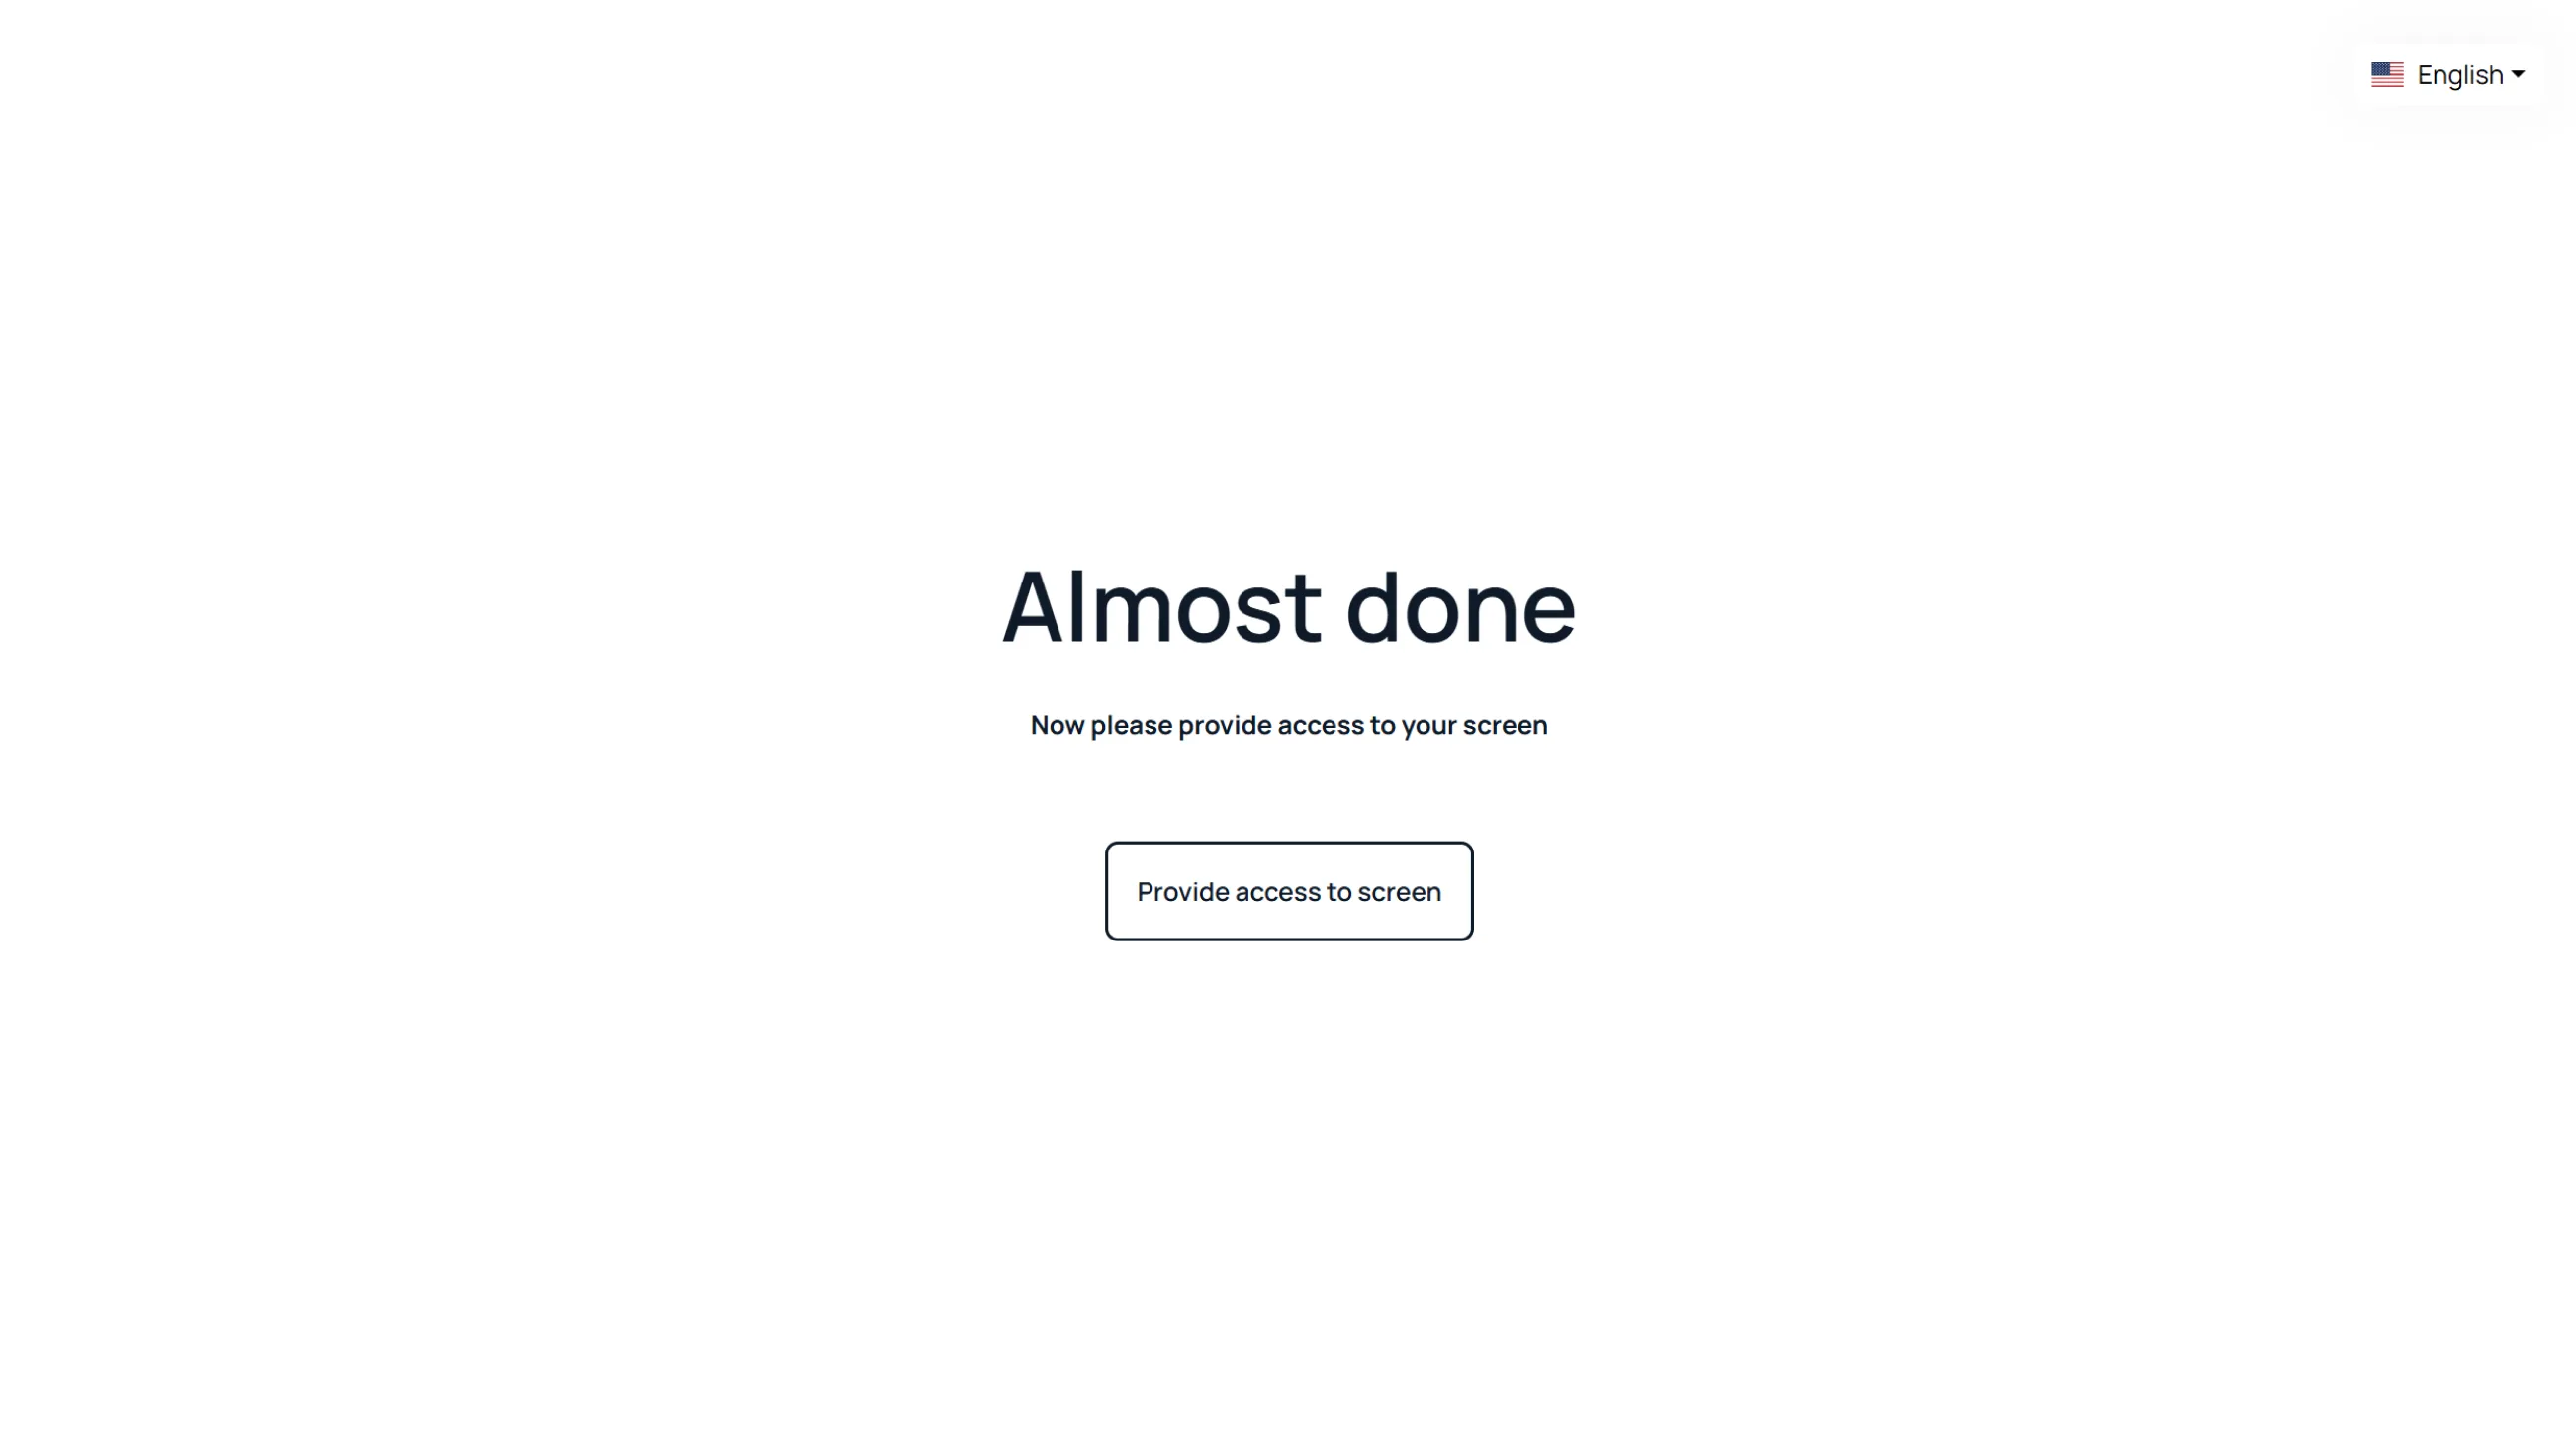
Grant Screen Access

  1. Click “Provide access to screen”;
  2. Choose what to share;
  3. Click “Share”.

Confirm Tracking Preview

  1. Verify the webcam and screen previews;
  2. Click “All good, open the form”.

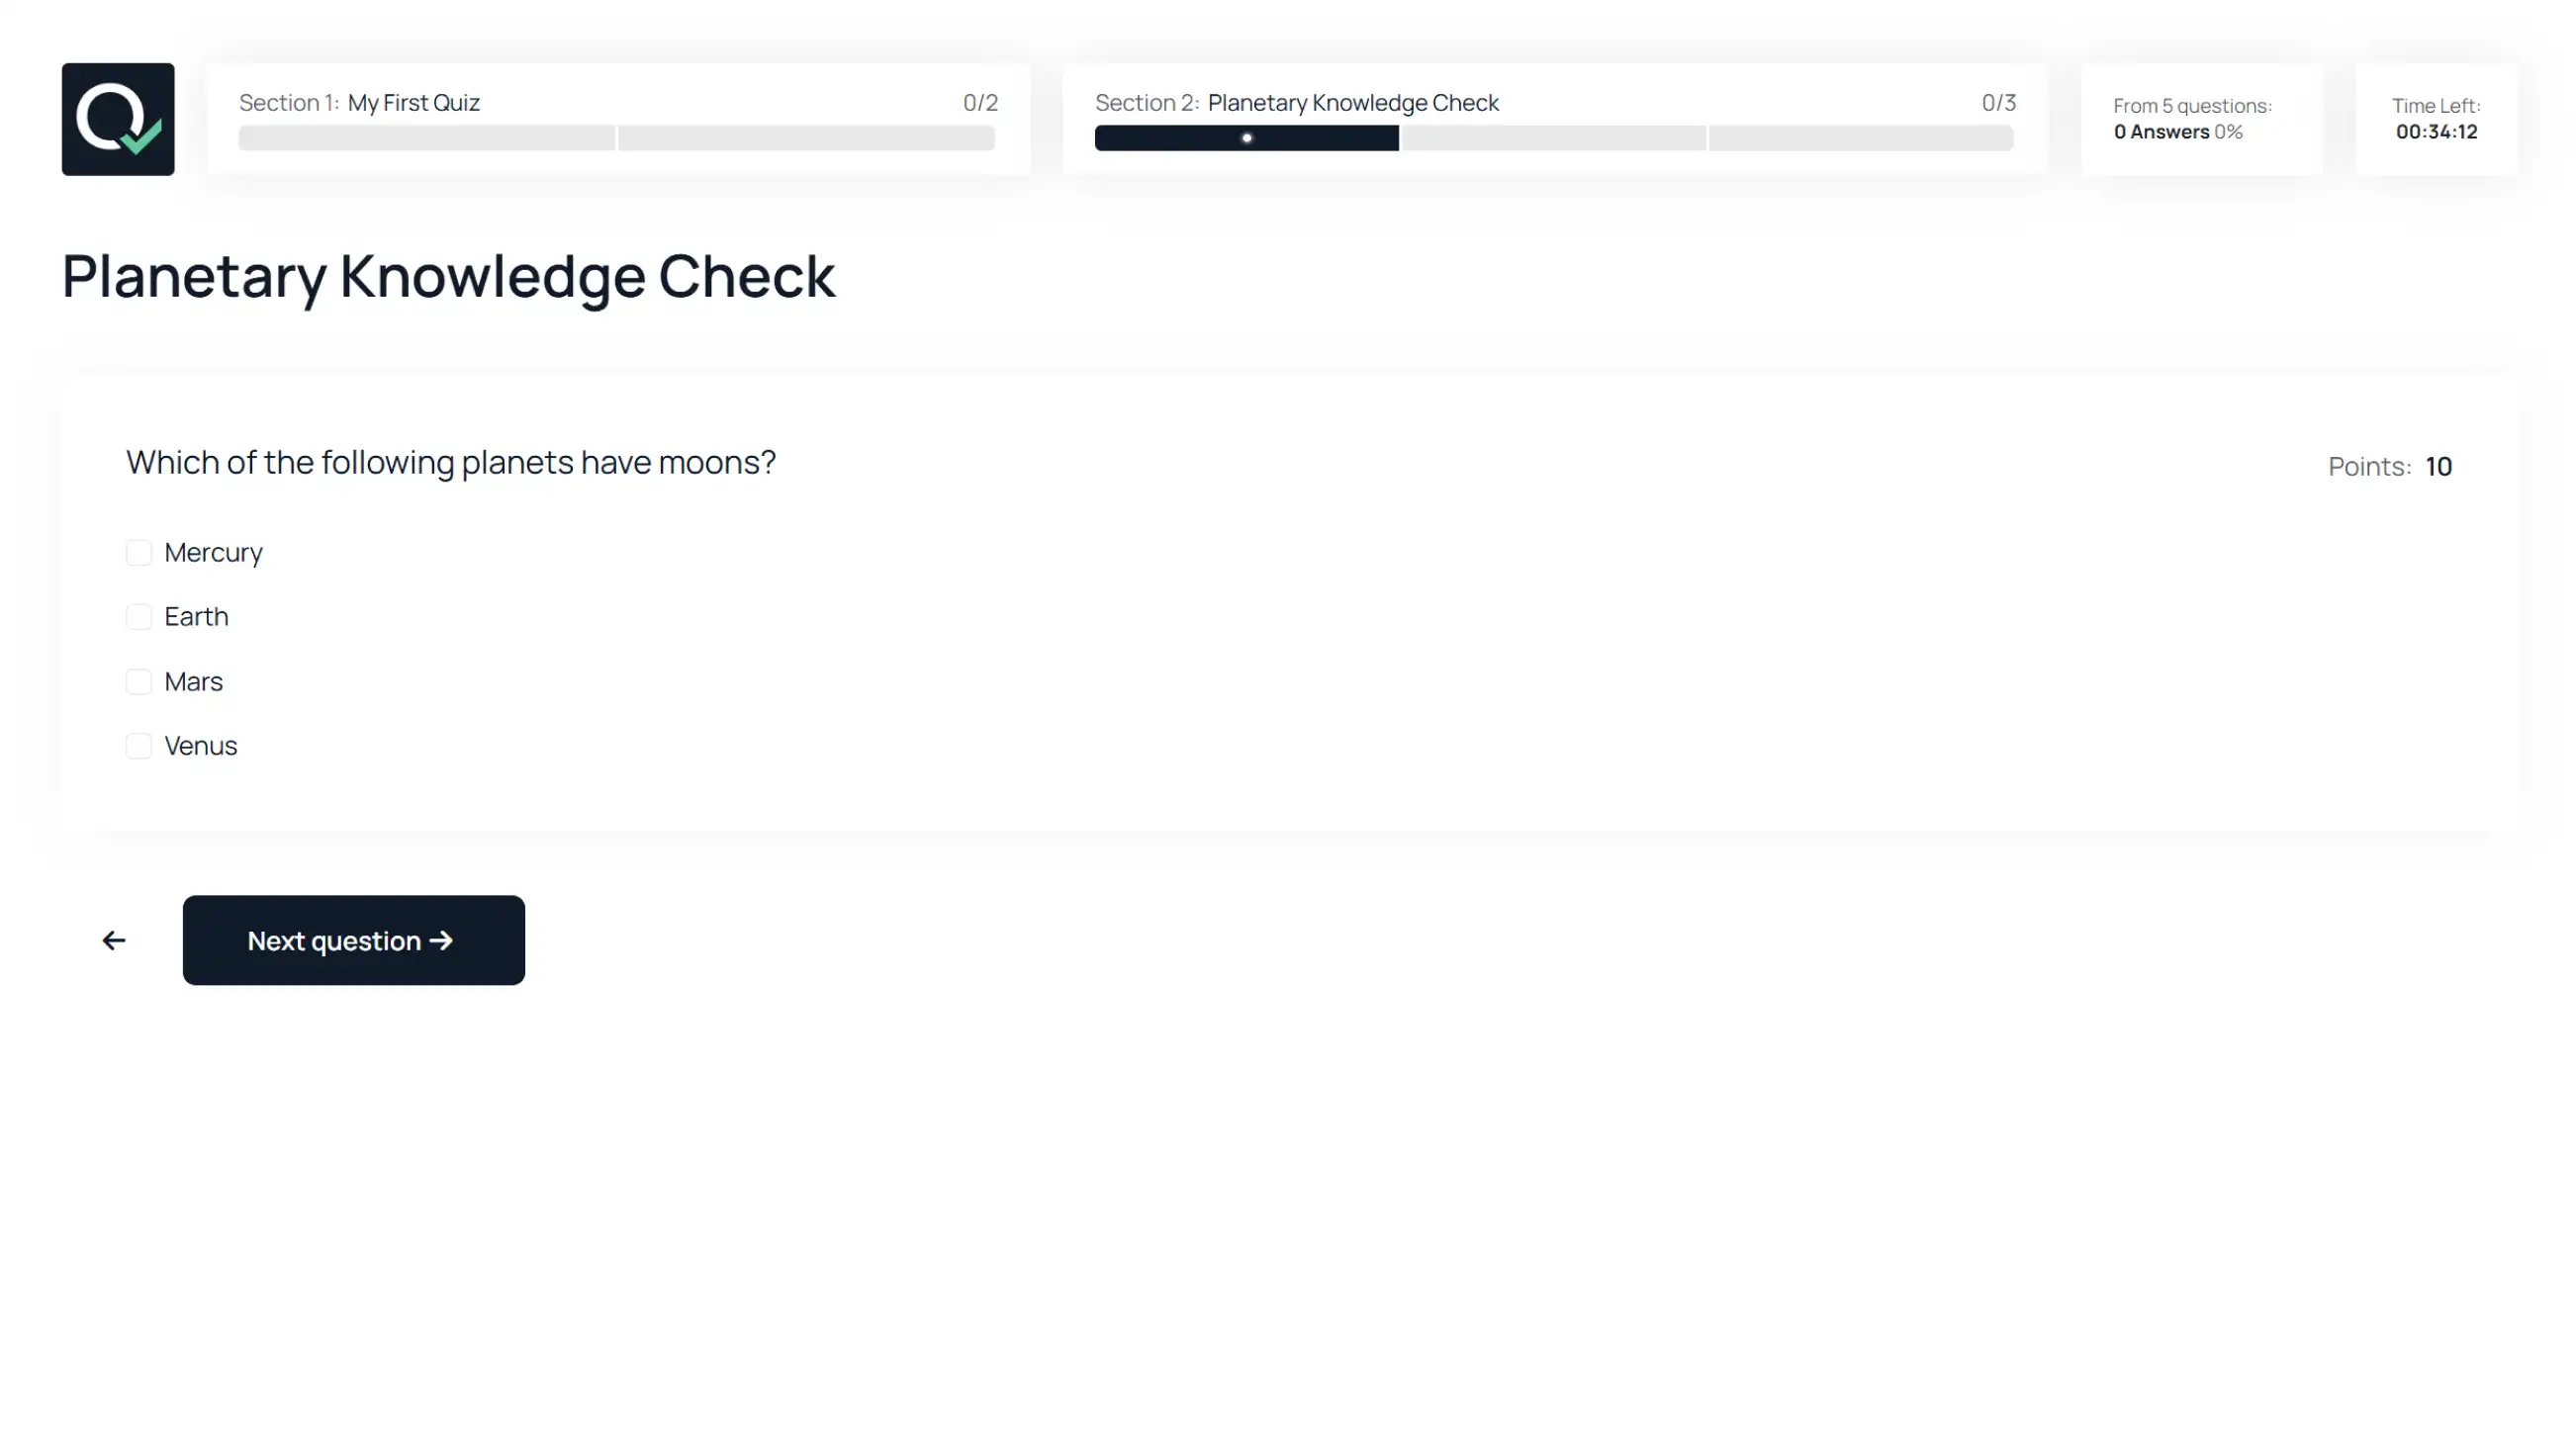
Complete the Test

During the test, respondents can:

  • move between questions;
  • move between sections;
  • continue after reconnecting;
  • rely on autosave.
Reports and Grading

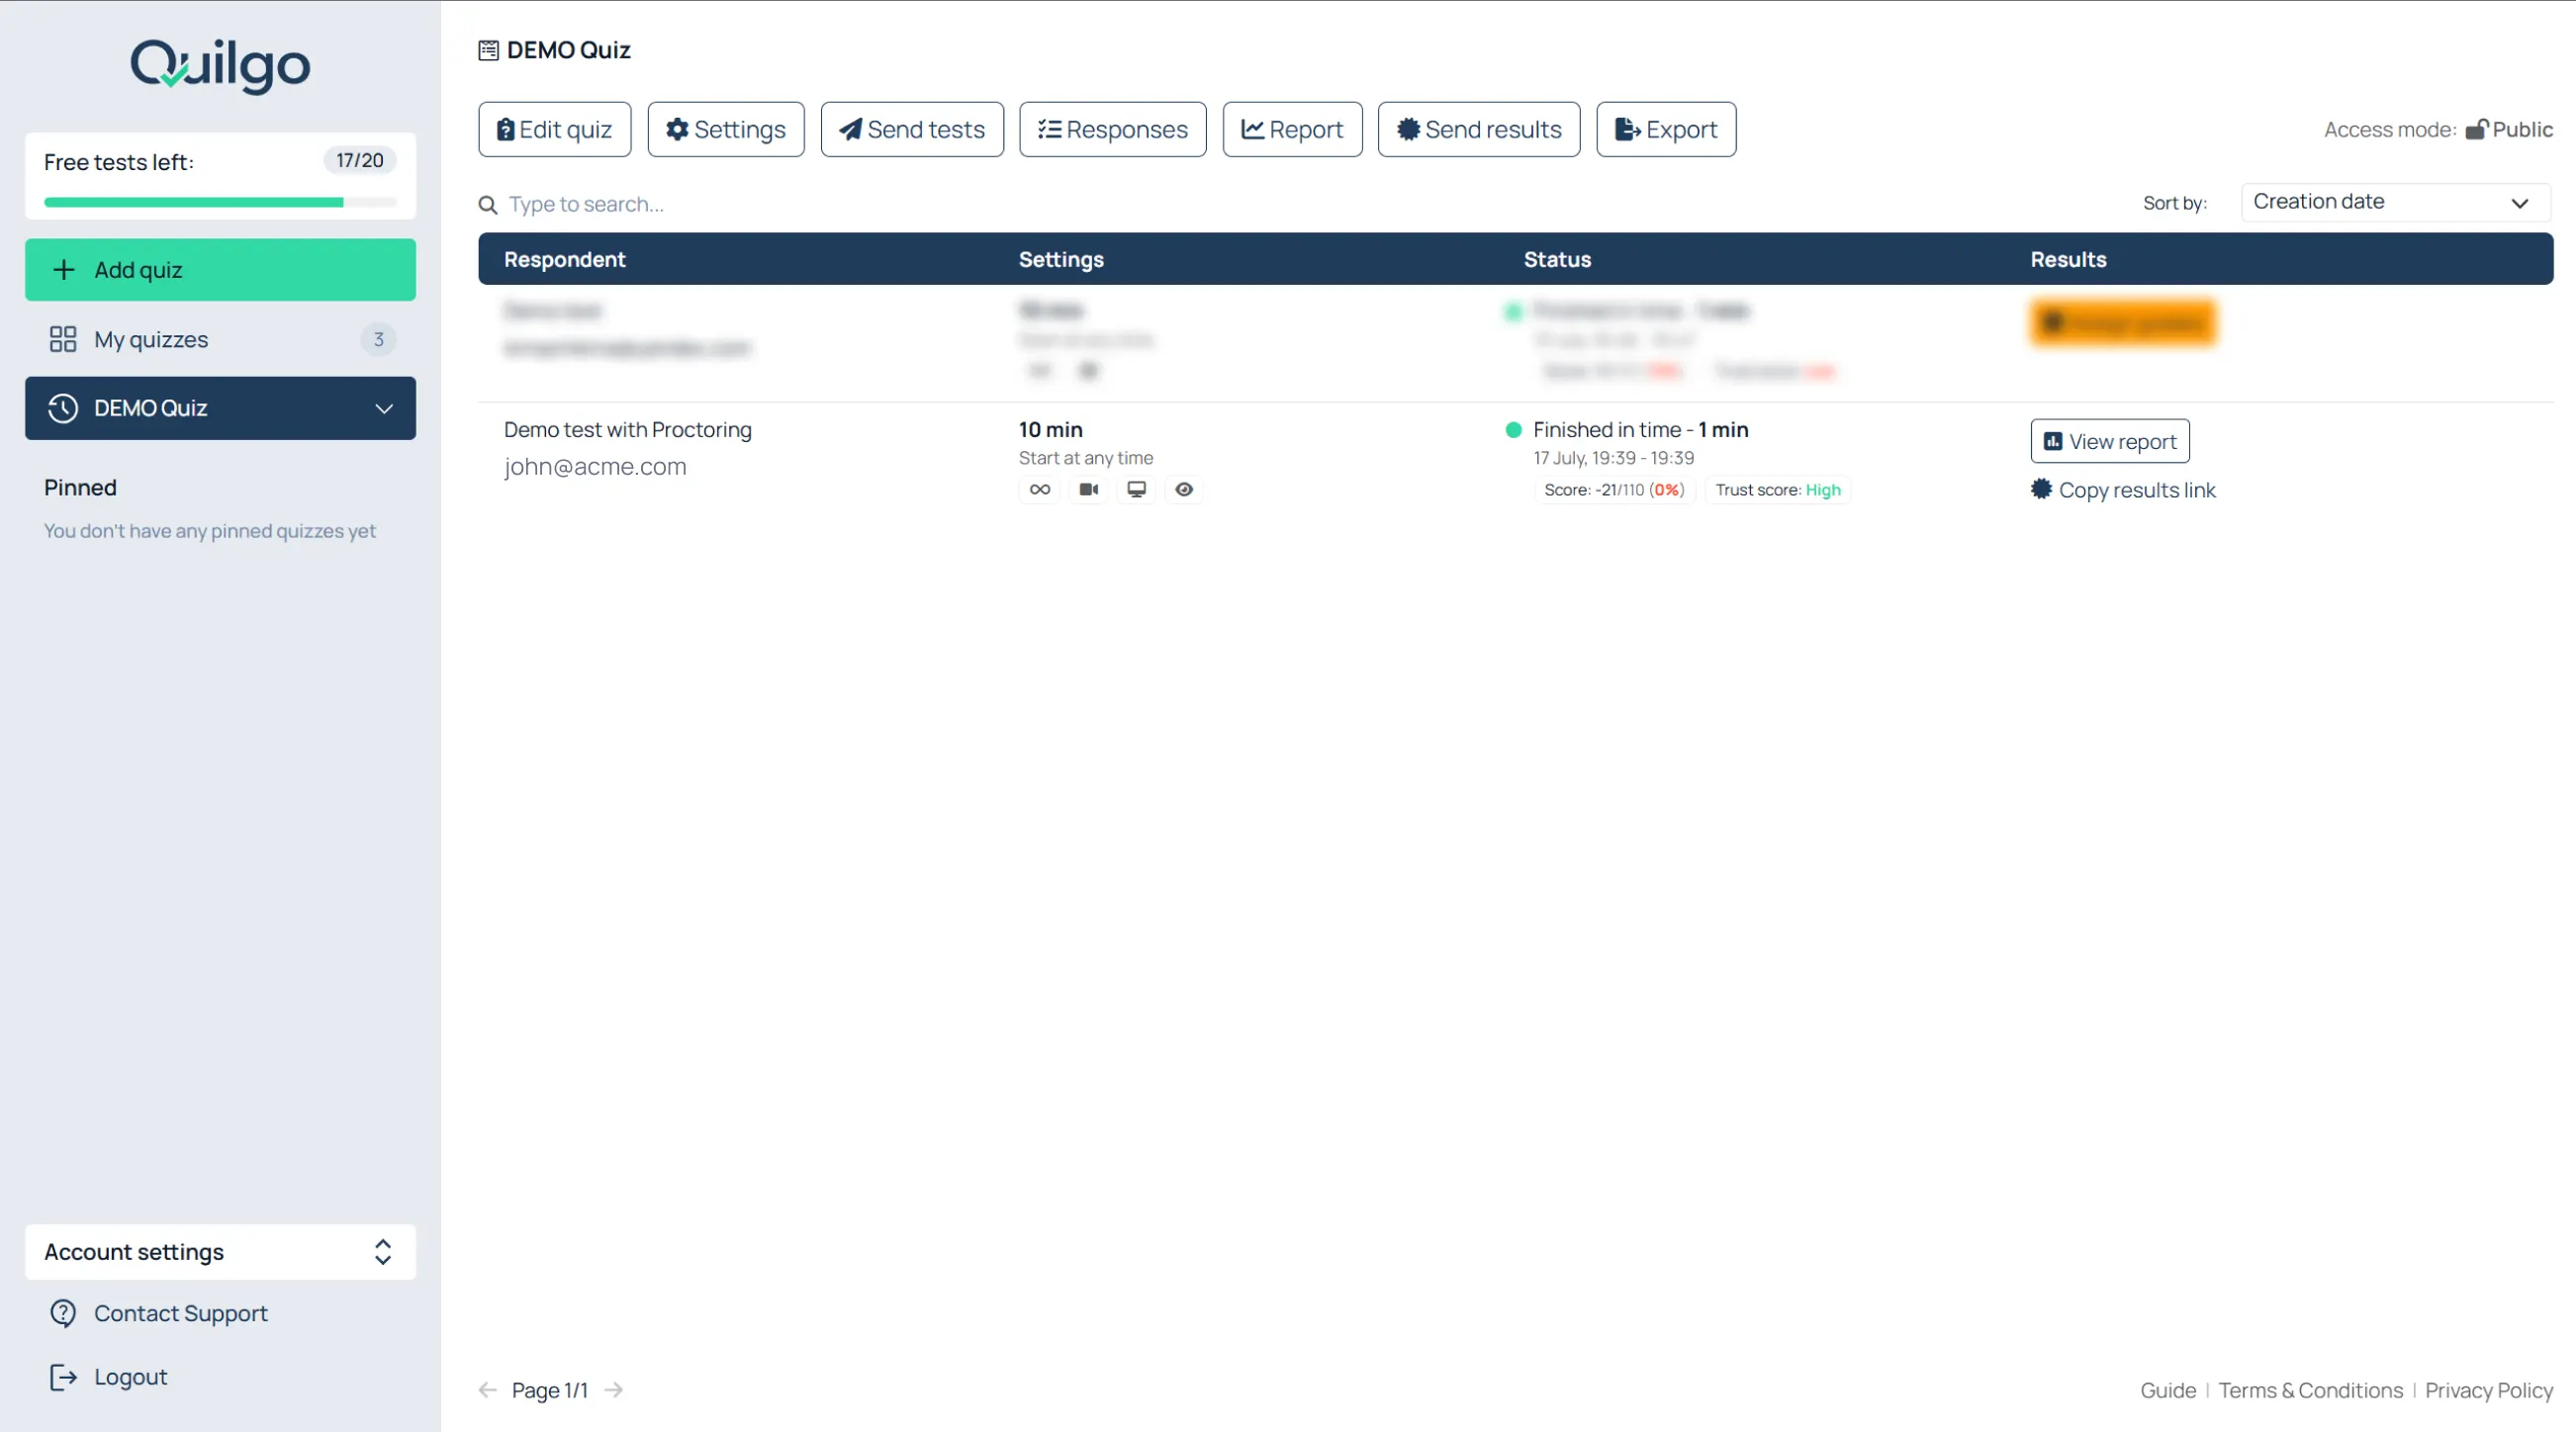
Open an Individual Report

To open a report:

  1. Return to the dashboard;
  2. Find the respondent row;
  3. Click “View report”.

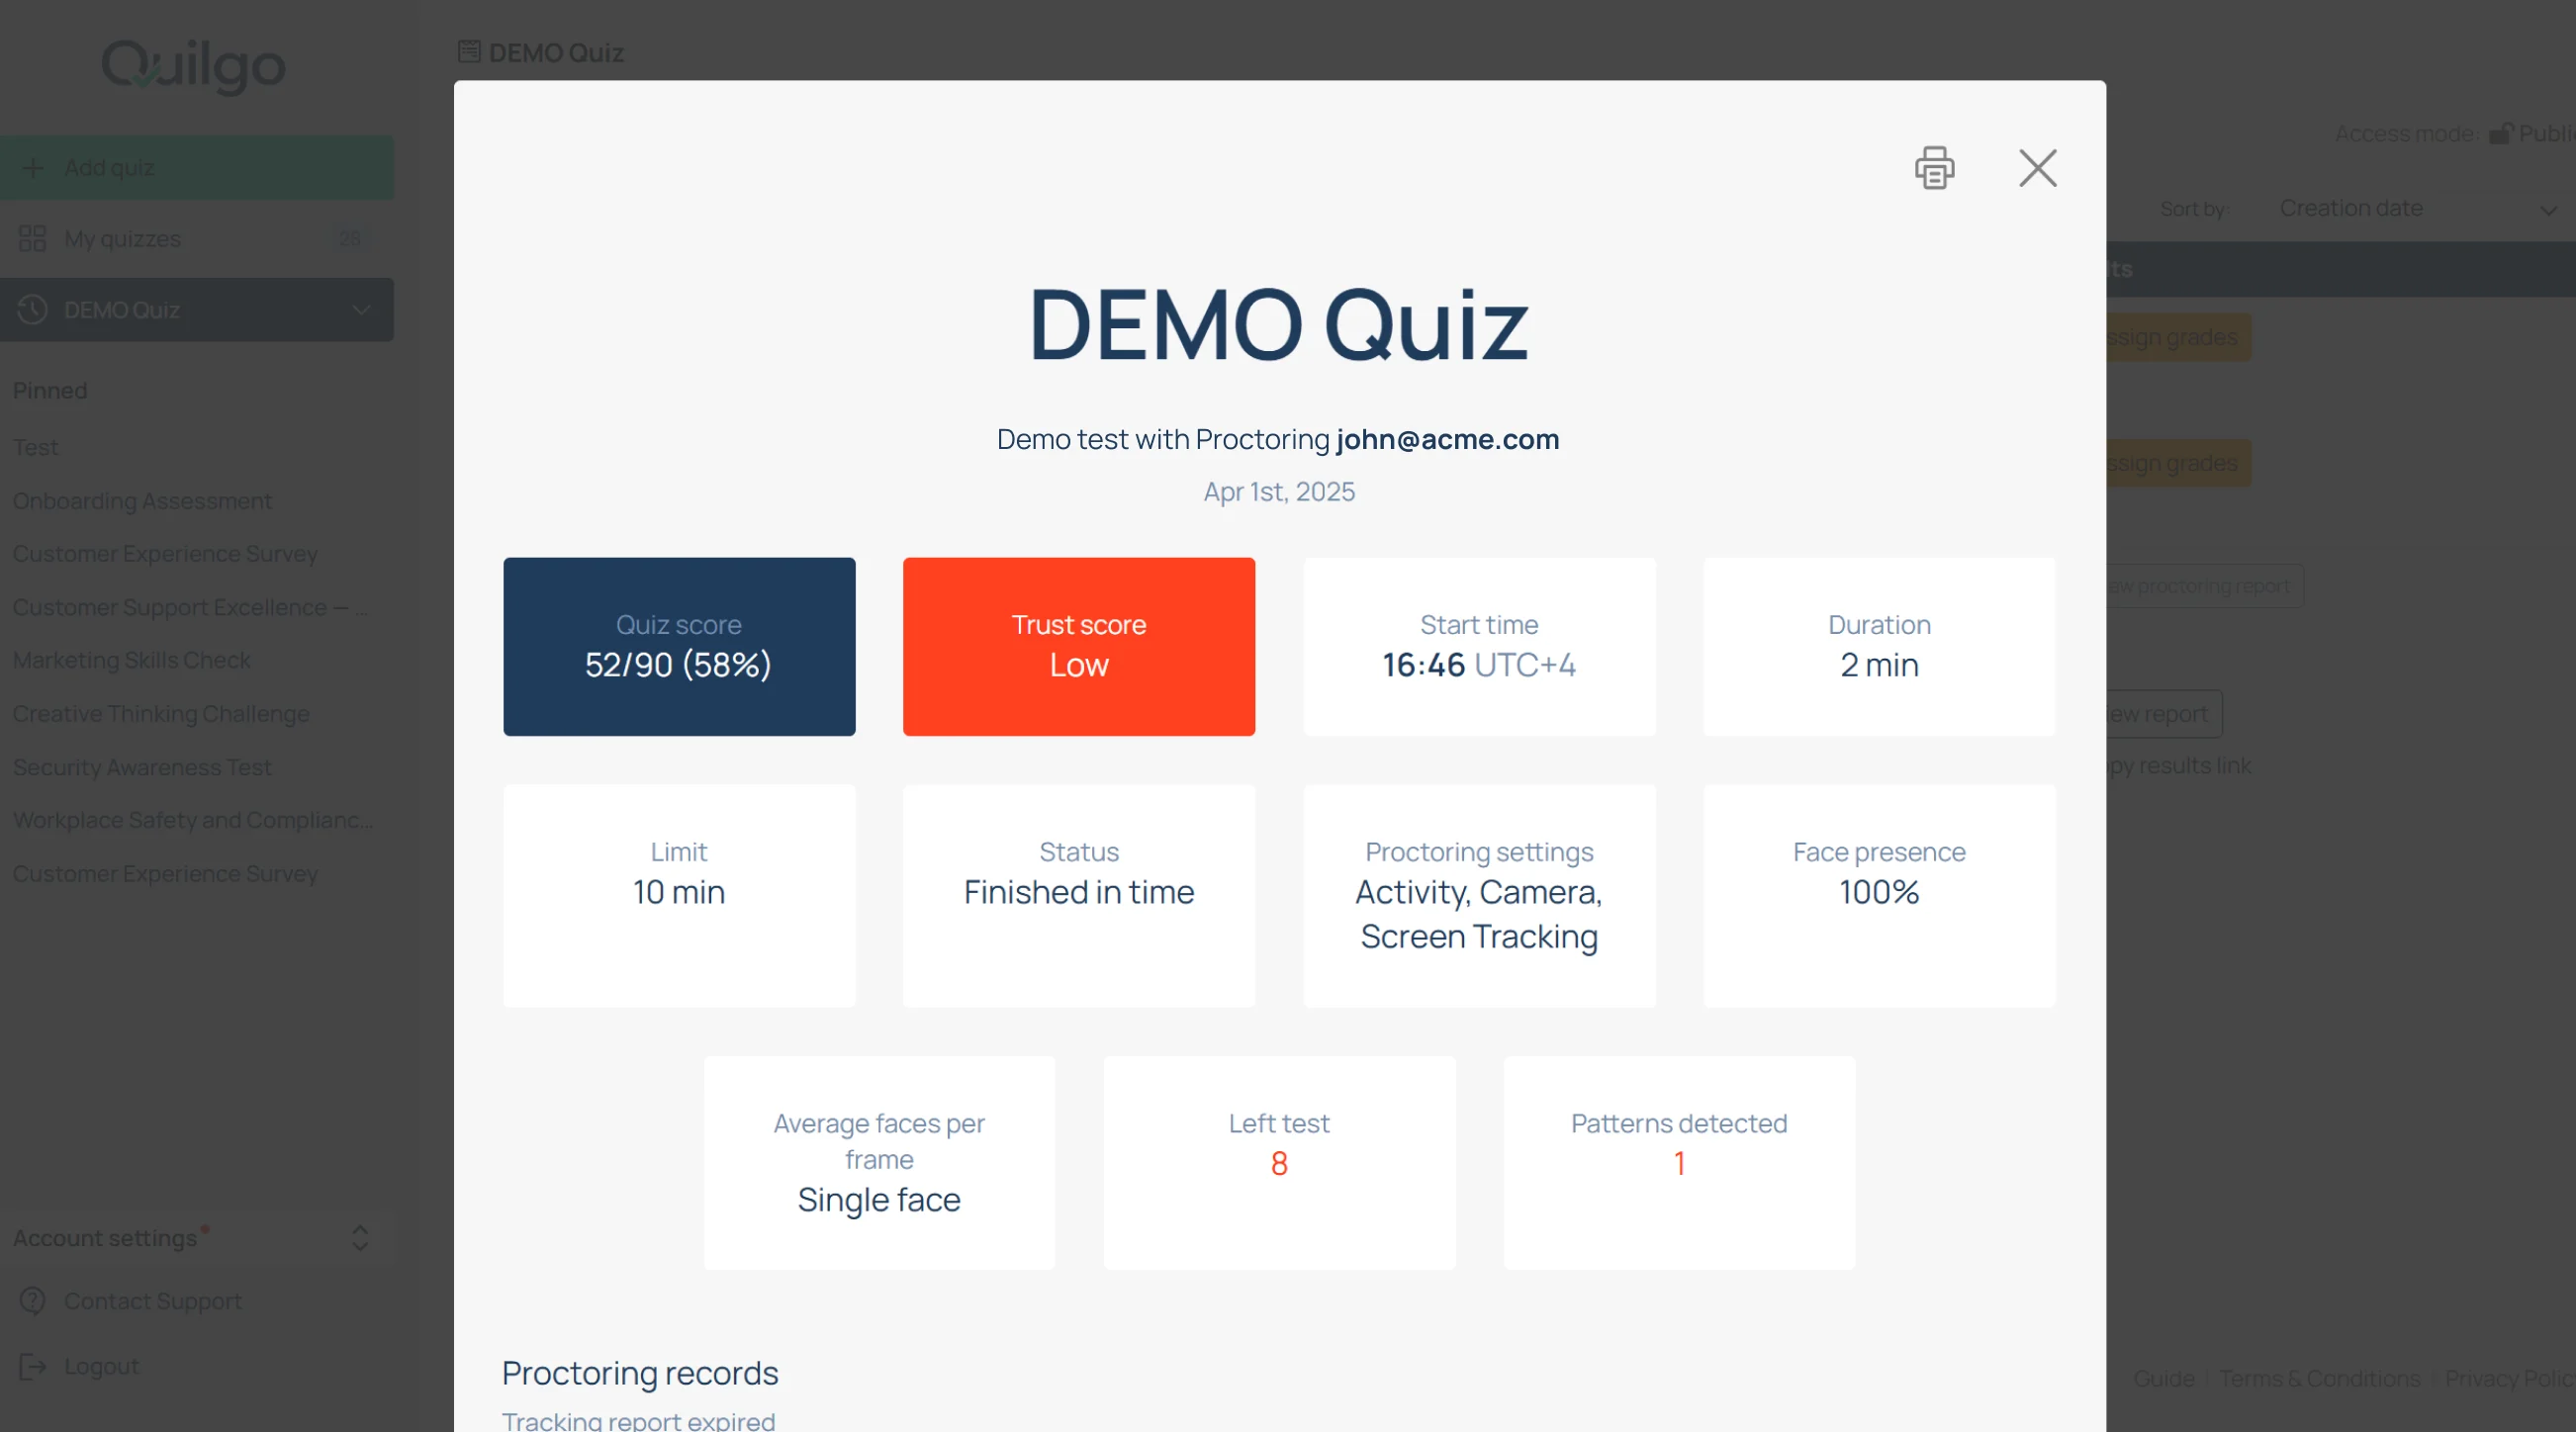
Reports may contain:

  • scores;
  • trust score;
  • timing;
  • suspicious activity;
  • answers;
  • snapshots.

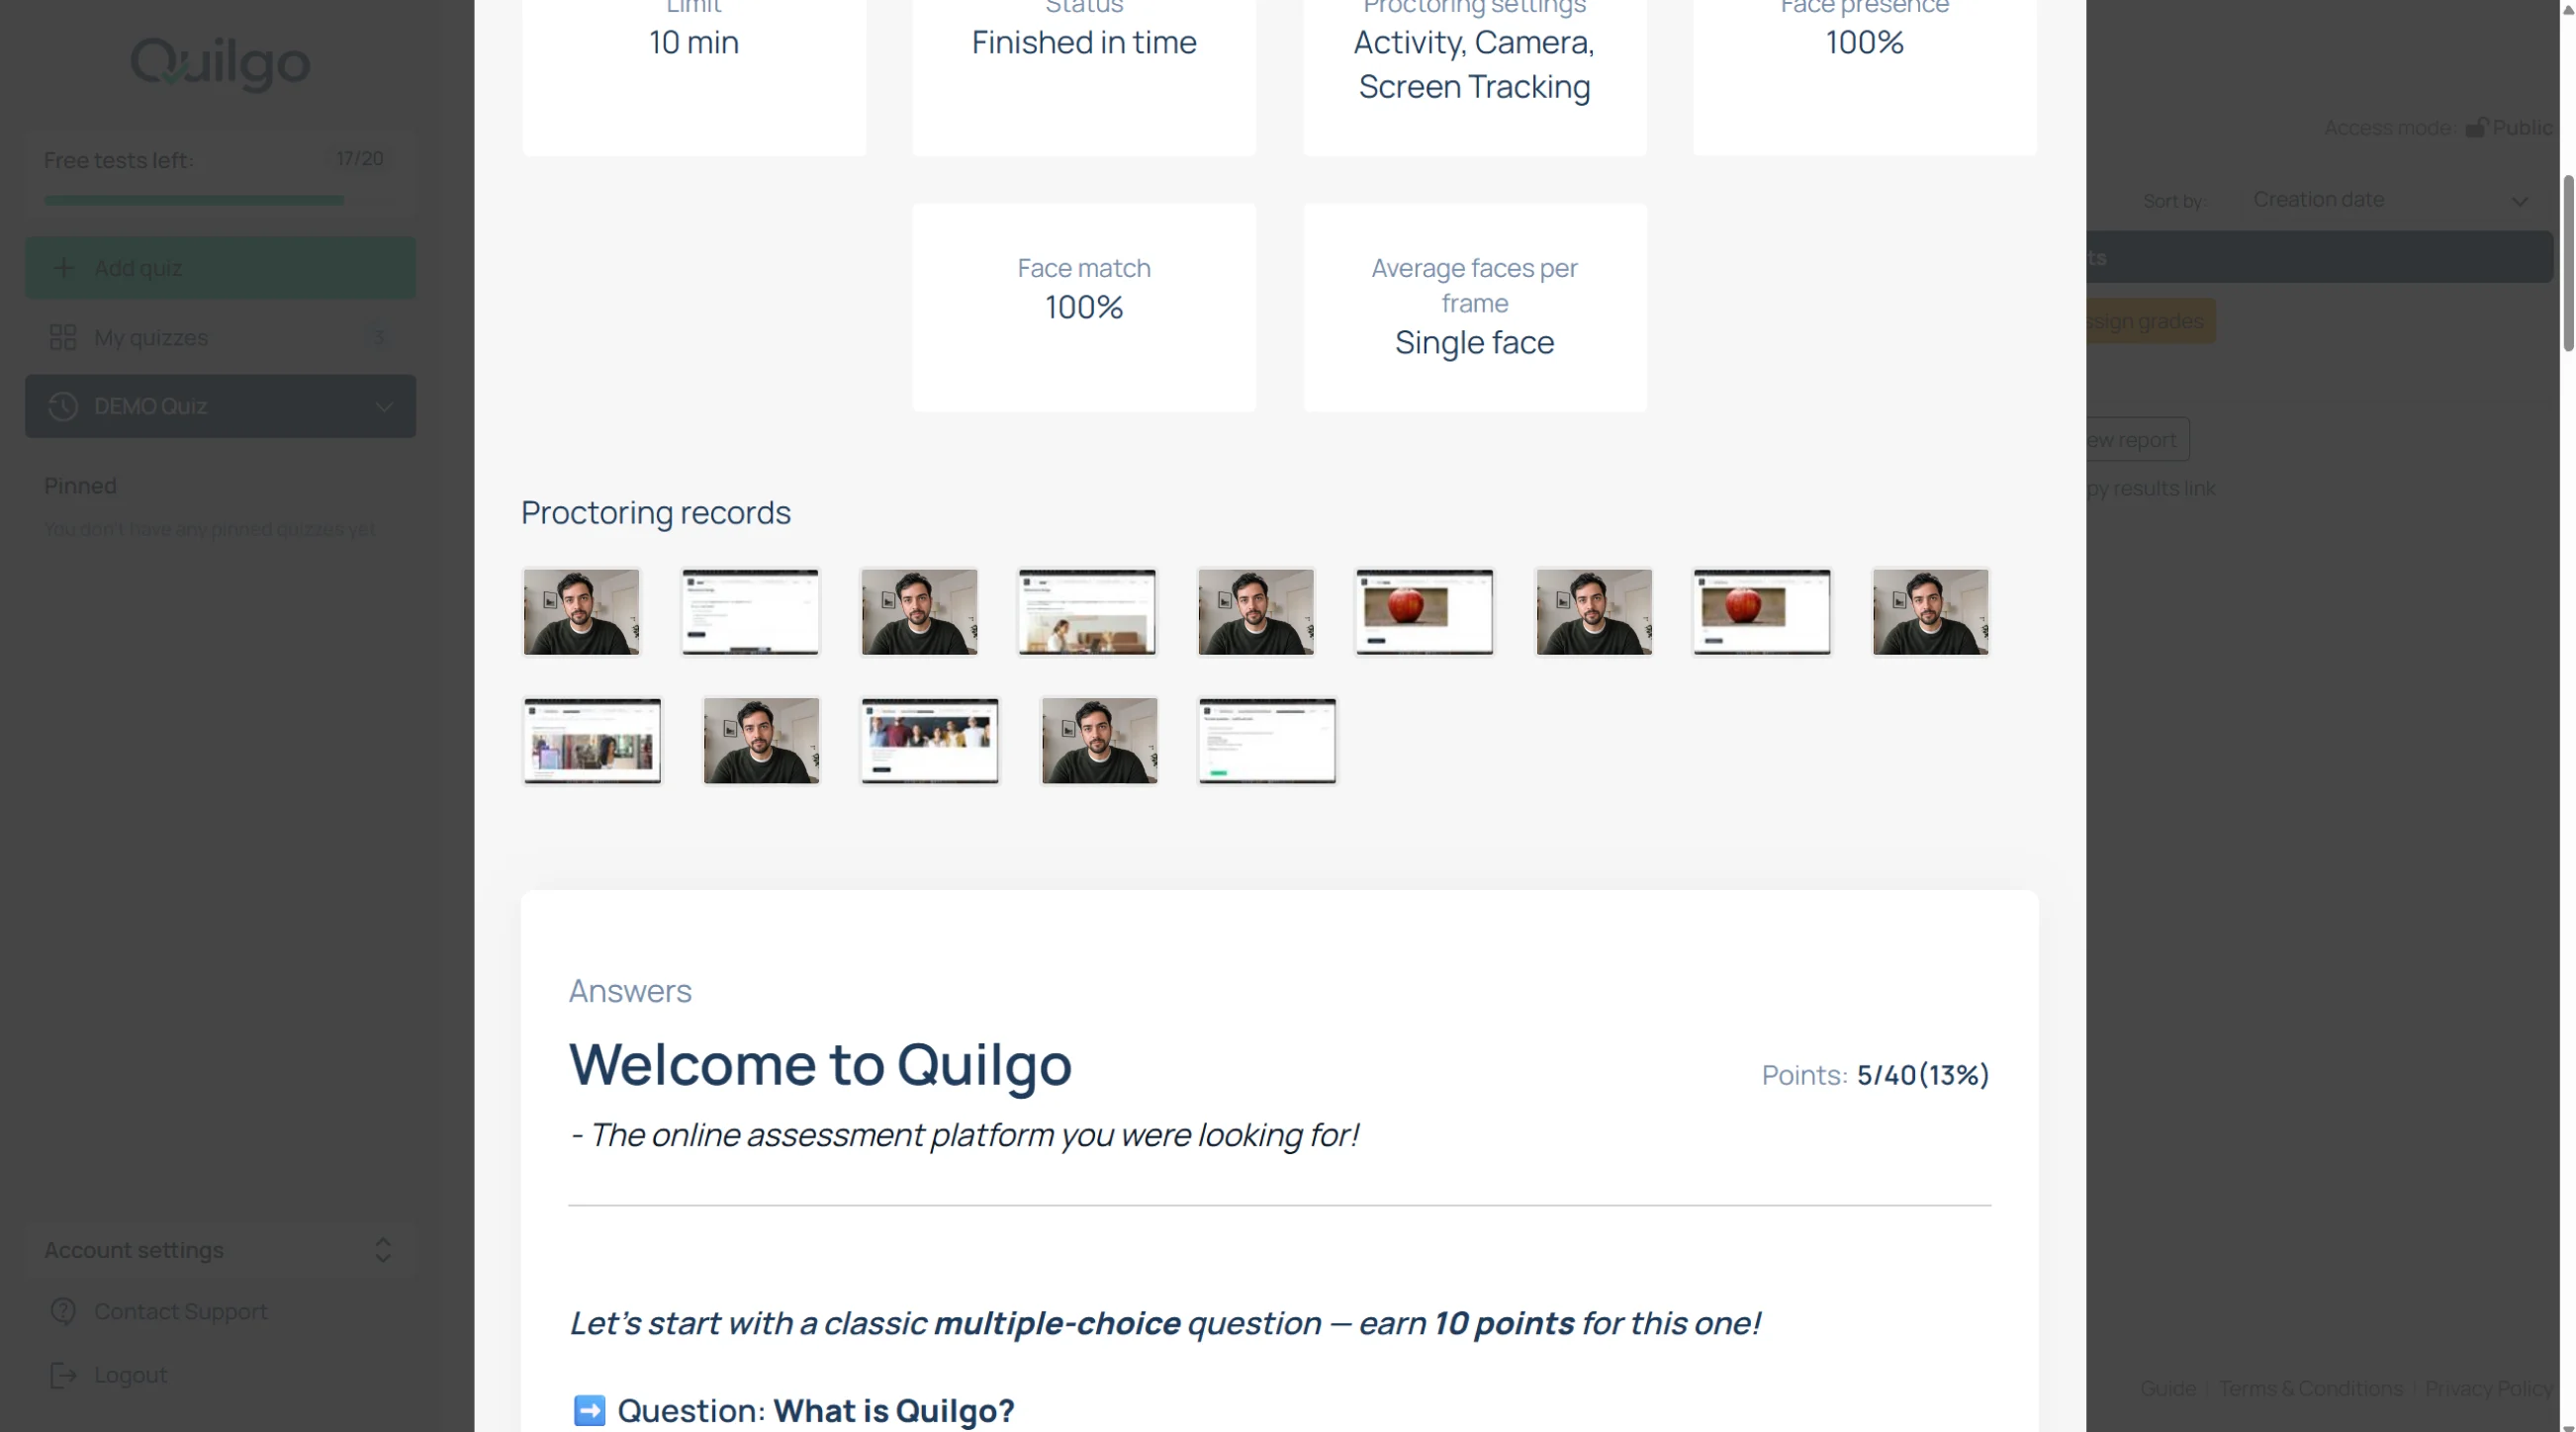
Review Proctoring Records

Proctoring records connect suspicious activity indicators with actual respondent behavior and answers. This helps reviewers evaluate integrity issues in context instead of relying on isolated screenshots.

Inside the report, scroll to “Proctoring records”.

You may see:

  • webcam snapshots;
  • screen snapshots;
  • tab switching indicators;
  • suspicious events.

Save the Report as PDF

  1. Open the report;
  2. Use the browser print dialog;
  3. Save as PDF.

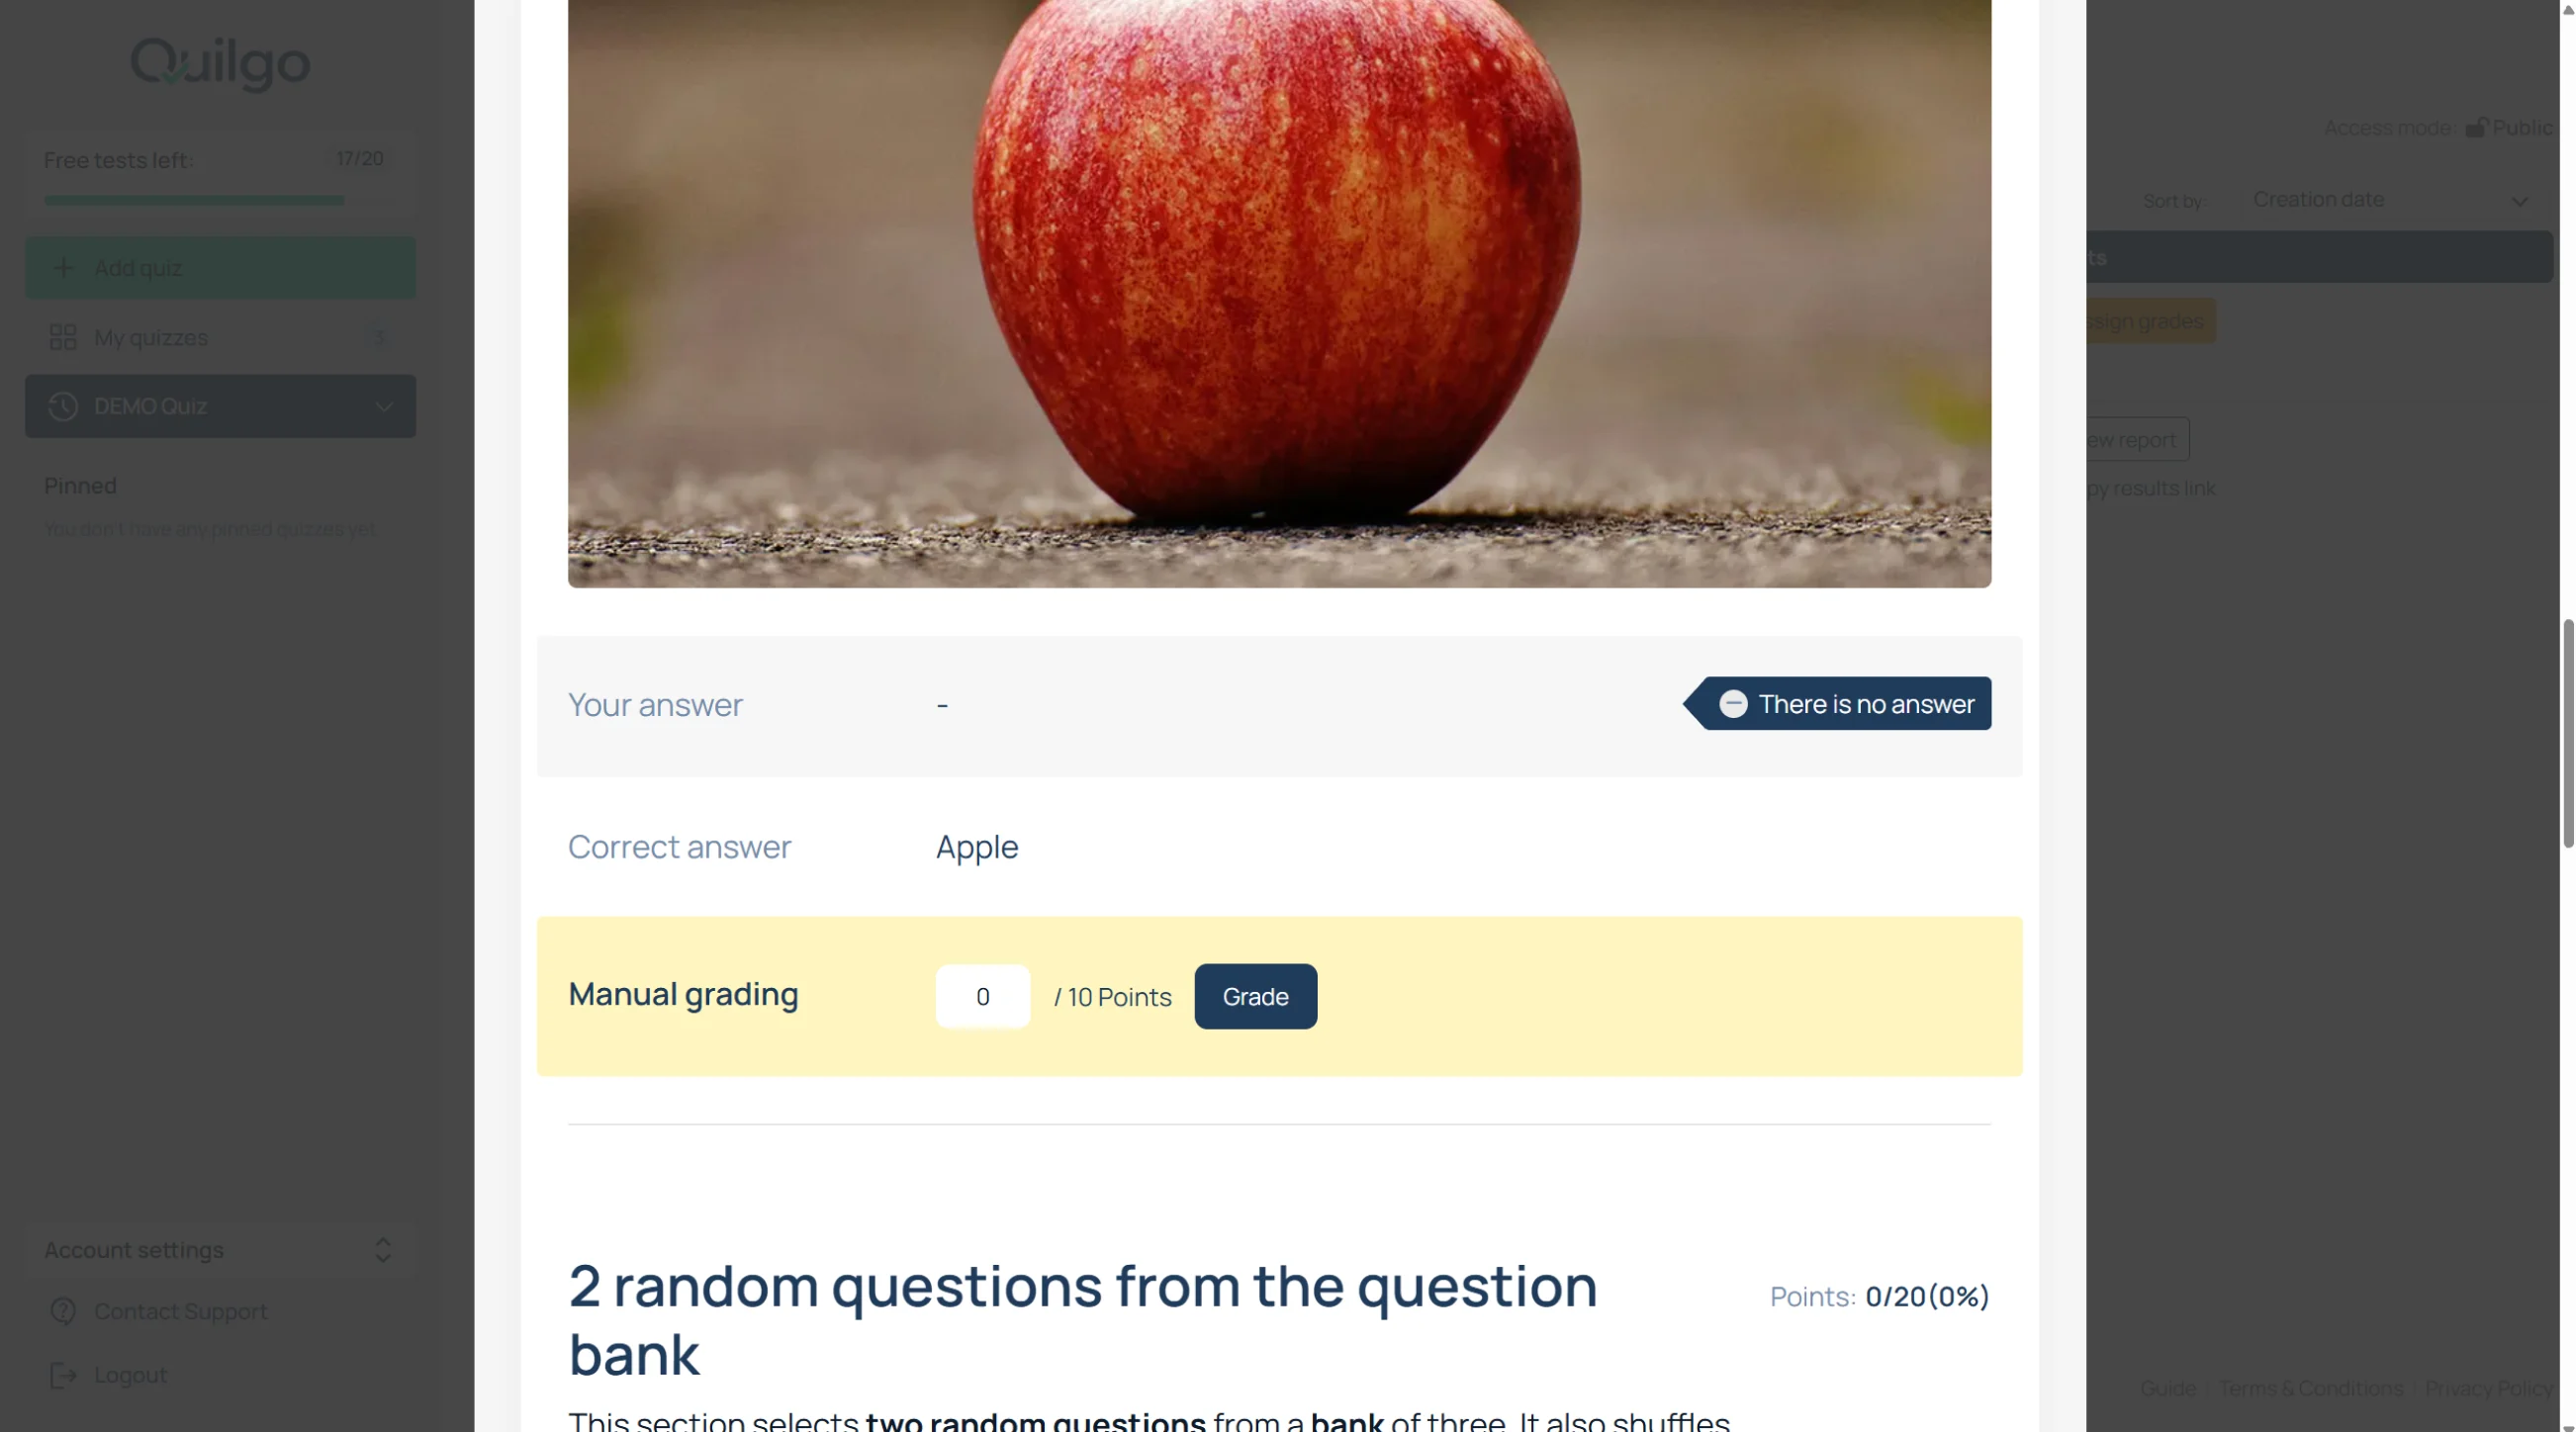
Assign Manual Grades

To manually grade Paragraph questions:

  1. Click “Assign grades”;
  2. Review the answer;
  3. Enter the score;
  4. Click “Grade”.
Share Results

Copy an Individual Results Link

  1. Find the respondent row;
  2. Click “Copy results link”;
  3. Send the link.

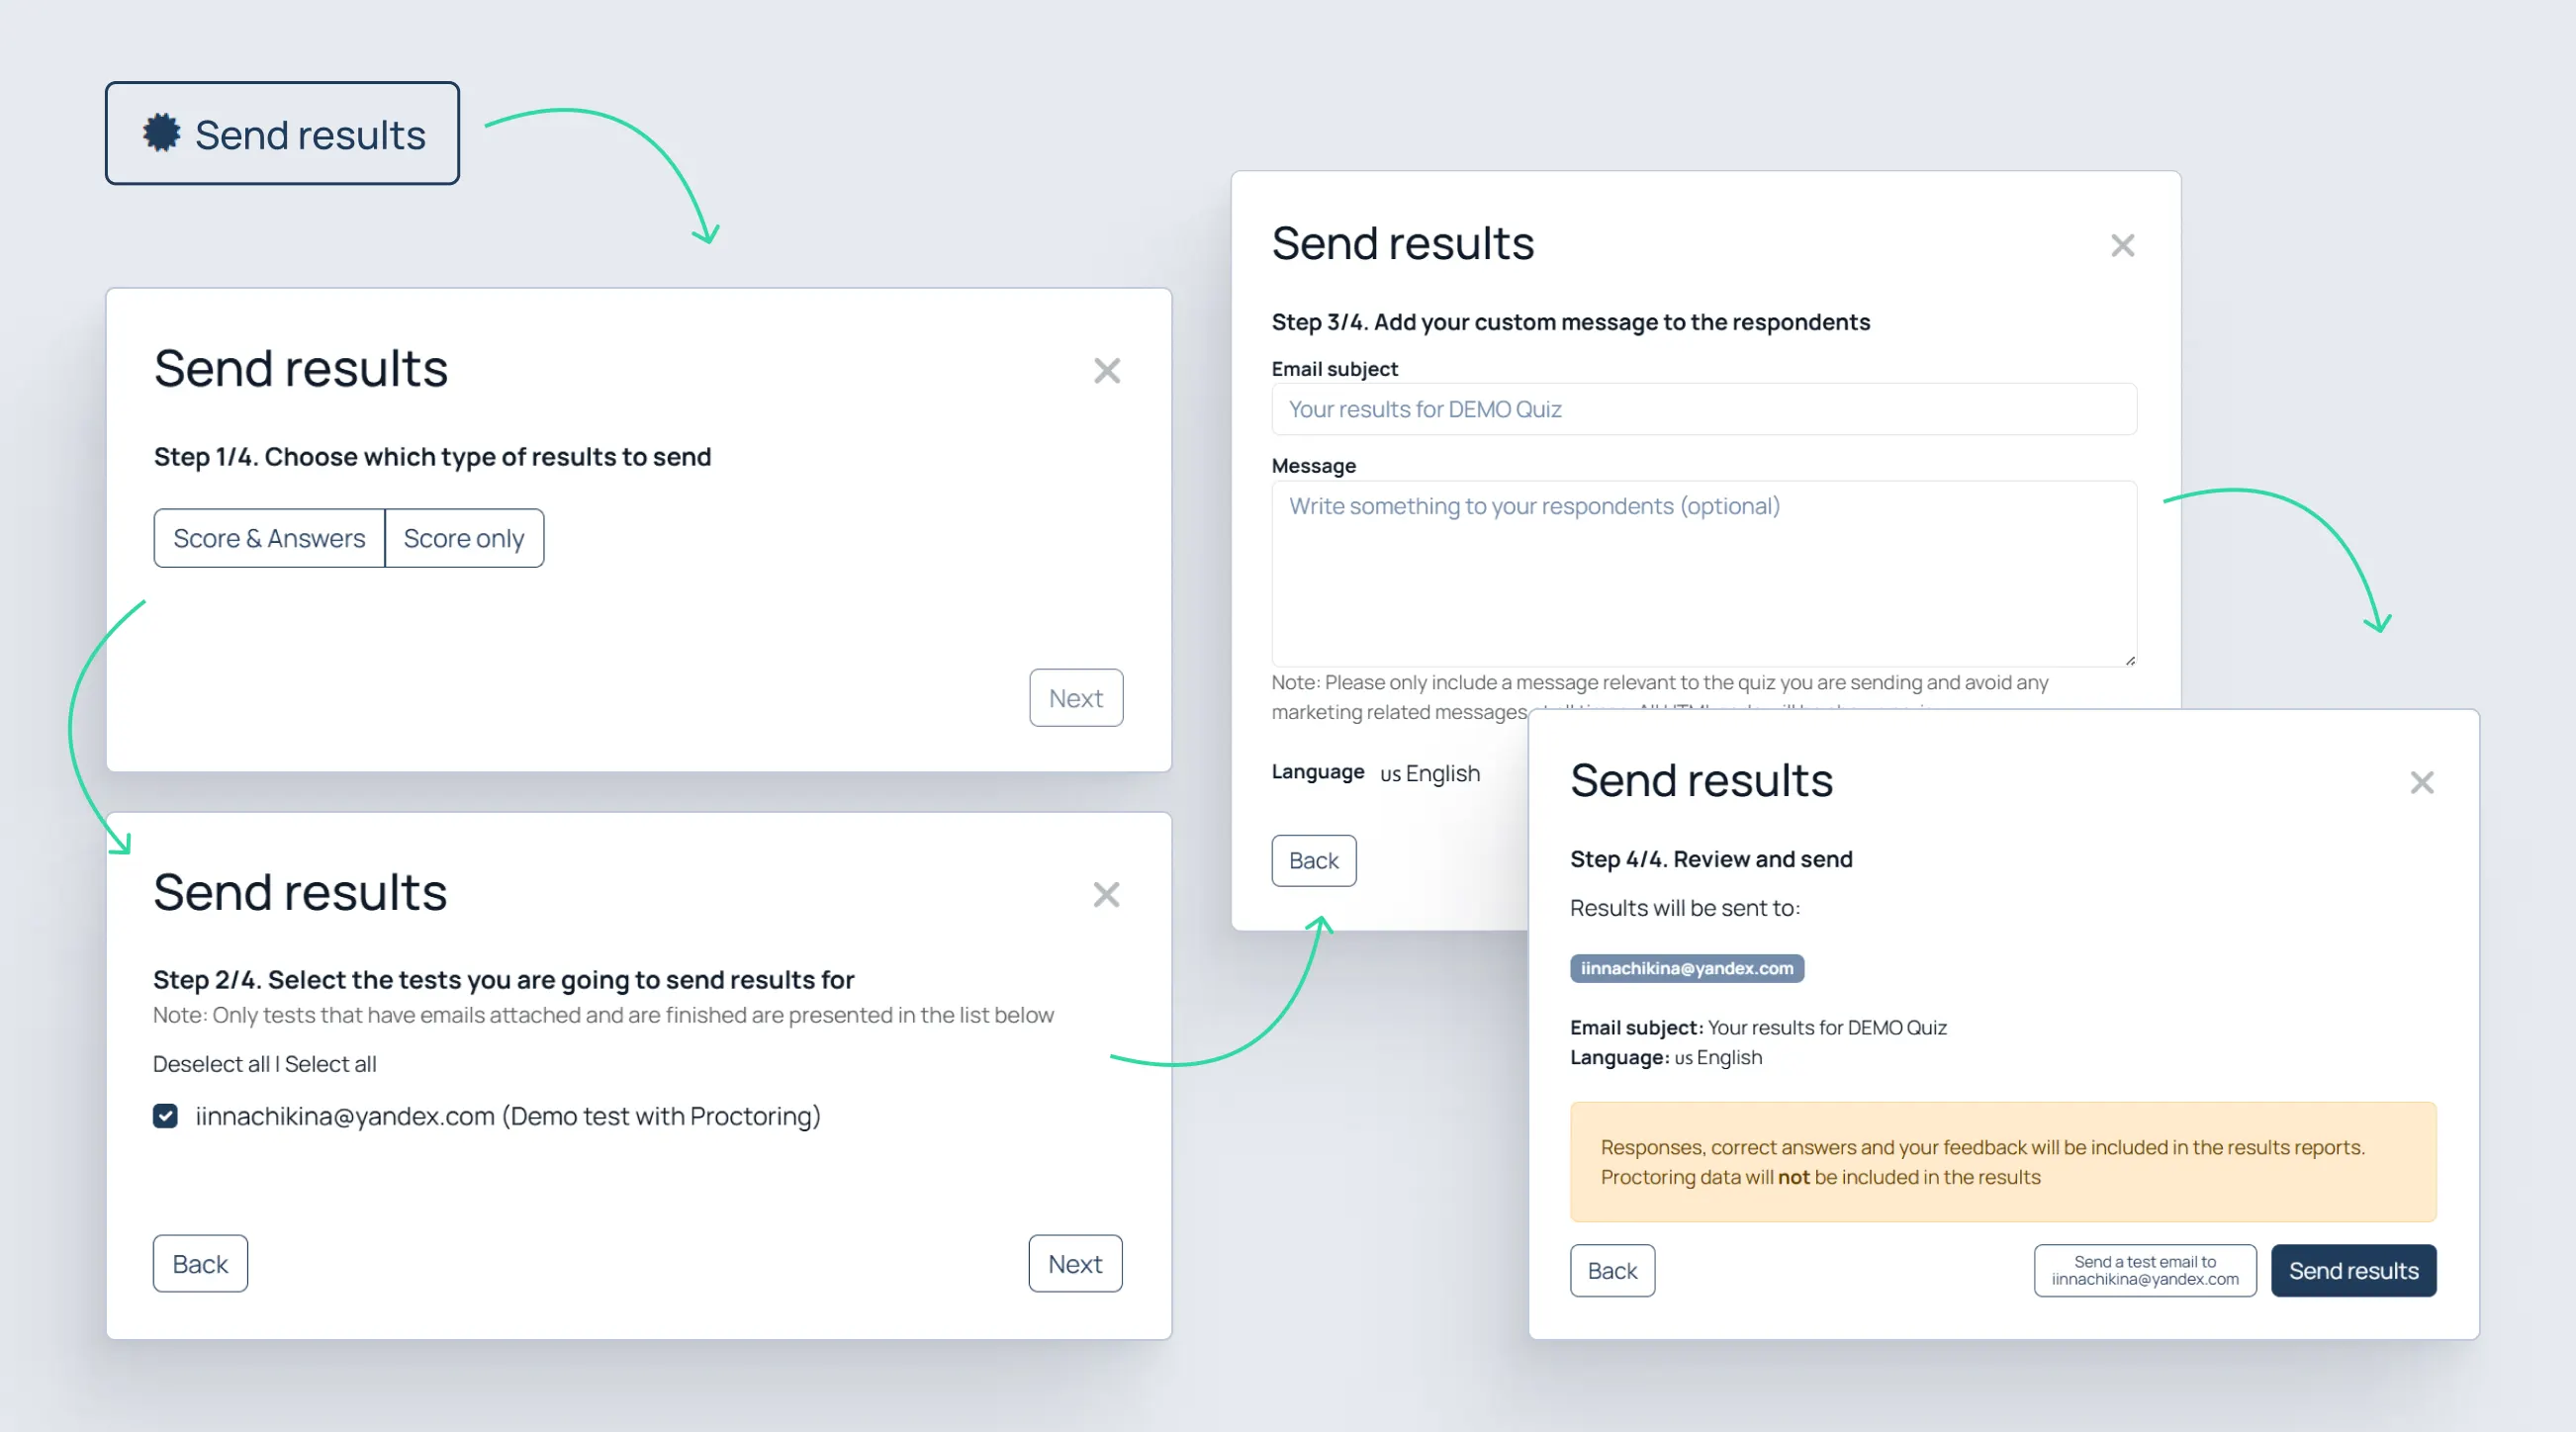
Send Results by Email

  1. Click “Send results”.

Choose result visibility

Select:

  • “Score & Answers”;
  • or “Score only”.

Select respondents

  1. Select finished tests;
  2. Click “Next”.

Customize the email

  1. Enter the subject;
  2. Optionally enter a message;
  3. Choose the language.

Send results

  1. Review the settings;
  2. Click “Send results”.
Export and Reporting

Export Quiz Data

Exports are useful for institutions and organizations that need offline records, spreadsheet analysis, compliance archives, or internal reporting workflows.

To export data:

  1. Click “Export”.

The Excel export may include:

  • quiz structure;
  • settings;
  • timing;
  • answers;
  • scores;
  • proctoring data.

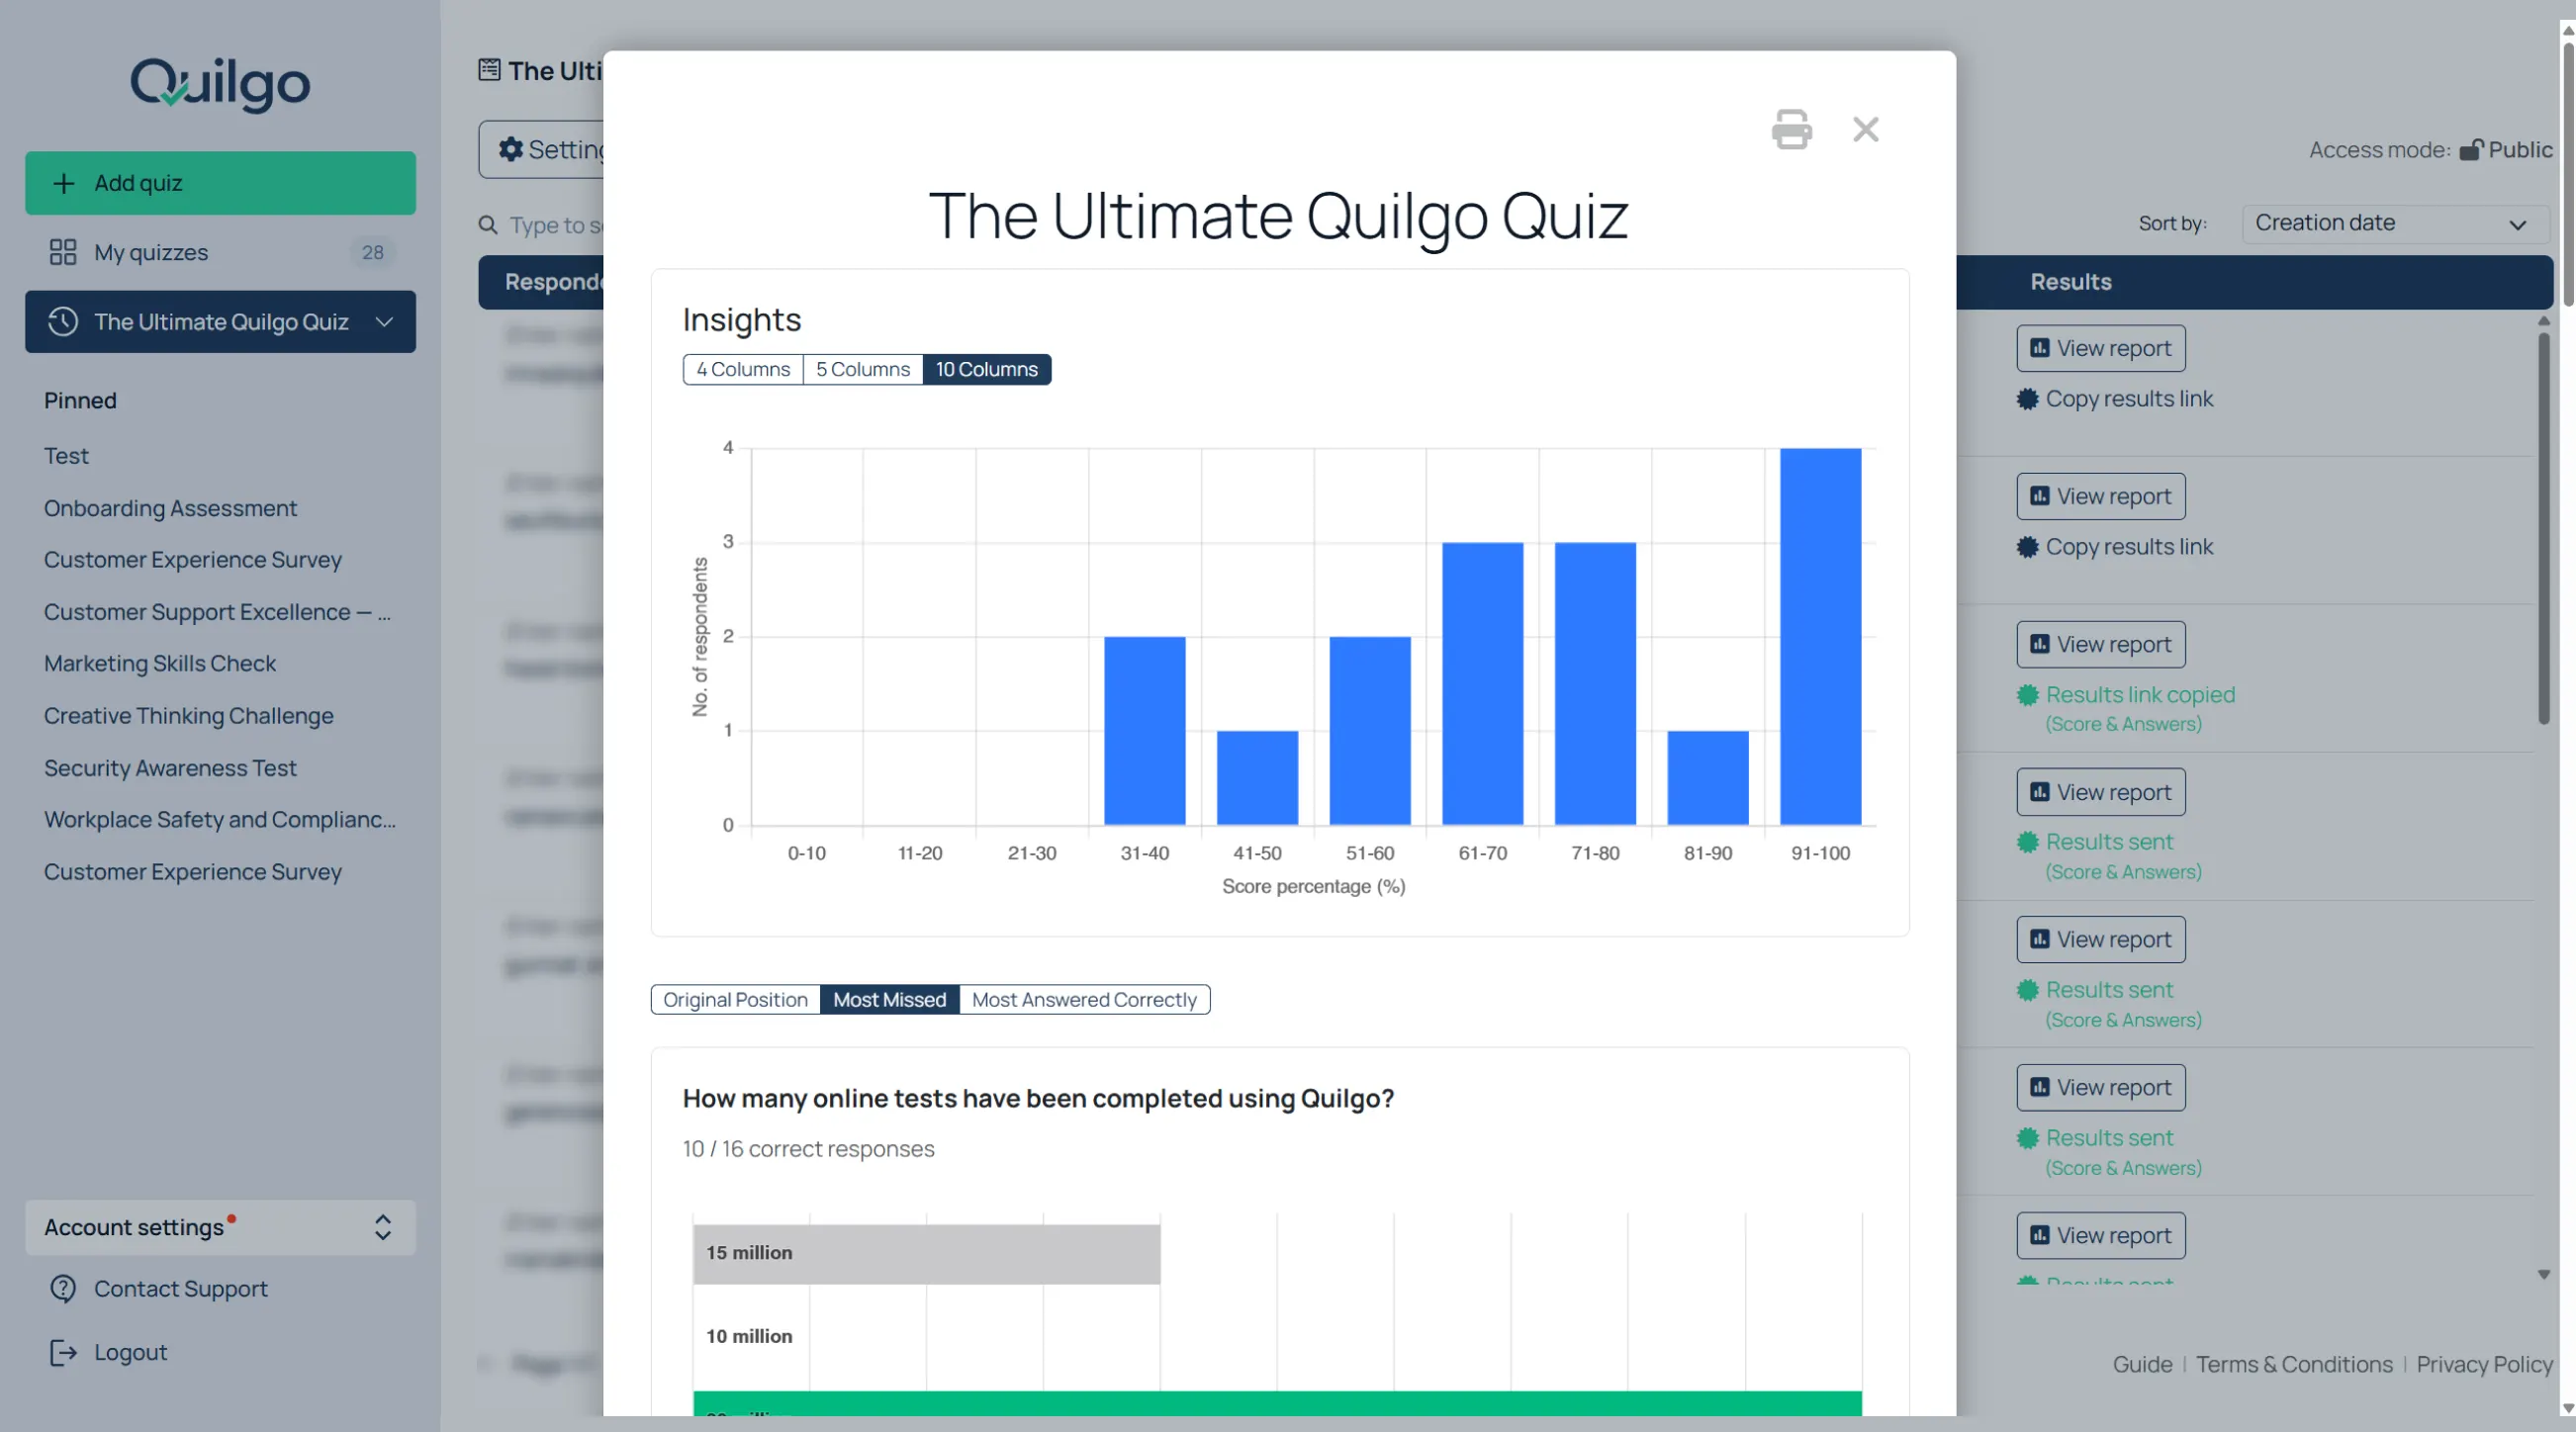
Open the Group Report

  1. Click “Report”.

Use the group report for:

  • score overviews;
  • question summaries;
  • quick cohort analysis.
Branding and Organization

Customize Quiz Branding

Branding allows the assessment experience to match your organization instead of looking like a generic third-party tool. This is especially useful for schools, universities, agencies, and recruitment workflows.

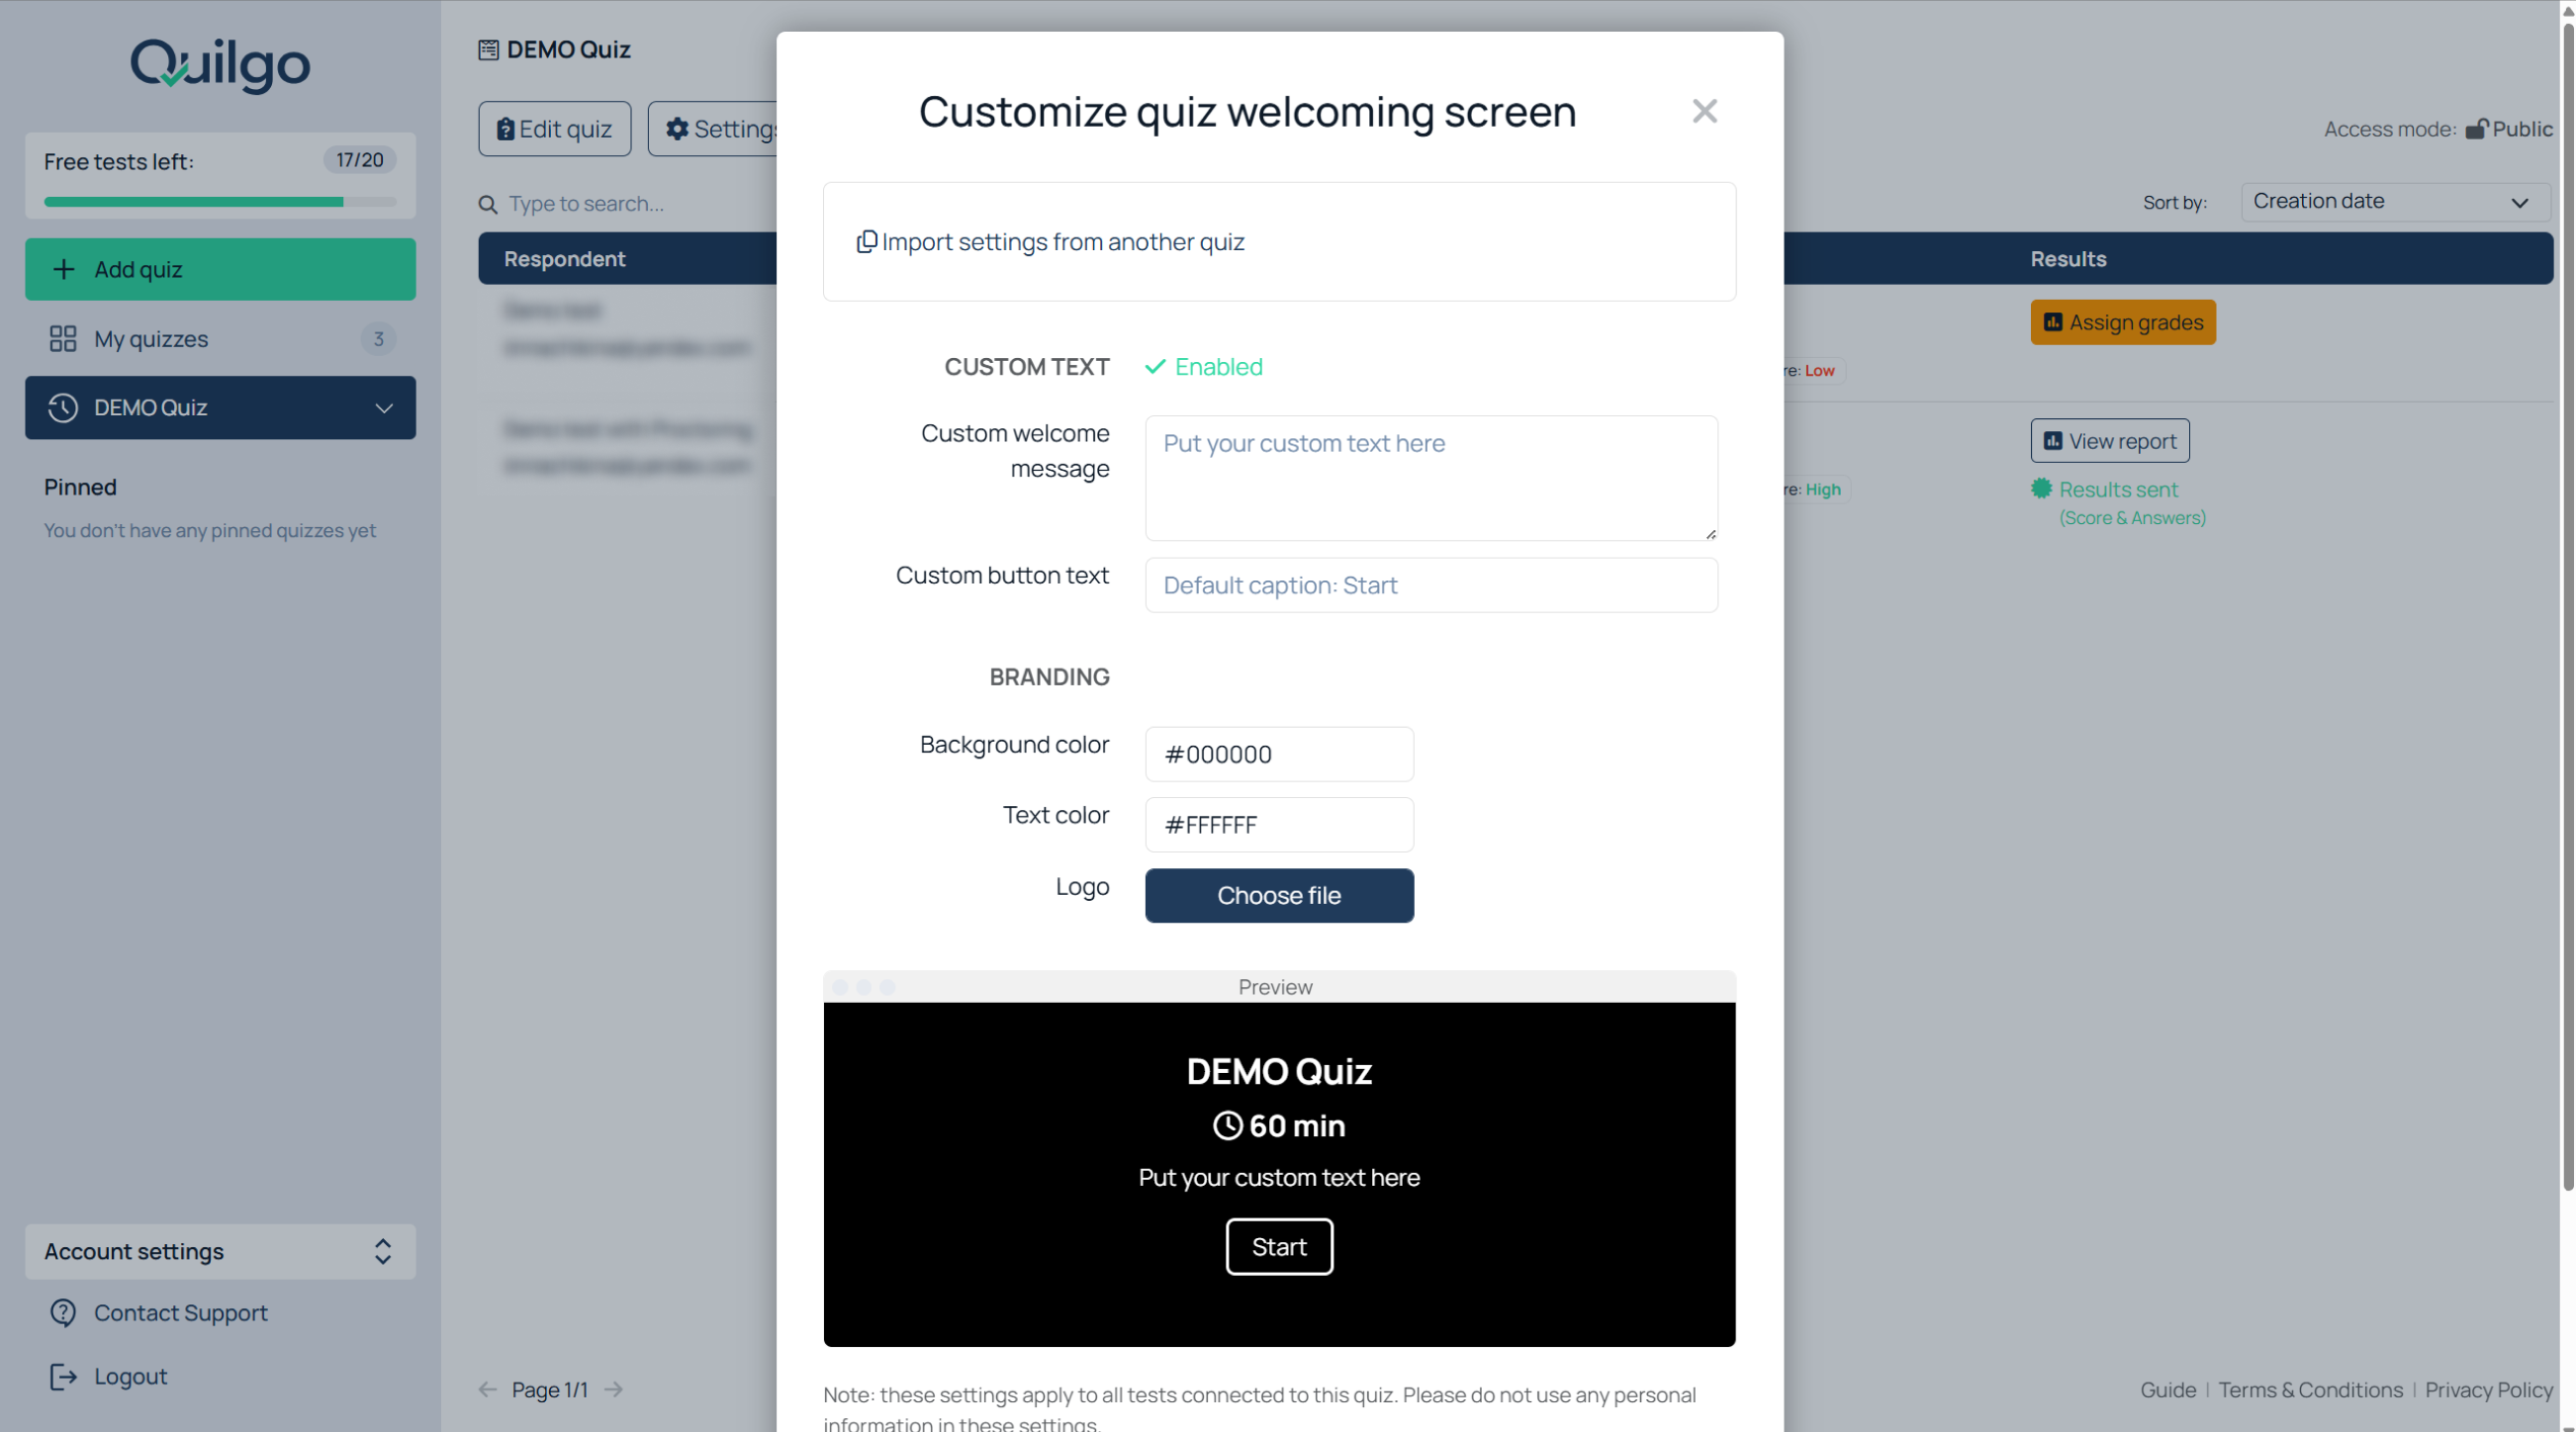
To customize the welcome screen:

  1. Click the dropdown next to the quiz title;
  2. Click “Branding”.

You can customize:

  • welcome message;
  • button text;
  • background color;
  • text color;
  • logo.

Upload a logo

  1. Click “Choose file”;
  2. Upload the logo.

Save branding settings

  1. Click “Save quiz settings”.

Organize Quizzes

Quiz organization tools help manage large numbers of assessments over time. This becomes especially important for recurring courses, hiring pipelines, certification programs, and reusable templates.

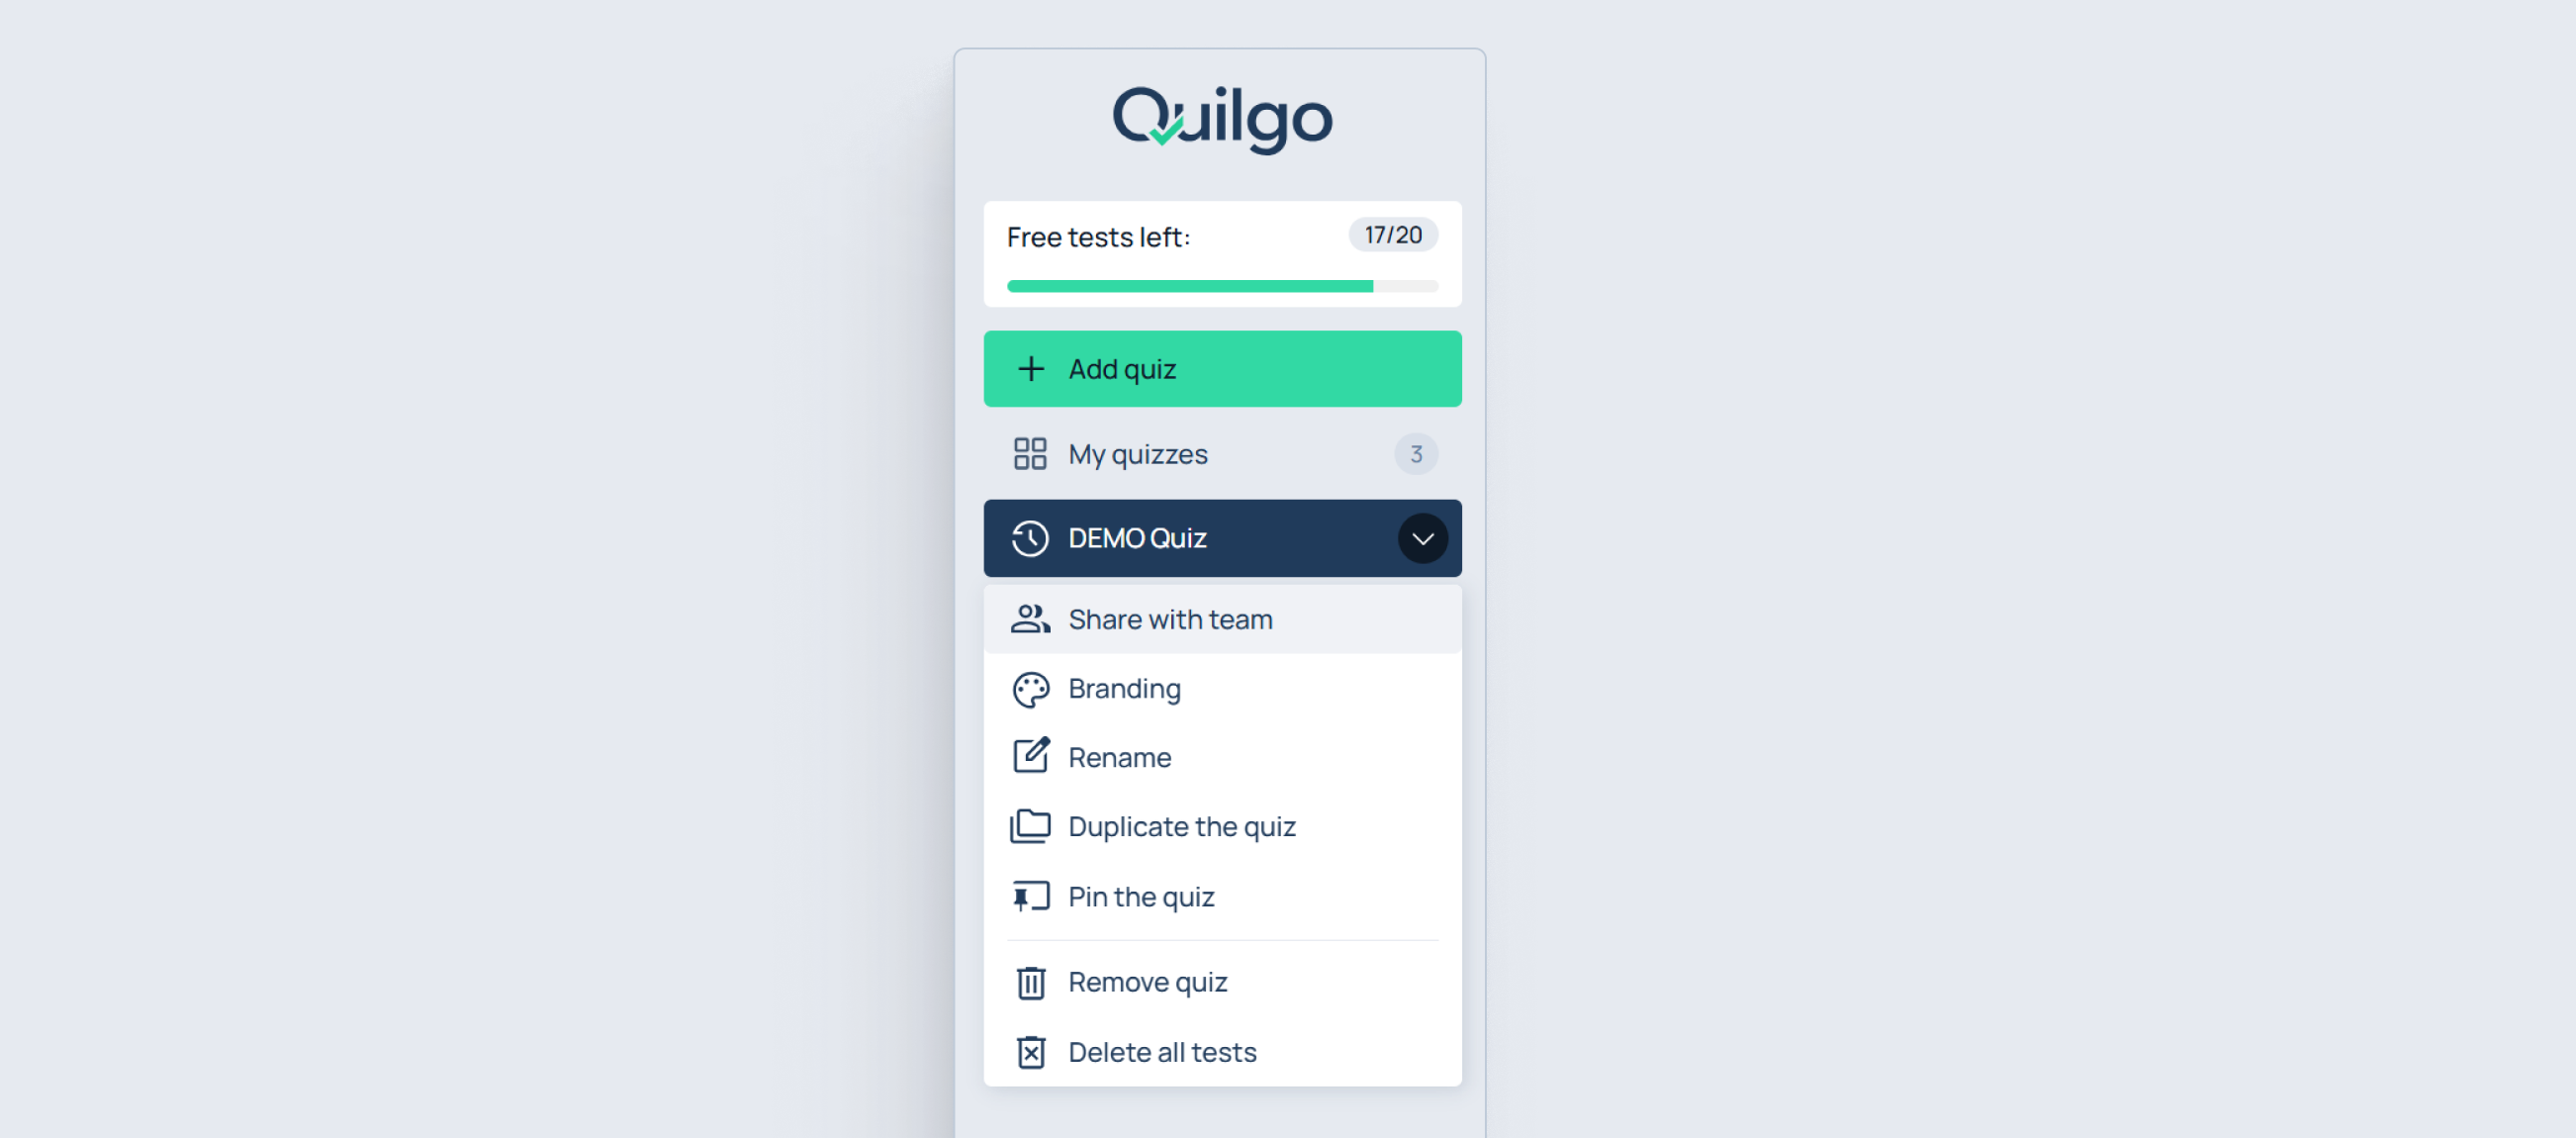
Open the quiz dropdown menu.

Available actions:

  • “Rename”;
  • “Duplicate the quiz”;
  • “Pin the quiz”;
  • “Remove quiz”;
  • “Delete all tests”.
Team Collaboration

Invite Team Members

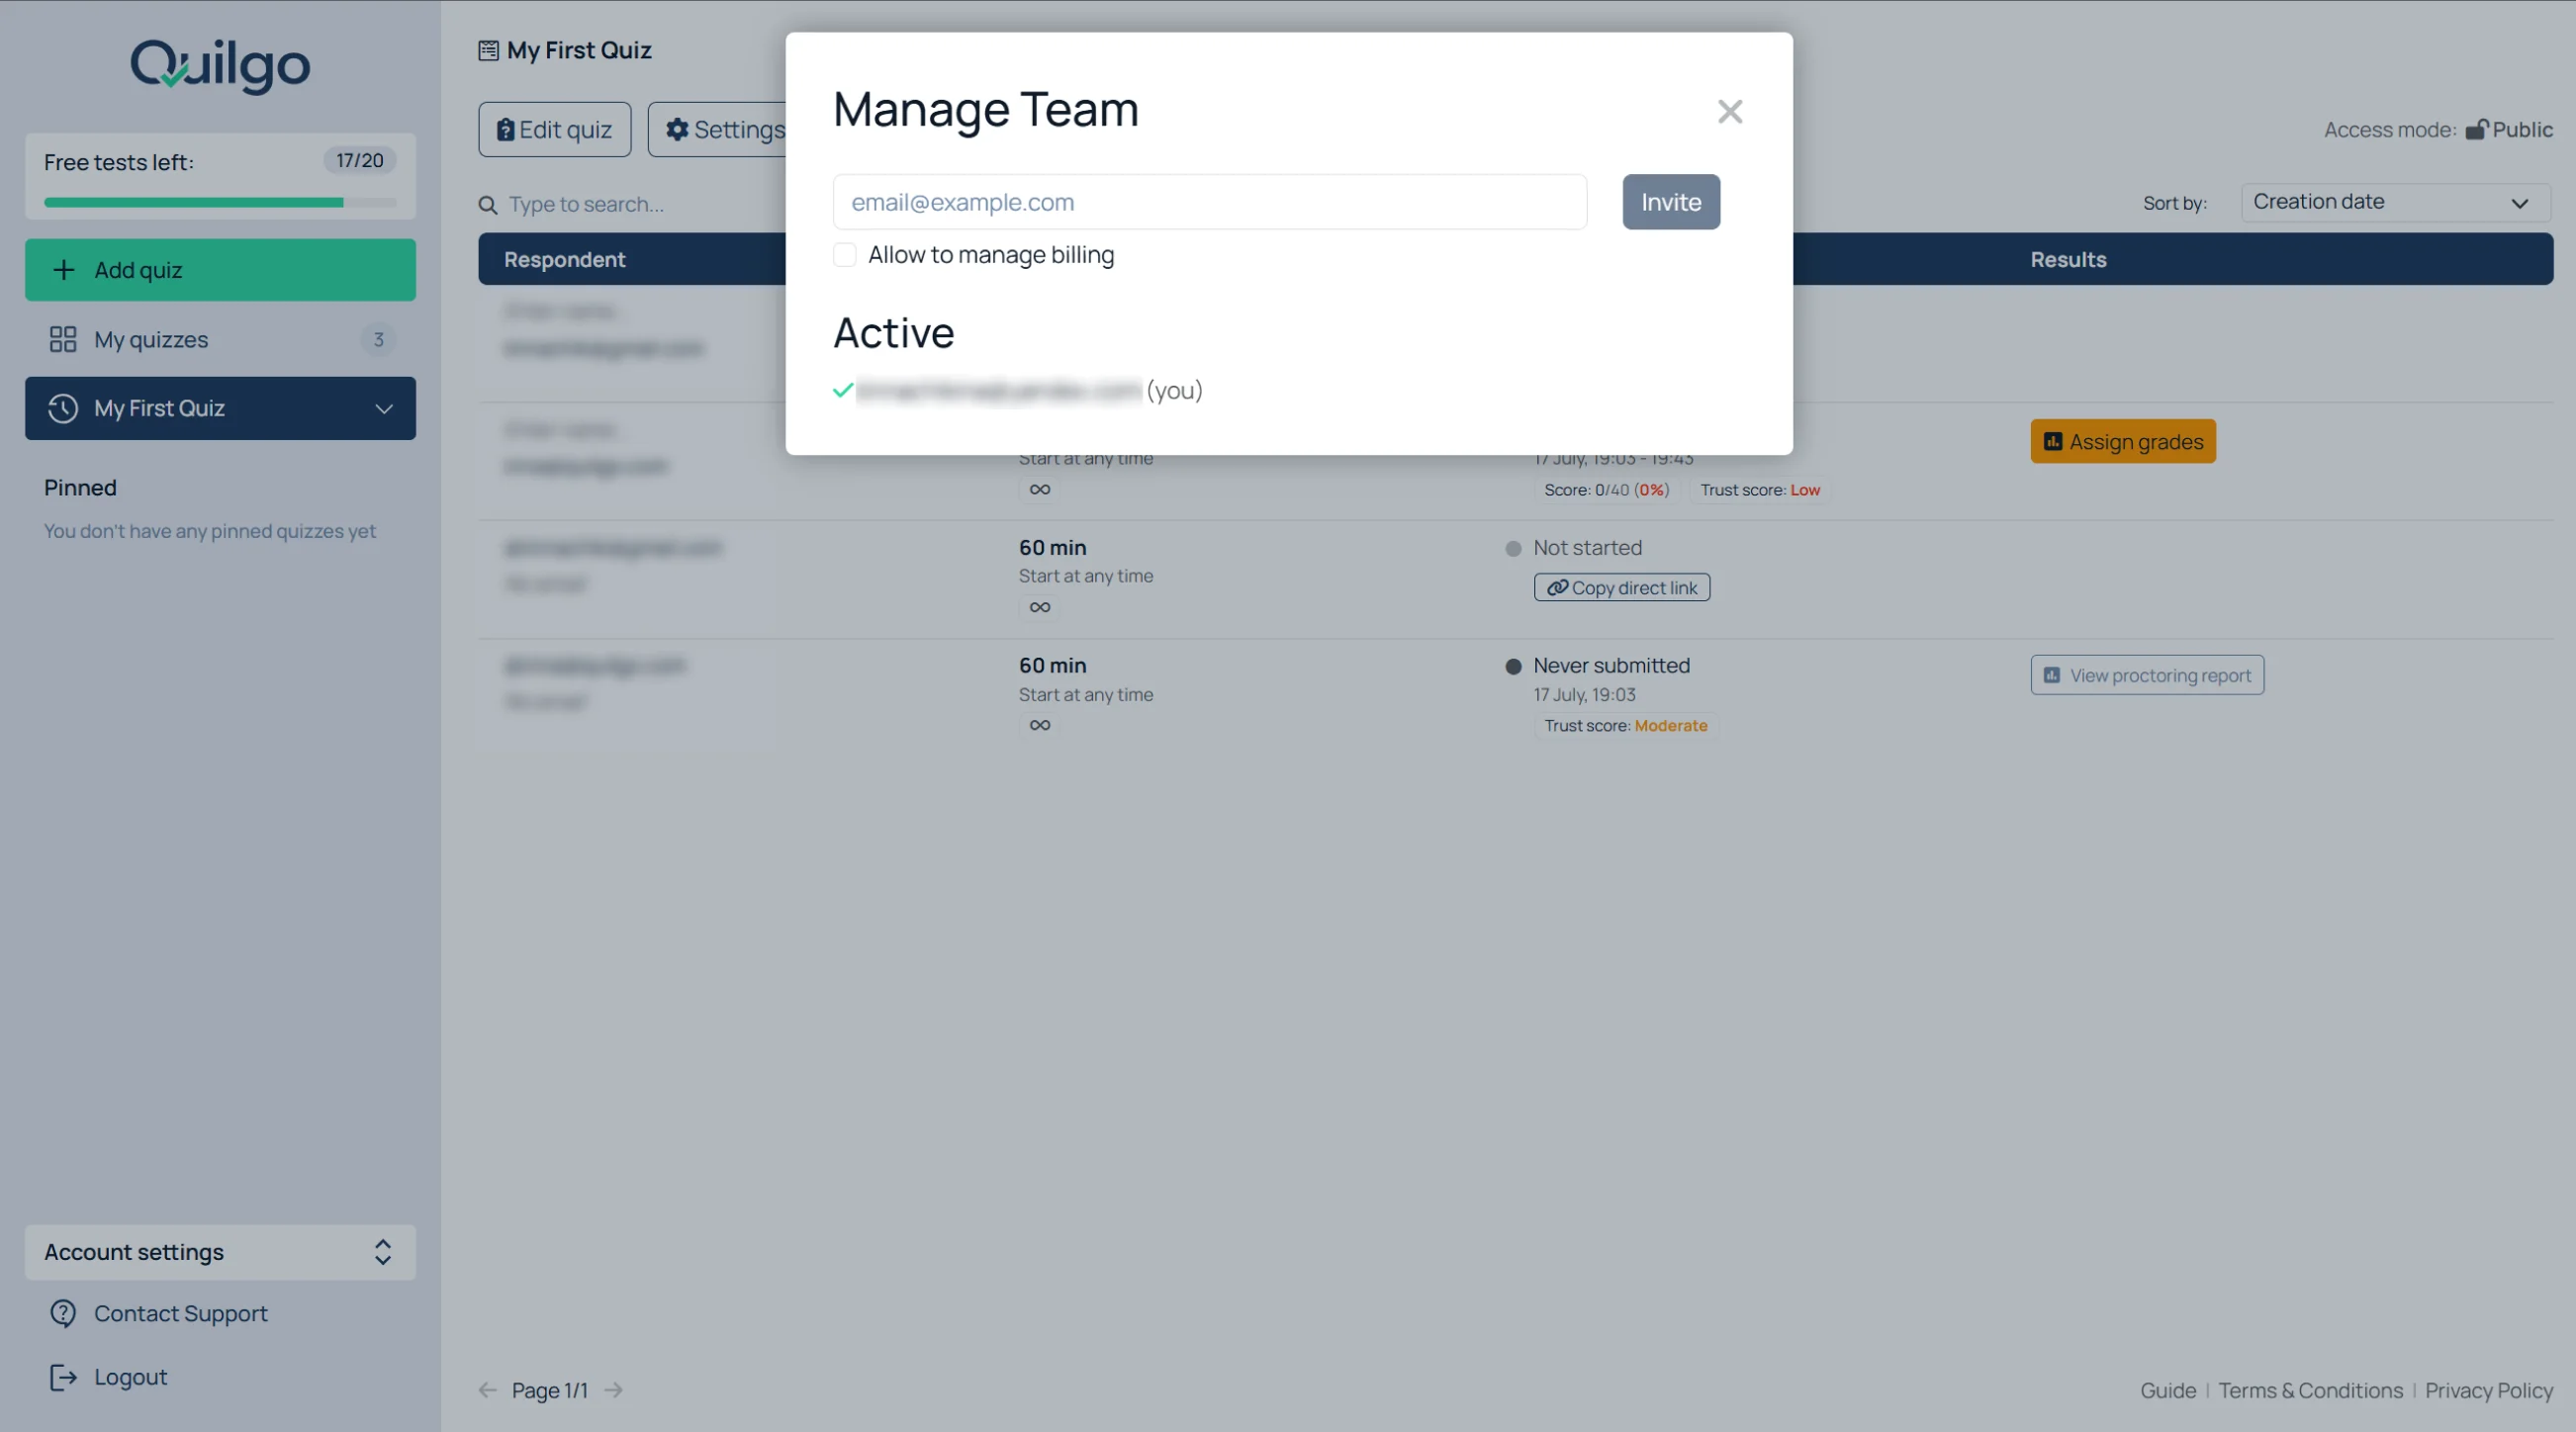
  1. Open “Account settings”;
  2. Click “Team”;
  3. Enter the email address;
  4. Decide whether the user should manage billing;
  5. Click “Invite”.

Share a Quiz with Team Members

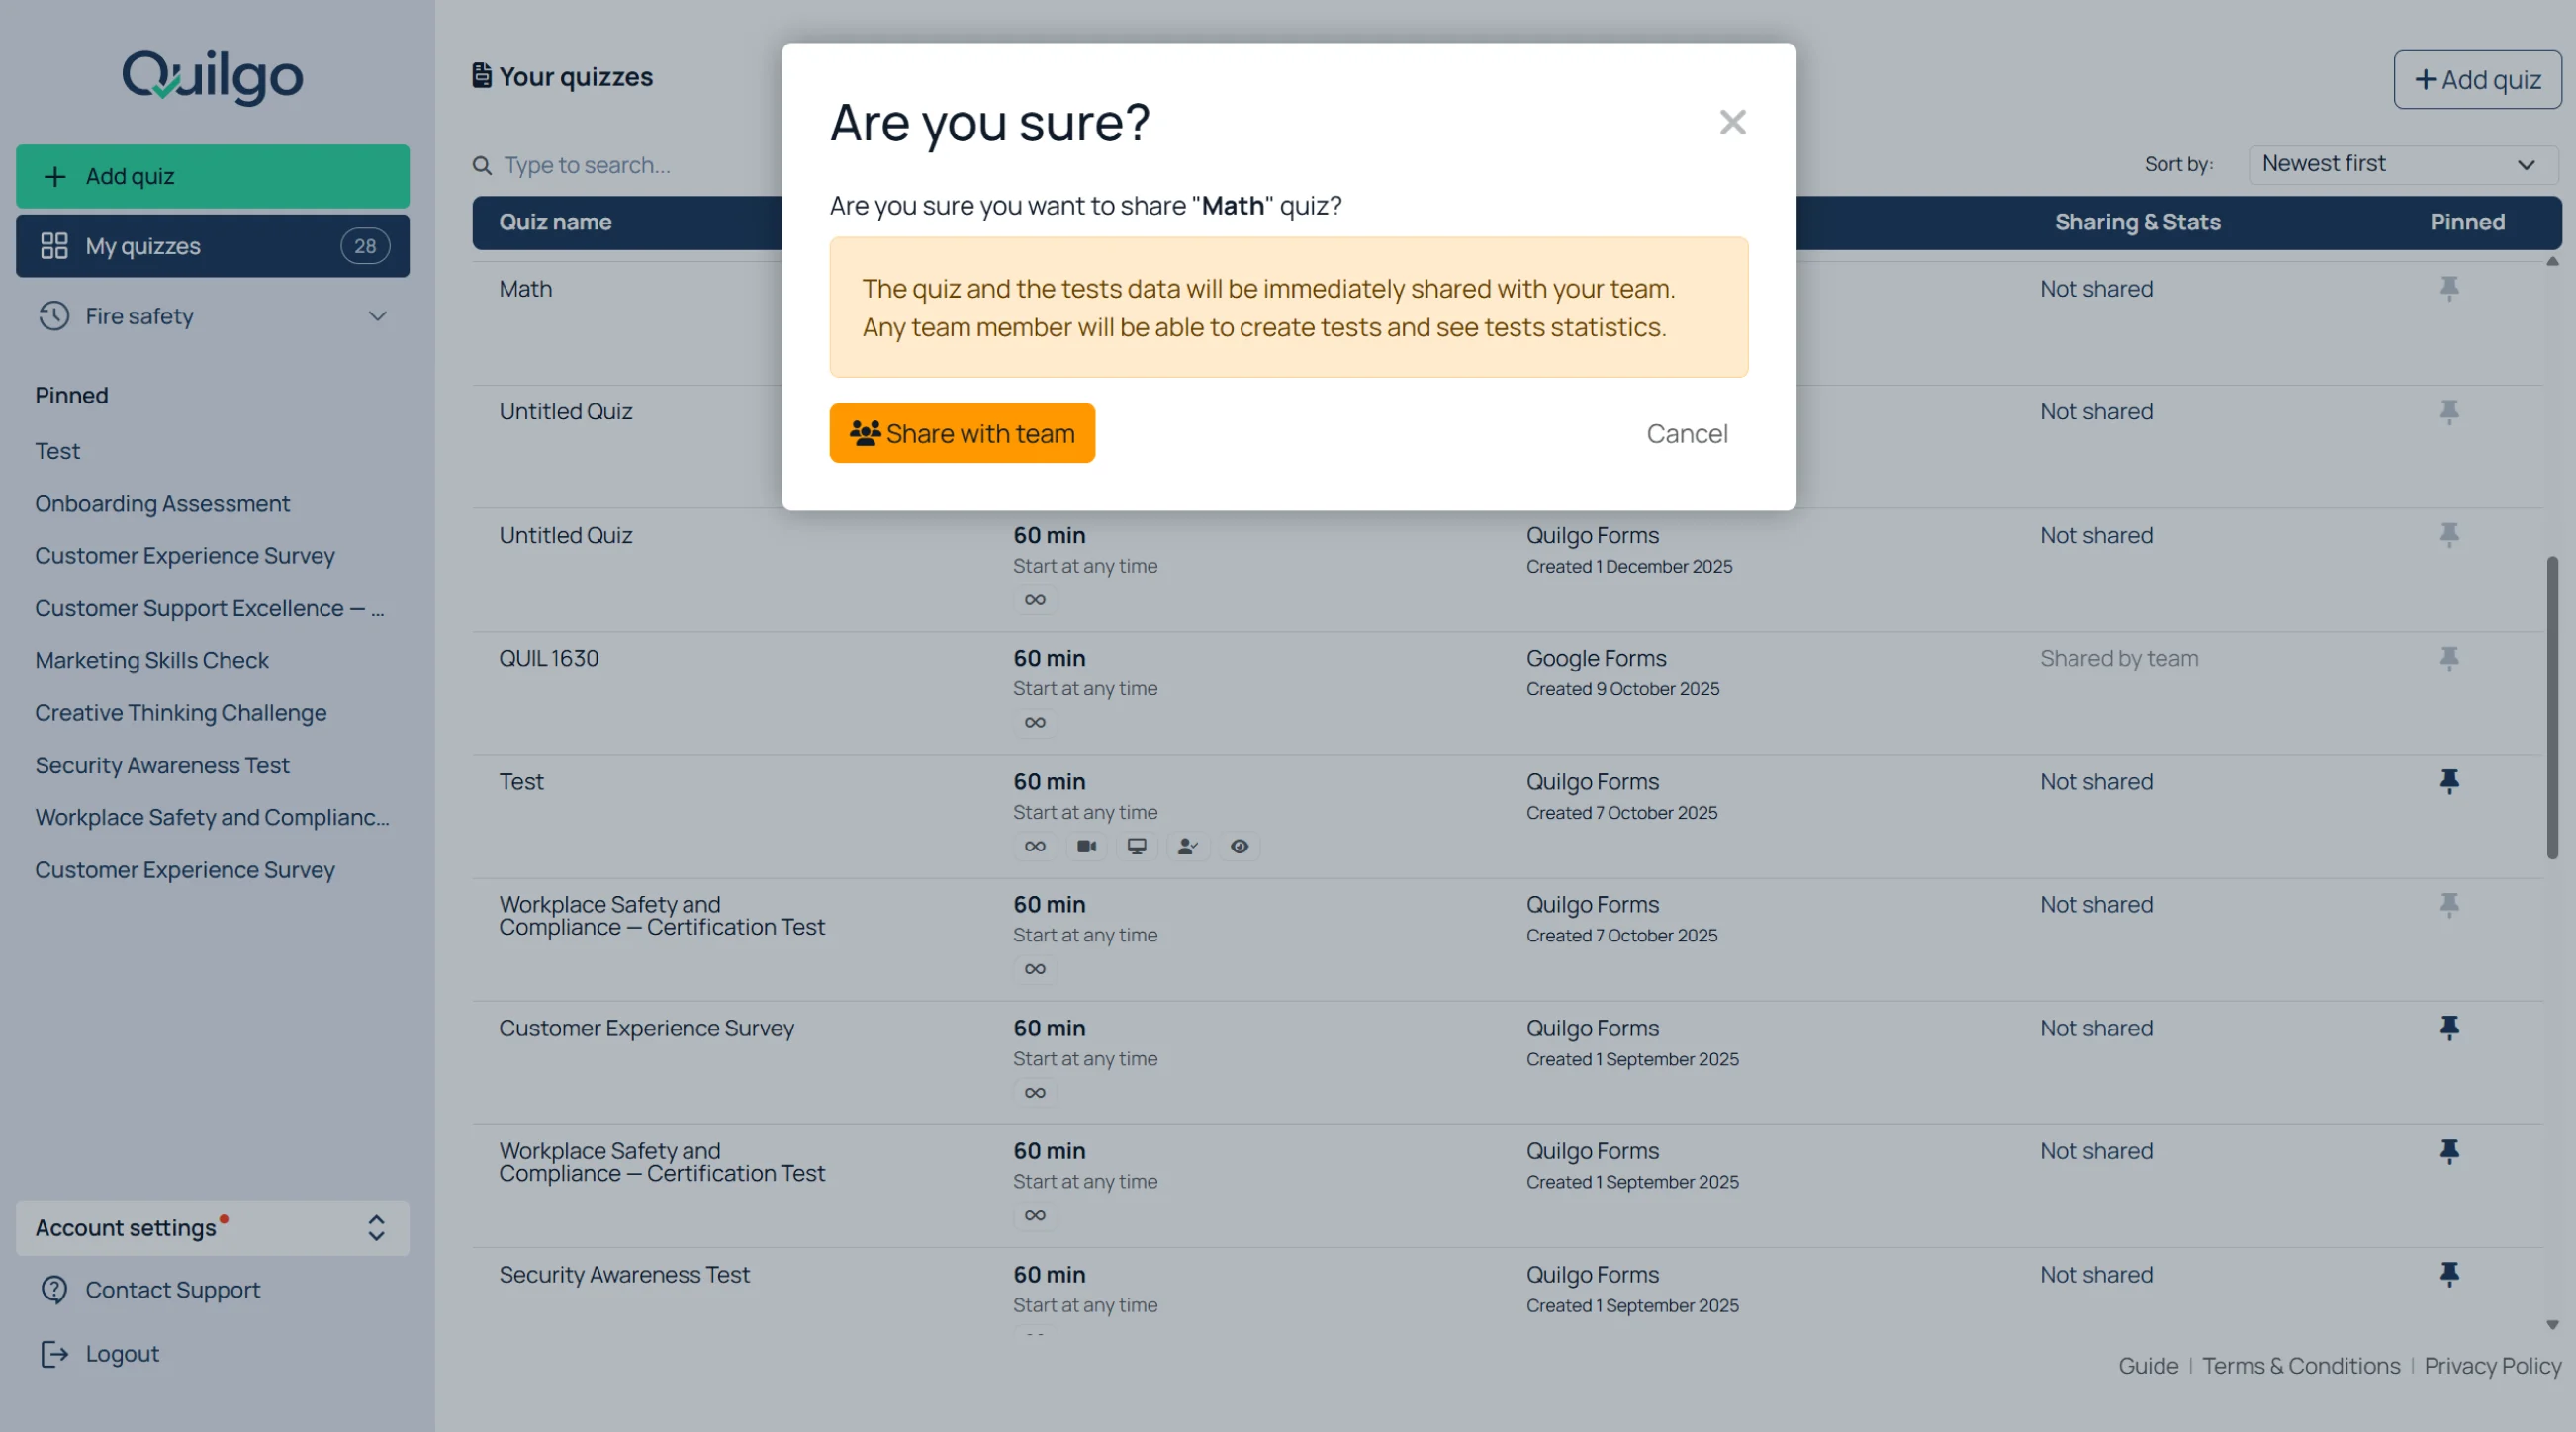
  1. Open the quiz dropdown menu;
  2. Click “Share with team”;
  3. Select team members.

Shared team members can:

  • review results;
  • open reports;
  • grade answers.

They cannot edit quiz content.

Integrations and automation

Quilgo works with several related products and integrations.

Google Forms™ Add-on

You can import existing Google Forms™ into Quilgo or use Google Forms™ as a quiz engine in Quilgo Platform. This is useful if you already have quizzes in Google Forms™ and want to add Quilgo's timing, delivery, reporting, and proctoring features.

See guide for Google Forms™ integration →

Google Classroom™ Add-on

Quilgo also has a Google Classroom Add-on. This is a separate product designed for Google Classroom workflows, including Classroom-based delivery and grade synchronization.

See guide for Google Classroom™ integration →

Moodle Plugin

The Moodle plugin is a separate product for Moodle-based institutions. It supports Moodle workflows and includes additional controls such as storage retention and storage location options.

See guide for Moodle™ integration →

Zapier

Zapier is Quilgo's main automation layer. You can use Zapier to connect Quilgo with tools such as:

  • Gmail,
  • Google Sheets,
  • Slack,
  • Microsoft Teams,
  • CRMs,
  • LMS tools,
  • email platforms,
  • SMS tools,
  • certificate tools,
  • reporting systems.

Zapier can help automate reminders, notifications, result workflows, exports, and follow-ups.

Watch the video →

Read the article →

Getting Started

Explore the Demo Quiz

When you create a new Quilgo account, the dashboard already contains a “DEMO Quiz”.

The demo quiz helps you understand both the standard respondent experience and the proctored workflow.

Take a regular demo test

  1. Open the “DEMO Quiz”;
  2. Click “Take a demo test”;
  3. Complete the test as a respondent;
  4. Return to the dashboard and review the generated result.

Take a proctored demo test

  1. Open the “DEMO Quiz”;
  2. Click “Take a proctored demo test”;
  3. Allow camera and screen access when asked;
  4. Complete the test;
  5. Open the generated report.

Use the proctored demo to understand:

  • camera tracking;
  • screen tracking;
  • snapshots;
  • suspicious activity detection;
  • trust score reports.

Create a Quiz

Start a New Quiz

To create a new quiz:

  1. Click “+ Add quiz” in the left sidebar;
  2. Choose how you want to create the quiz.

The main creation methods are:

  • “Build a new quiz”;
  • “Import from a document”.

For a new manual quiz:

  1. Click “Build a new quiz”;
  2. Enter the quiz title;
  3. Click “Start building your quiz”.

Build Questions

Choose a Question Type

After entering the quiz title, Quilgo asks you to choose the first question type.

Supported question types:

  • “Multiple Choice”;
  • “Checkboxes”;
  • “Dropdown”;
  • “Short Answer”;
  • “Paragraph”;
  • “Section break”.

Additional actions:

  • “Import Questions”;
  • “Generate questions”.

Create Choice-Based Questions

Add the question text

  1. Click inside the “Question” field;
  2. Enter the question.

Add answer options

  1. Click “Add option”;
  2. Enter the option text;
  3. Repeat for additional options.

Mark correct answers

  1. Find the correct option;
  2. Click the checkmark next to it.

→ For “Multiple Choice” and “Dropdown”, select one correct answer.

→ For “Checkboxes”, select multiple correct answers if needed.

Shuffle answer options

  1. Click the shuffle icon inside the question;
  2. Leave it enabled if respondents should see options in a different order.

Add Images or Audio

To attach media:

  1. Click the attachment icon inside the question;
  2. Choose “Image” or “Audio”;
  3. Upload the file.

Configure Scoring

Scoring settings help control how respondents are evaluated. Use them to reward correct answers, allow partial credit, or discourage random guessing on exams and certifications.

Question scoring is configured directly inside each question.

Available scoring settings:

  • “Score”;
  • “Partial score”;
  • “Negative score”.

Set the main score

The “Score” input is enabled and expanded by default.

  1. Enter the number of points in the “Score” input.

If you do not want the question to be graded:

  1. Click the “Score” label to collapse or disable scoring for that question.

Enable partial score

Partial scoring is useful when a respondent gives a partially correct answer. This is especially valuable for checkbox questions where respondents may correctly identify some answers but miss others.

  1. Click “Partial score”;
  2. Enter the value.

Enable negative score

“Negative score” is disabled by default.

  1. Click “Negative score” to expand the setting;
  2. Enter the penalty value.

Negative scoring discourages guessing by subtracting points for incorrect answers. This is commonly used in exams and certifications where random guessing should reduce the final score.

Add Descriptions and Explanations

To add extra instructional text:

  1. Click the three-dot menu on the question;
  2. Click “Add description” or “Add explanation”.

Descriptions appear during the test.

Explanations appear later in reports or results.

Create Short Answer Questions

To configure accepted answers:

  1. Add a “Short Answer” question;
  2. Click “Add correct answer”;
  3. Enter accepted answers.

Example accepted answers:

  • dad;
  • daddy;
  • father.

Create Paragraph Questions

Use “Paragraph” for essays, written explanations, and manually graded answers.

Organize Large Quizzes

Use Sections

To add a section:

  1. Click “+ Add question”;
  2. Choose “Section break”;
  3. Enter the section title.

Use sections for:

  • chapters;
  • topics;
  • theory blocks;
  • practical tasks;
  • reading passages.

Add Section Content

Sections can contain:

  • descriptions;
  • images;
  • audio.

To add them:

  1. Click the section menu or attachment icon;
  2. Choose the content type;
  3. Upload or enter the content.

Shuffle Questions Inside a Section

To randomize question order:

  1. Click the shuffle icon on the section;
  2. Leave it enabled.

Use Question Pools

Question pools help generate different versions of the same assessment automatically. This reduces answer sharing and makes repeated testing more secure.

To randomly select questions from a section:

  1. Add many questions to the section;
  2. Open the random selection setting;
  3. Enter how many questions should be selected.

Example:

  • Add 100 questions;
  • Randomly select 10.

Each respondent receives a different subset.

Save and Configure the Quiz

Save the Quiz

Saving the quiz creates the initial delivery link and stores all question settings; scoring rules; and quiz structure.

When the quiz is ready:

  1. Click “Save changes”.

Quilgo automatically creates a ready-to-use quiz link.

Configure Test Delivery

Open Quiz Settings

To configure test behavior:

  1. Click “Settings” from the dashboard;
  2. Or click “Change settings” from the link screen.

This opens “Tests default settings”.

Configure Timing

Set the start time

  1. Find “Choose the start time for your tests”;
  2. Select “Any time” or “Start at or after”;
  3. Choose the date and time if scheduling is enabled.

Set the duration

  1. Find “Choose the duration of the tests”;
  2. Enter the number of minutes.

Set the hard deadline

  1. Find “Choose the submission hard deadline”;
  2. Select “No deadline” or “Submit by”;
  3. Choose the date and time.

Configure Access Modes

Use Public Mode

Public mode is designed for self-registration workflows. Instead of manually creating respondents one by one, you can distribute one shared link and let respondents register themselves.

Public mode allows respondents to self-register using a shared link.

Restrict registrations to one domain

Domain restriction limits registrations to specific email domains, such as those of schools, universities, or companies. This helps prevent external users from registering for private assessments.

  1. Enable “Allow registration for a specific domain only”;
  2. Enter the allowed domain.

Allow one registration per email

This setting prevents respondents from repeatedly registering with the same email address. It is especially useful for graded quizzes, certifications, and controlled assessments.

  1. Enable “Allow to register only once with the same email address”.

Use both restrictions together

Use both settings for stricter classroom or university workflows.

Use Restricted Mode

Restricted mode is designed for controlled assessments where you already know exactly who should take the test. Instead of self-registration, respondents receive individually assigned tests.

Restricted mode creates individually assigned tests.

Add respondents manually

  1. Switch to “Restricted”;
  2. Paste or type names and emails;
  3. Press Enter to separate entries.

Accepted formats:

  • John Snow;
  • john@example.com;
  • John Snow john@example.com.

Import respondents from another quiz

  1. Click “Import respondents from another quiz”;
  2. Choose the source quiz.

Connect Google Classroom

  1. Click “Connect your Google Classroom”;
  2. Import students.

Configure Proctoring

Enable Camera Tracking

Camera Tracking adds webcam monitoring to the assessment workflow. Quilgo captures snapshots during the session and includes them in reports for later review.

  1. Enable “Camera Tracking”.

Enable Screen Tracking

Screen Tracking captures snapshots of the respondent’s shared screen during the assessment. Use it when you need stronger evidence of integrity or want to review on-screen activity during the test.

  1. Enable “Screen Tracking”.

Enable Force Tracking

Force Tracking ensures that tracking remains active throughout the test session. This is useful for high-control exams and certification-style assessments.

  1. Enable “Force tracking”.

Configure Overtime and Auto-Submit

Allow overtime

  1. Enable “Allow overtime” if respondents may continue after the timer ends.

Auto-submit answers when time is over

  1. Enable “Auto-submit answers when time over” if Quilgo should submit the test automatically.

Show score after submission

  1. Enable “Show score after submission” if respondents should see their score immediately after submission.

Save settings

  1. Click “Save settings”.

Send and Deliver Tests

Share the Group Link

The group link is the main entry point respondents use to access the assessment. Its behavior changes depending on whether the quiz uses Public or Restricted mode.

To open the delivery window:

  1. Click “Send tests”.

Public mode behavior

In Public mode, the group link is used for self-registration.

Restricted mode behavior

In Restricted mode, the group link is used for authentication.

Send Tests by Email

To send invitations:

  1. Click “Send tests”;
  2. Click “Send tests directly via email”.

Select respondents

  1. Select the respondents;
  2. Click “Next”.

Configure the email

  1. Enter the subject;
  2. Optionally enter a message;
  3. Choose the language;
  4. Click “Next”.

Review and send

  1. Review the settings;
  2. Optionally click “Send a test email”;
  3. Click “Send tests”.

Respondent Experience

Open the Group Link

Respondents may:

  1. Enter their email;
  2. Click “Confirm”;
  3. Or click “Sign in with Google”.

Start the Test

After authentication:

  1. Review the timing and instructions;
  2. Click “Start Test”.

Grant Camera Access

  1. Click “Provide access to Camera”;
  2. Allow camera access in the browser.

Grant Screen Access

  1. Click “Provide access to screen”;
  2. Choose what to share;
  3. Click “Share”.

Confirm Tracking Preview

  1. Verify the webcam and screen previews;
  2. Click “All good, open the form”.

Complete the Test

During the test, respondents can:

  • move between questions;
  • move between sections;
  • continue after reconnecting;
  • rely on autosave.

Reports and Grading

Open an Individual Report

To open a report:

  1. Return to the dashboard;
  2. Find the respondent row;
  3. Click “View report”.

Reports may contain:

  • scores;
  • trust score;
  • timing;
  • suspicious activity;
  • answers;
  • snapshots.

Review Proctoring Records

Proctoring records connect suspicious activity indicators with actual respondent behavior and answers. This helps reviewers evaluate integrity issues in context instead of relying on isolated screenshots.

Inside the report, scroll to “Proctoring records”.

You may see:

  • webcam snapshots;
  • screen snapshots;
  • tab switching indicators;
  • suspicious events.

Save the Report as PDF

  1. Open the report;
  2. Use the browser print dialog;
  3. Save as PDF.

Assign Manual Grades

To manually grade Paragraph questions:

  1. Click “Assign grades”;
  2. Review the answer;
  3. Enter the score;
  4. Click “Grade”.

Share Results

Copy an Individual Results Link

  1. Find the respondent row;
  2. Click “Copy results link”;
  3. Send the link.

Send Results by Email

  1. Click “Send results”.

Choose result visibility

Select:

  • “Score & Answers”;
  • or “Score only”.

Select respondents

  1. Select finished tests;
  2. Click “Next”.

Customize the email

  1. Enter the subject;
  2. Optionally enter a message;
  3. Choose the language.

Send results

  1. Review the settings;
  2. Click “Send results”.

Export and Reporting

Export Quiz Data

Exports are useful for institutions and organizations that need offline records, spreadsheet analysis, compliance archives, or internal reporting workflows.

To export data:

  1. Click “Export”.

The Excel export may include:

  • quiz structure;
  • settings;
  • timing;
  • answers;
  • scores;
  • proctoring data.

Open the Group Report

  1. Click “Report”.

Use the group report for:

  • score overviews;
  • question summaries;
  • quick cohort analysis.

Branding and Organization

Customize Quiz Branding

Branding allows the assessment experience to match your organization instead of looking like a generic third-party tool. This is especially useful for schools, universities, agencies, and recruitment workflows.

To customize the welcome screen:

  1. Click the dropdown next to the quiz title;
  2. Click “Branding”.

You can customize:

  • welcome message;
  • button text;
  • background color;
  • text color;
  • logo.

Upload a logo

  1. Click “Choose file”;
  2. Upload the logo.

Save branding settings

  1. Click “Save quiz settings”.

Organize Quizzes

Quiz organization tools help manage large numbers of assessments over time. This becomes especially important for recurring courses, hiring pipelines, certification programs, and reusable templates.

Open the quiz dropdown menu.

Available actions:

  • “Rename”;
  • “Duplicate the quiz”;
  • “Pin the quiz”;
  • “Remove quiz”;
  • “Delete all tests”.

Team Collaboration

Invite Team Members

  1. Open “Account settings”;
  2. Click “Team”;
  3. Enter the email address;
  4. Decide whether the user should manage billing;
  5. Click “Invite”.

Share a Quiz with Team Members

  1. Open the quiz dropdown menu;
  2. Click “Share with team”;
  3. Select team members.

Shared team members can:

  • review results;
  • open reports;
  • grade answers.

They cannot edit quiz content.

Integrations and automation

Quilgo works with several related products and integrations.

Google Forms™ Add-on

You can import existing Google Forms™ into Quilgo or use Google Forms™ as a quiz engine in Quilgo Platform. This is useful if you already have quizzes in Google Forms™ and want to add Quilgo's timing, delivery, reporting, and proctoring features.

See guide for Google Forms™ integration →

Google Classroom™ Add-on

Quilgo also has a Google Classroom Add-on. This is a separate product designed for Google Classroom workflows, including Classroom-based delivery and grade synchronization.

See guide for Google Classroom™ integration →

Moodle Plugin

The Moodle plugin is a separate product for Moodle-based institutions. It supports Moodle workflows and includes additional controls such as storage retention and storage location options.

See guide for Moodle™ integration →

Zapier

Zapier is Quilgo's main automation layer. You can use Zapier to connect Quilgo with tools such as:

  • Gmail,
  • Google Sheets,
  • Slack,
  • Microsoft Teams,
  • CRMs,
  • LMS tools,
  • email platforms,
  • SMS tools,
  • certificate tools,
  • reporting systems.

Zapier can help automate reminders, notifications, result workflows, exports, and follow-ups.

Watch the video →

Read the article →

Recommended Workflows

Fast Training Quiz

Recommended setup:

  • Public mode;
  • no proctoring;
  • immediate score display.

Classroom Assessment

Recommended setup:

  • Public mode;
  • domain restriction enabled;
  • one registration per email enabled.

Recruitment Assessment

Recommended setup:

  • Restricted mode;
  • pre-created respondents;
  • direct email delivery.

Strict Online Exam

Recommended setup:

  • Restricted mode or strict Public mode;
  • scheduled start time;
  • duration;
  • submission deadline;
  • Camera Tracking;
  • Screen Tracking;
  • Force tracking.

Practice or Self-Learning Quiz

Recommended setup:

  • Public mode;
  • explanations enabled;
  • immediate score visibility.