Brought to you by
Native Platform Ltd
© 2017-2026
All rights reserved
Native Platform Ltd
© 2017-2026
All rights reserved
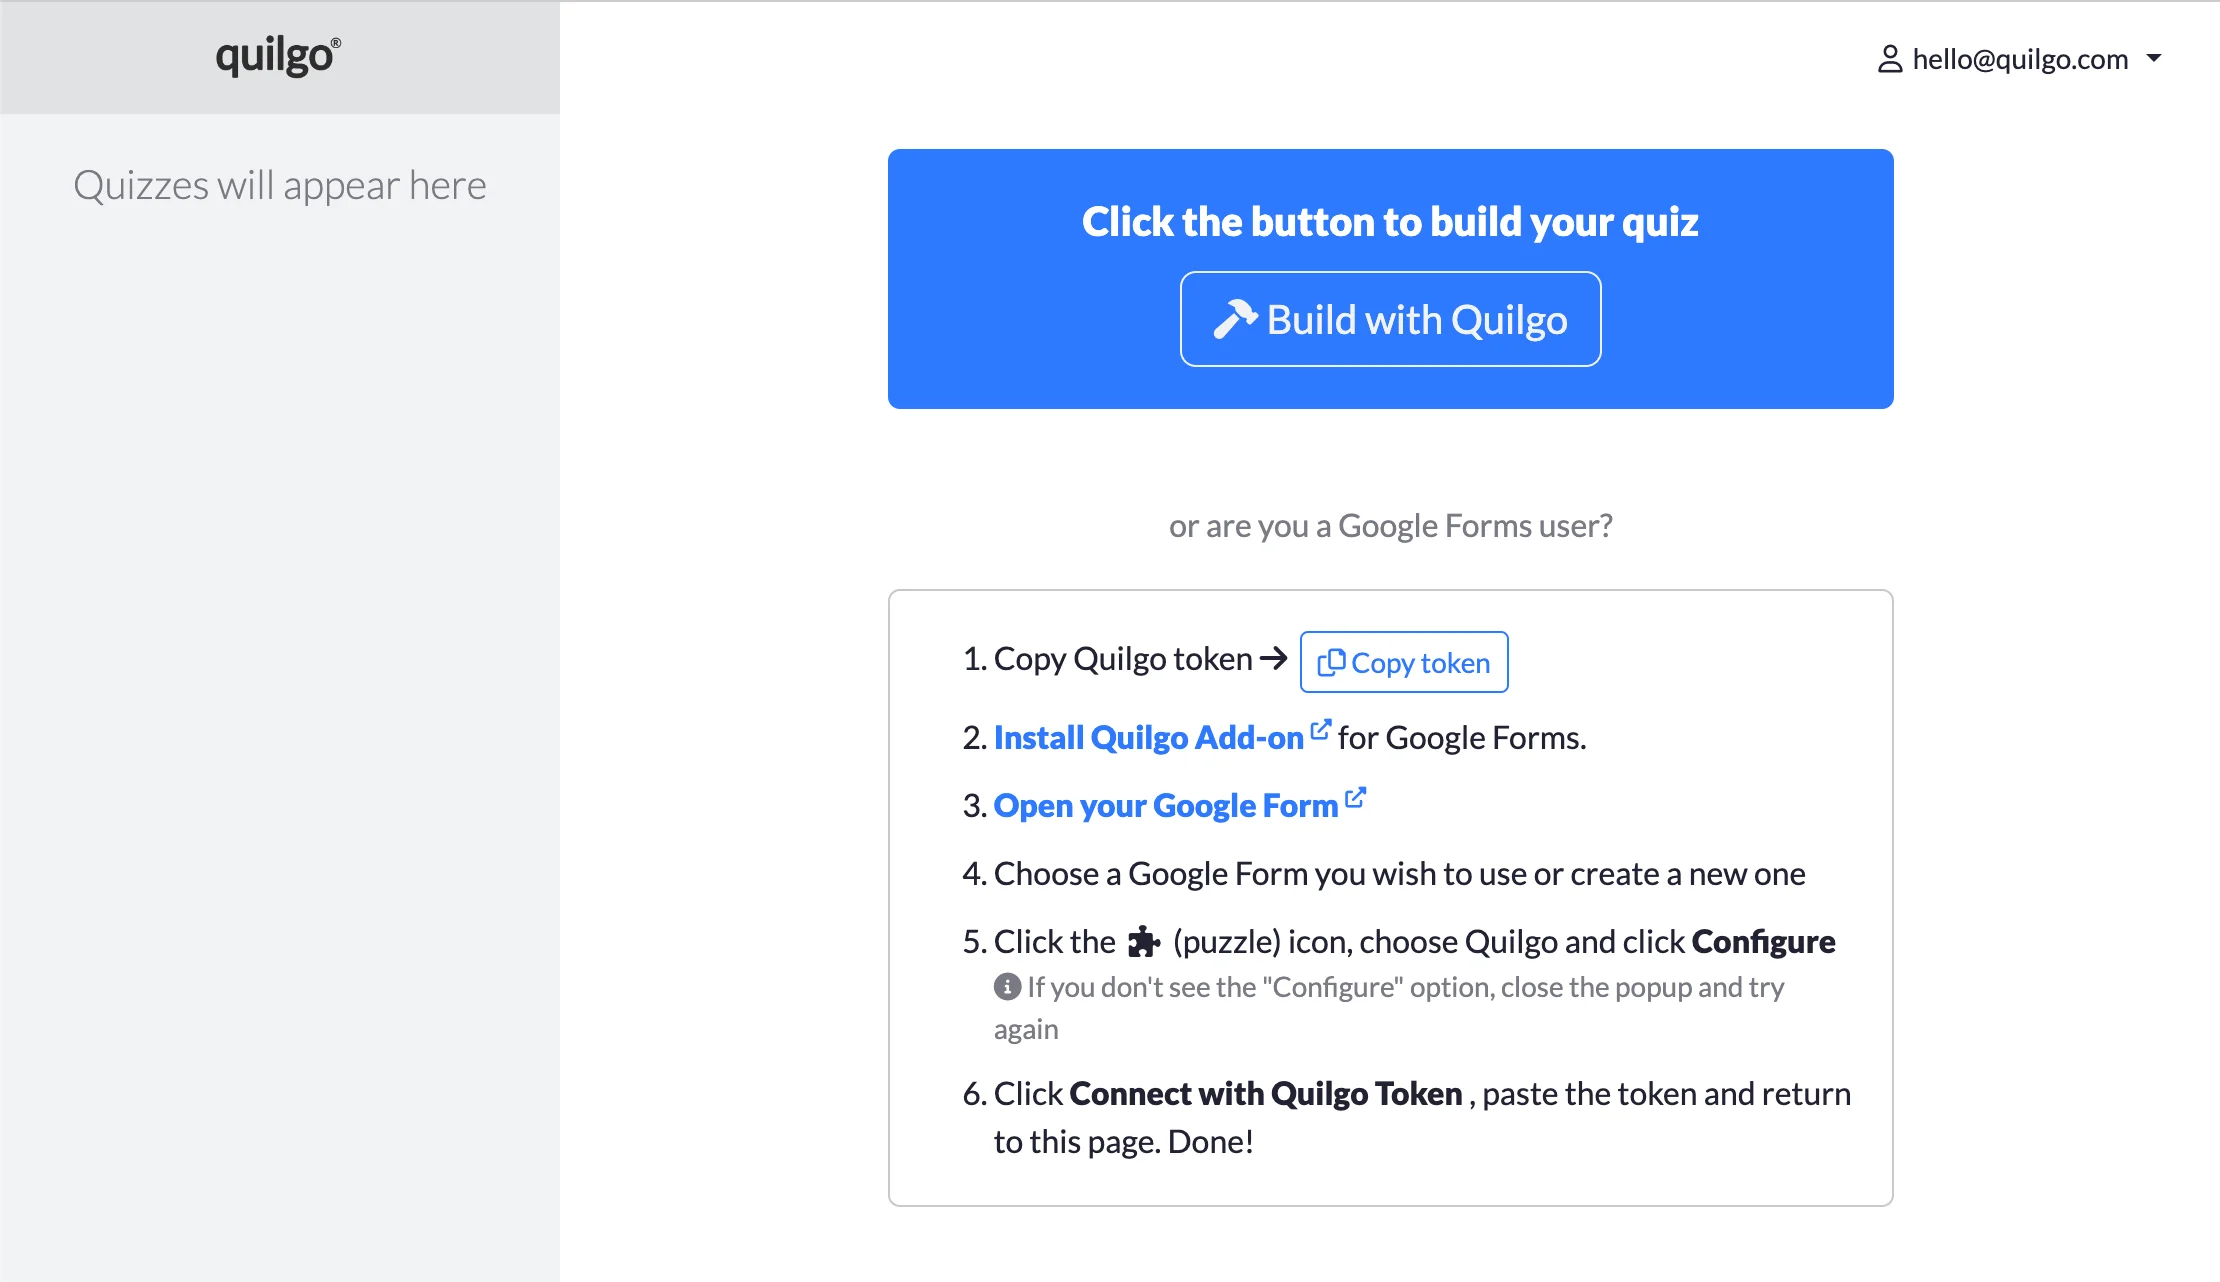
Quilgo is an online testing platform that allows you to create quizzes and conduct online tests, exams and assessments with a timer, online AI proctoring and other features. Quilgo also has an integration with Google Forms.
After registration, click the "Build with Quilgo" button. If you have quizzes already, click the "+ Add another quiz" then click the "Build with Quilgo" button.
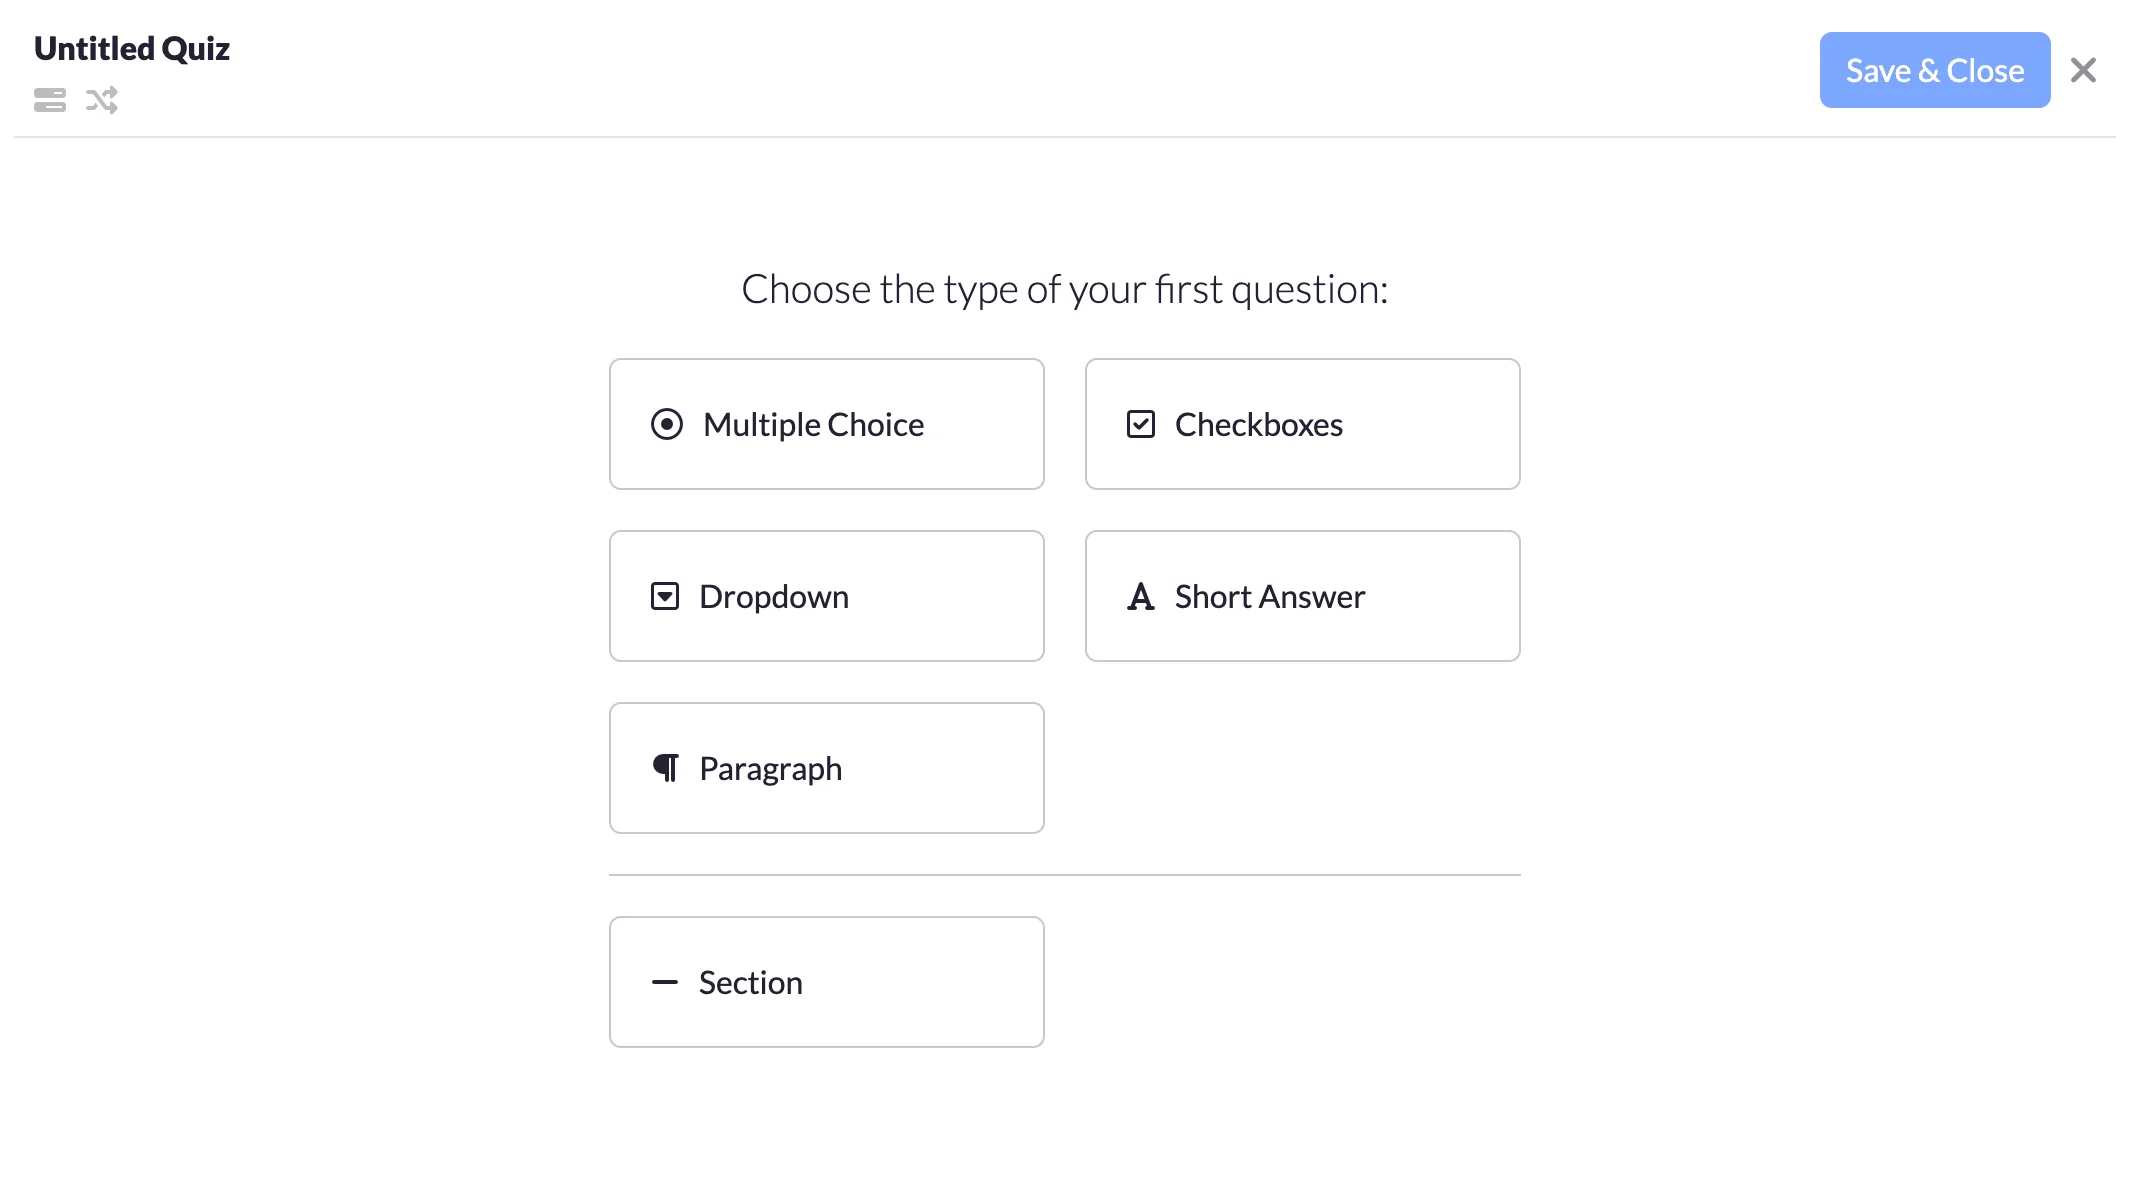
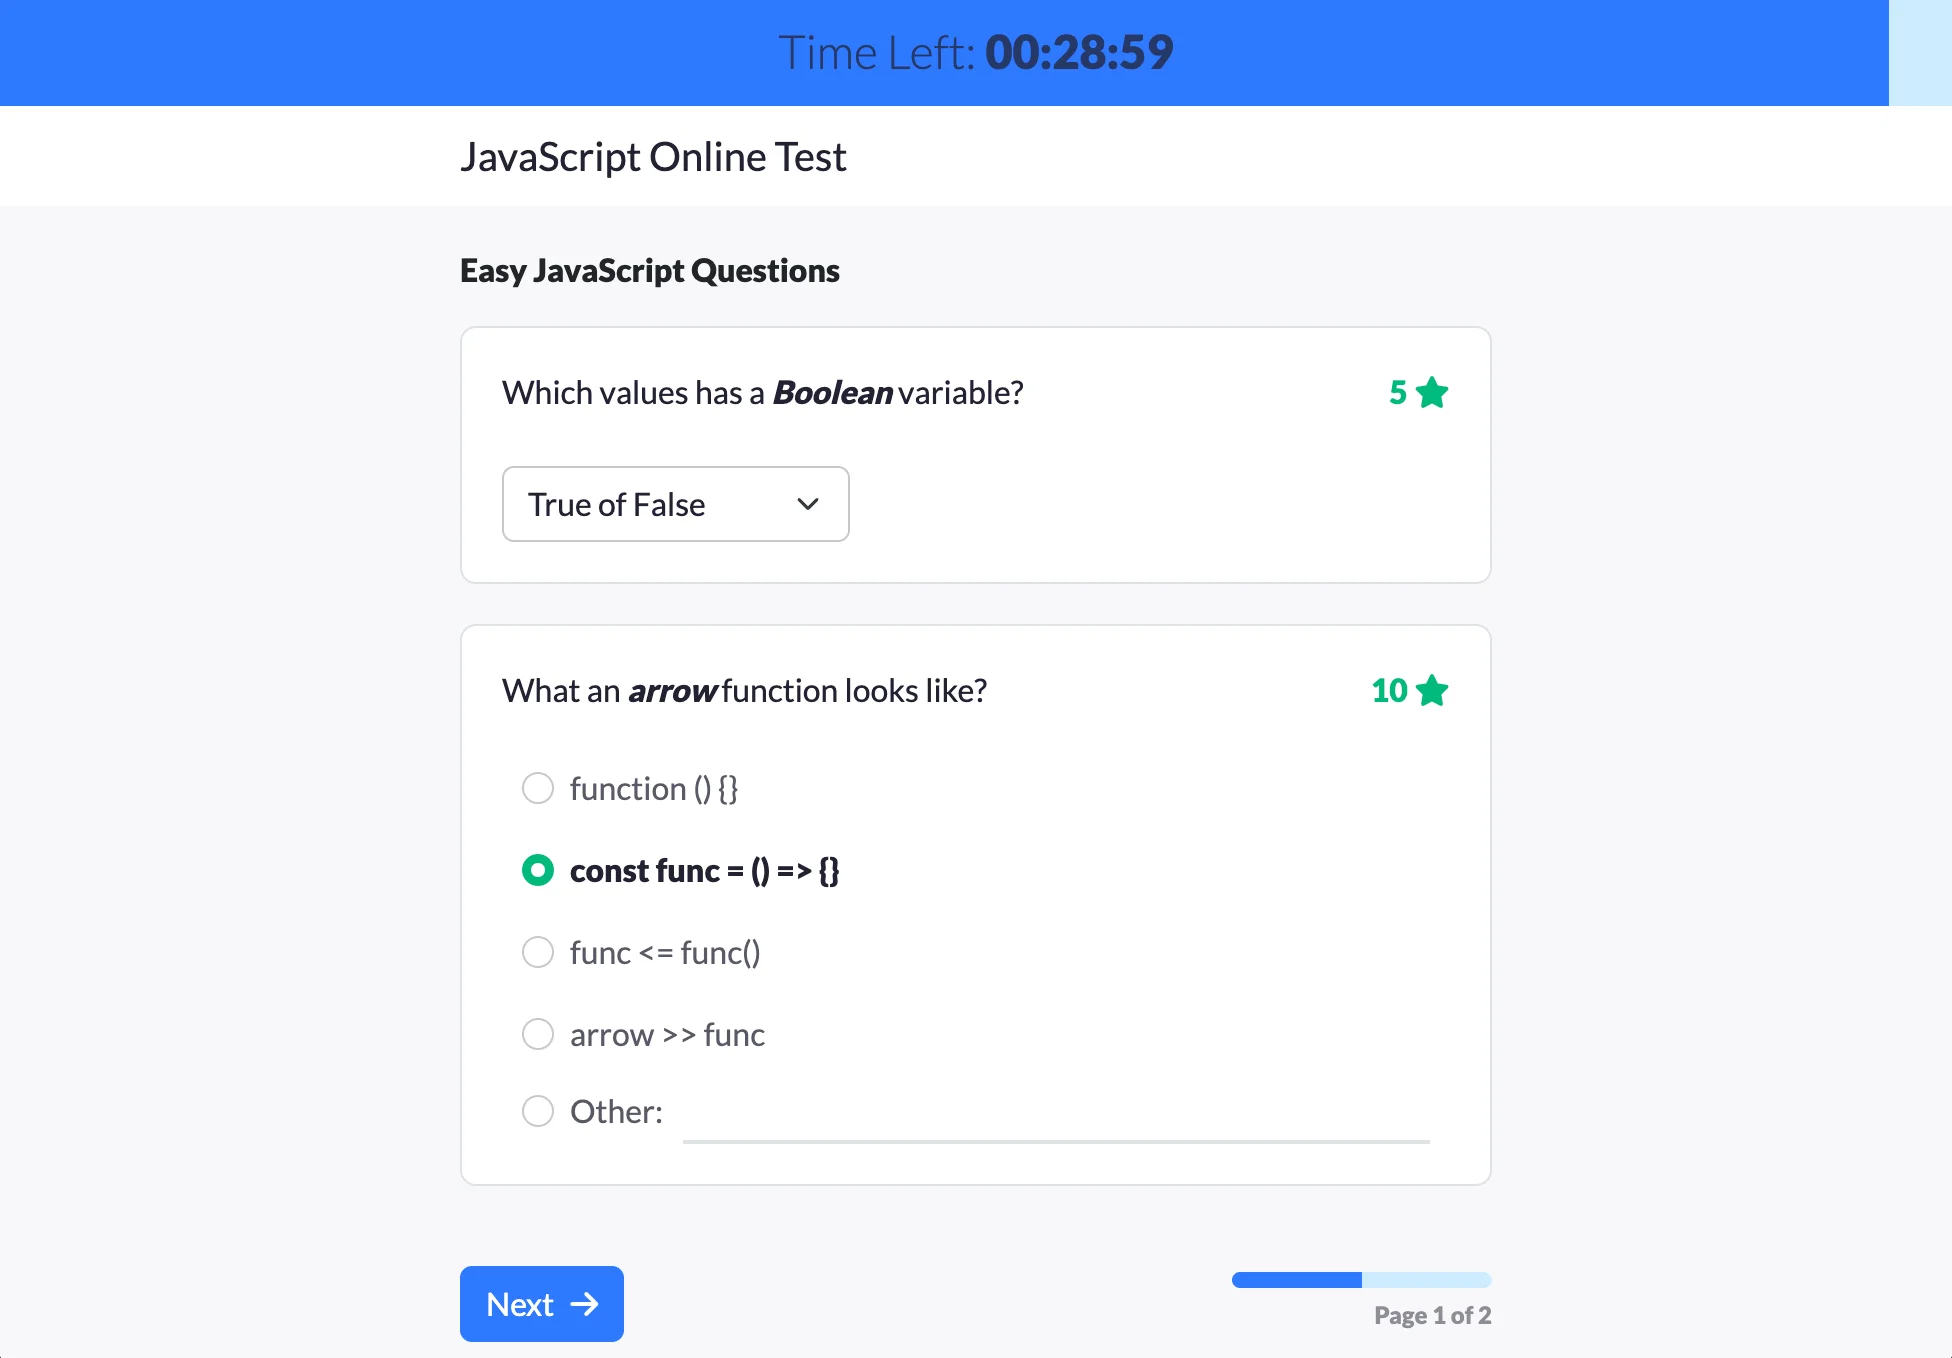
First, provide a title for your quiz, then choose the type for your first question. You can choose Multiple Choice, Checkboxes, Dropdown, Short Answer (single line) or Paragraph (multi-line). You can mix question types in your quiz. You can also start by creating multiple sections if you wish.
By default, Quilgo creates a single section. Each section has a feature called Question Randomizer . This feature allows you to randomly assign a set number of questions from the section per a test taker. For example, you have 20 questions in a section, 10 points each, and set the Question Randomizer to 5. This means each test taker will receive 5 random questions and would be able to earn up to 50 points for this section.
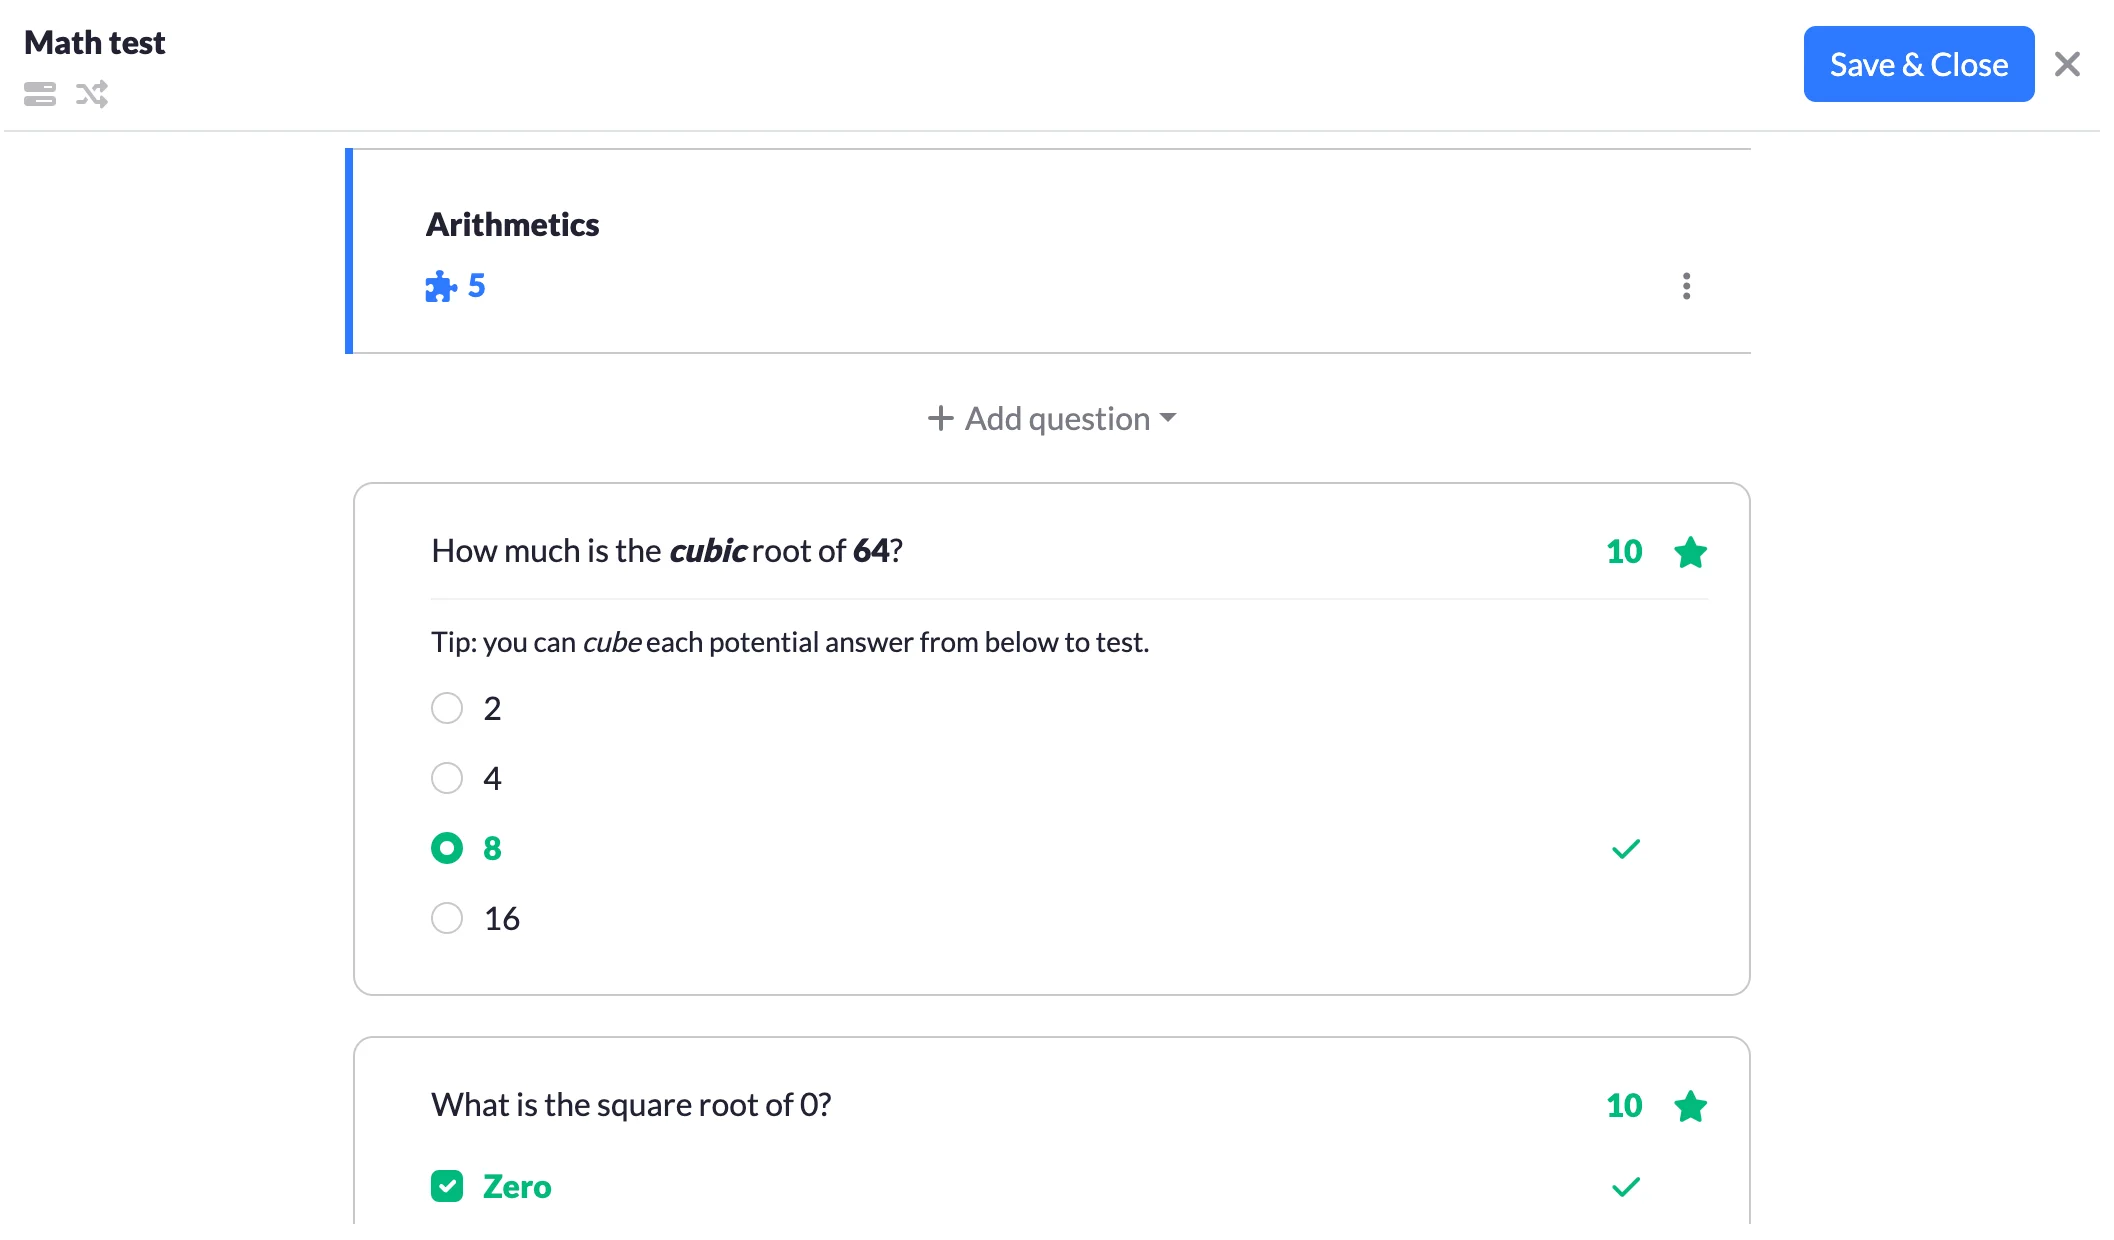
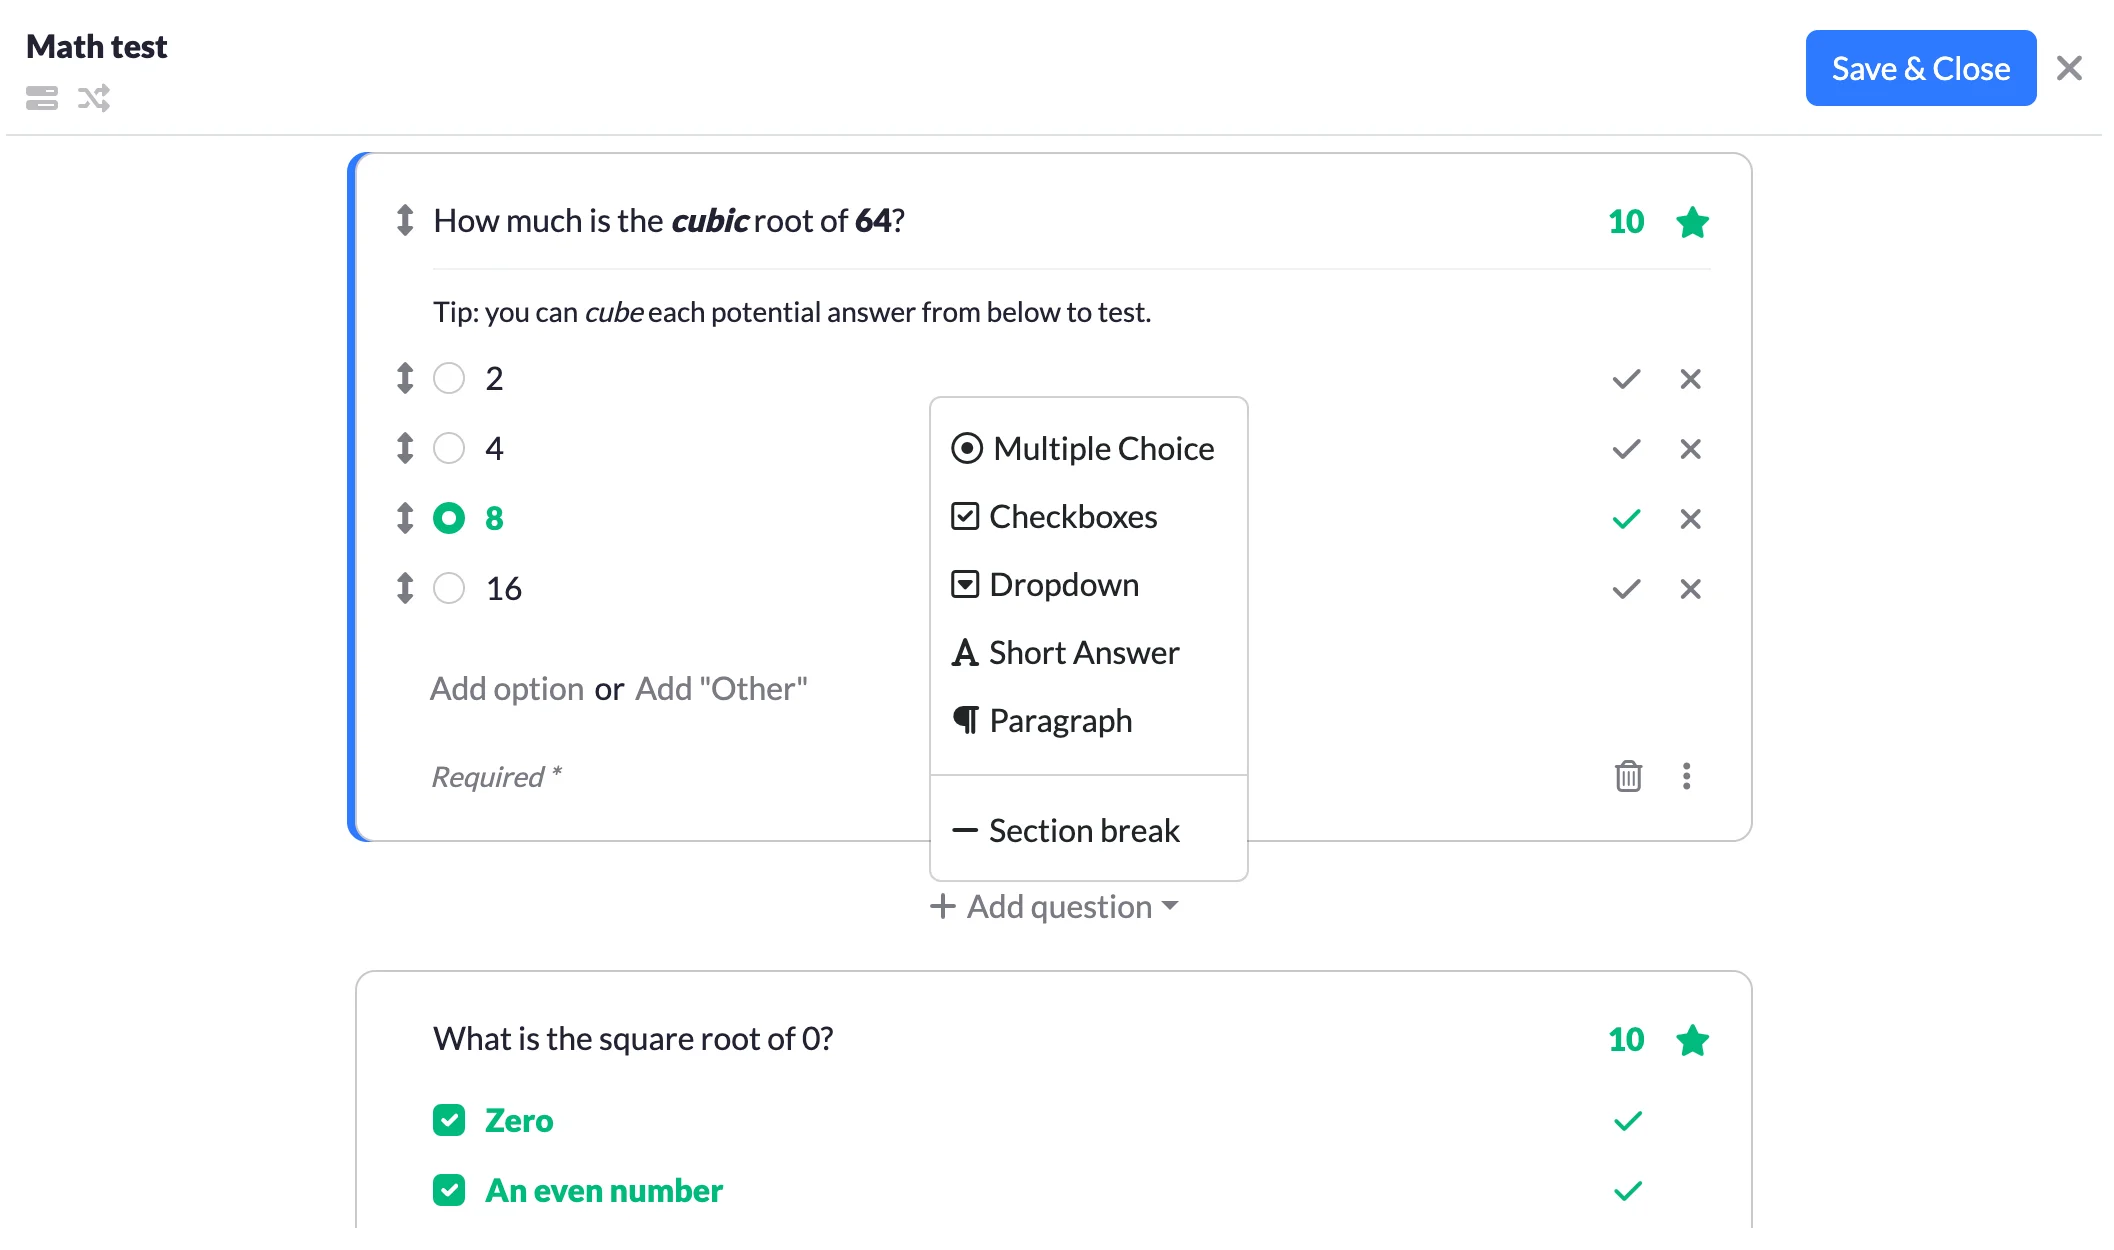
You can add as many questions in a section as you wish. To add a question, focus on a question or a section, click "Add question" and choose the type. The new question will be populated right after your current selection.
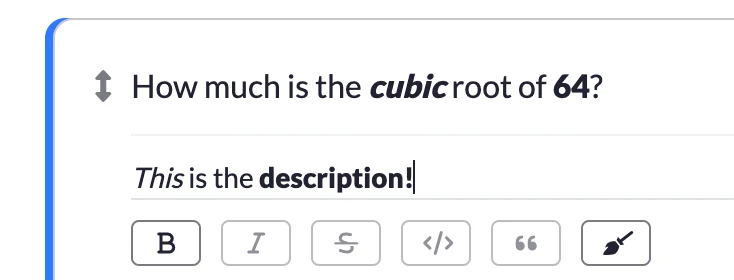
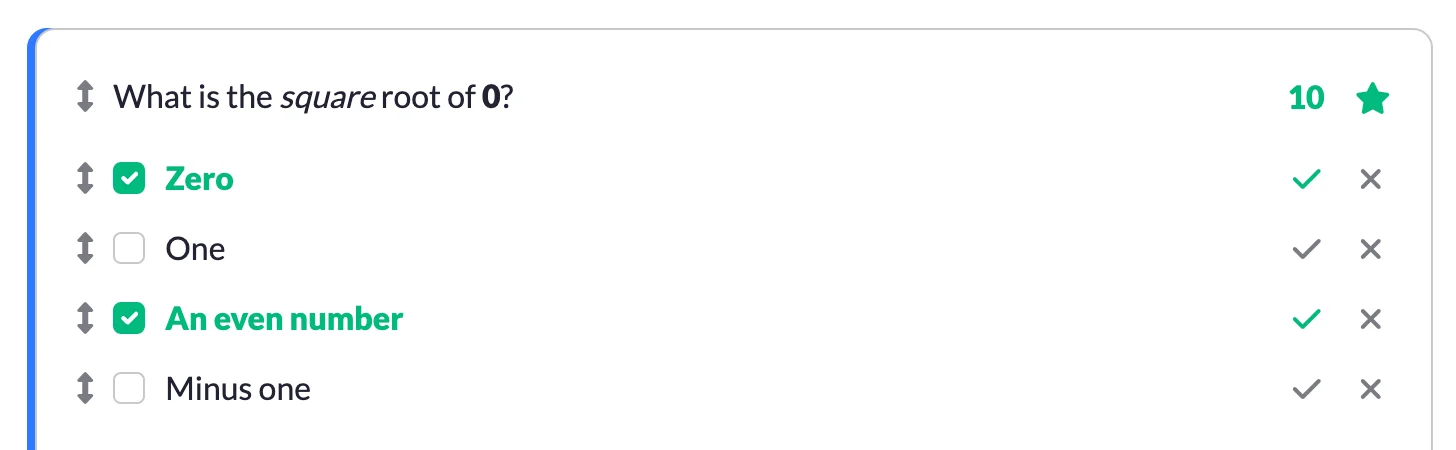
Each question has a mandatory title. You can use rich-text controls to style your question properly. The score is marked with the star icon and is enabled by default. You can change the score by using the arrow controls next to the score number, or by direct input. You can also disable the score by clicking on the star icon if you wish.

You can also add a description to a question. To do that click the ellipsis icon and choose "Description". You can also benefit from the rich text in your descriptions. You can add a description to a section as well.

Multiple Choice, Checkboxes and Dropdowns have options. You can provide as many options as you like. To mark the options as correct, use the tick icon. For Multiple Choice and Dropdown questions, you can only mark a single option as correct, for Checkboxes, you can choose multiple options. For Checkboxes questions test takers must check all correct options to get the score, in other words, it uses the "AND" operation, NOT "OR".
You can also make a question optional. To do so, click on the "Required" caption. Making a question optional does NOT affect the maximum score.
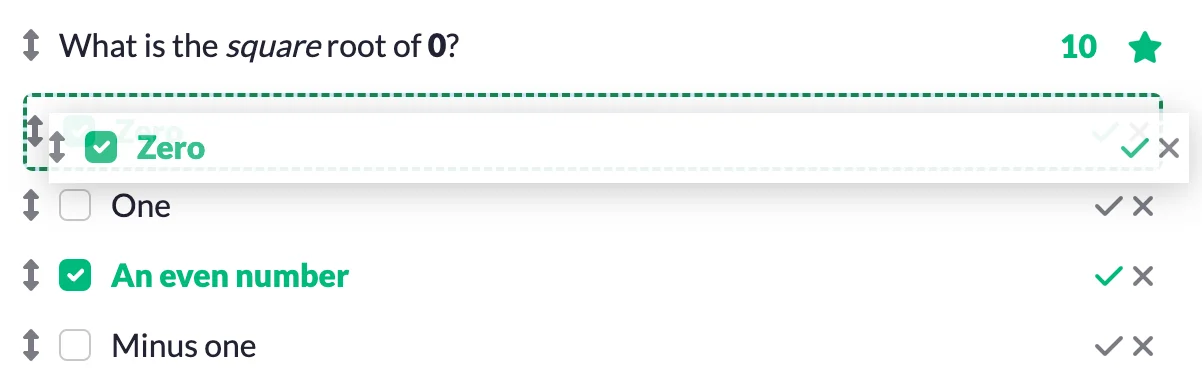
Both sections, questions and options can be moved around. To sort items, use the "up-down" arrow icon .
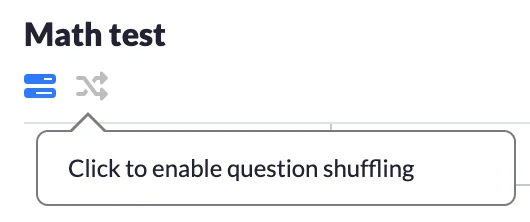
You can also enable the Progress Bar and Question Shuffling features. The icons are located next to the quiz title. Question Shuffling works really well with the Question Randomizer feature.
Once you are happy with your quiz, click the "Save & Close" button. Please note, the builder does not save your quiz structure on the go yet, so we recommend saving your building progress frequently.

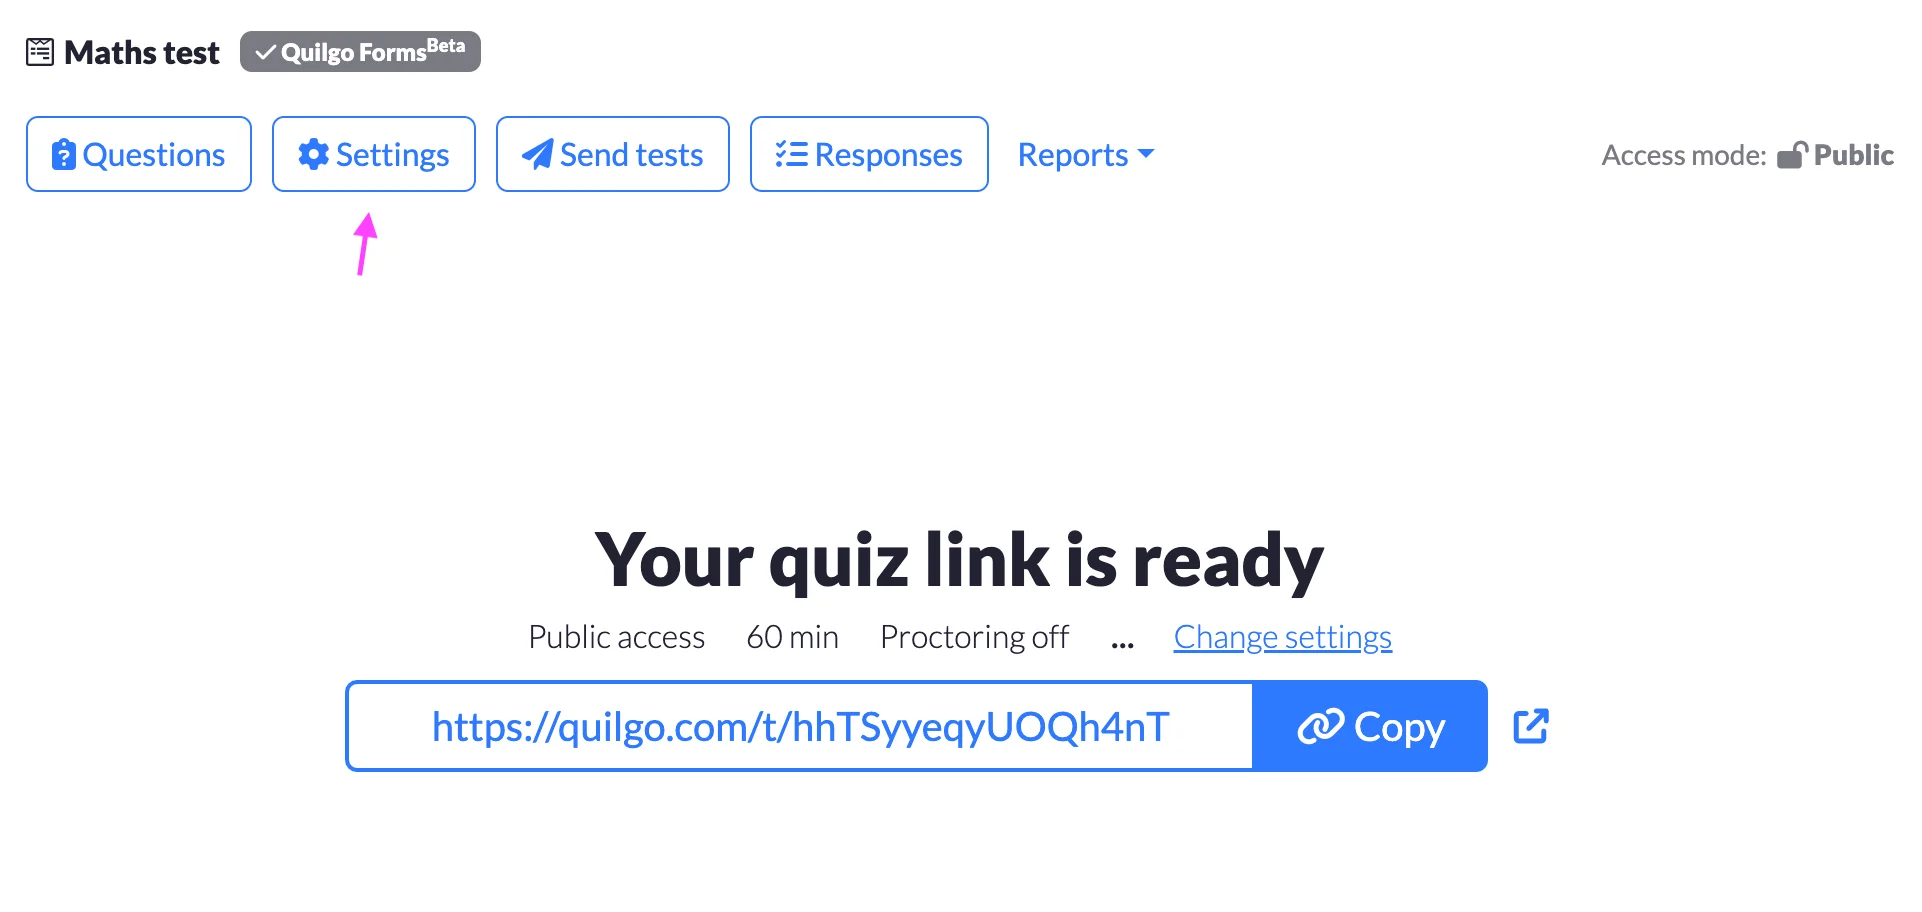
After a quiz has been built you can start conducting online tests. However, before you deliver your tests, you might want to adjust the default configuration according to your needs. To open the settings click the "Settings" button.
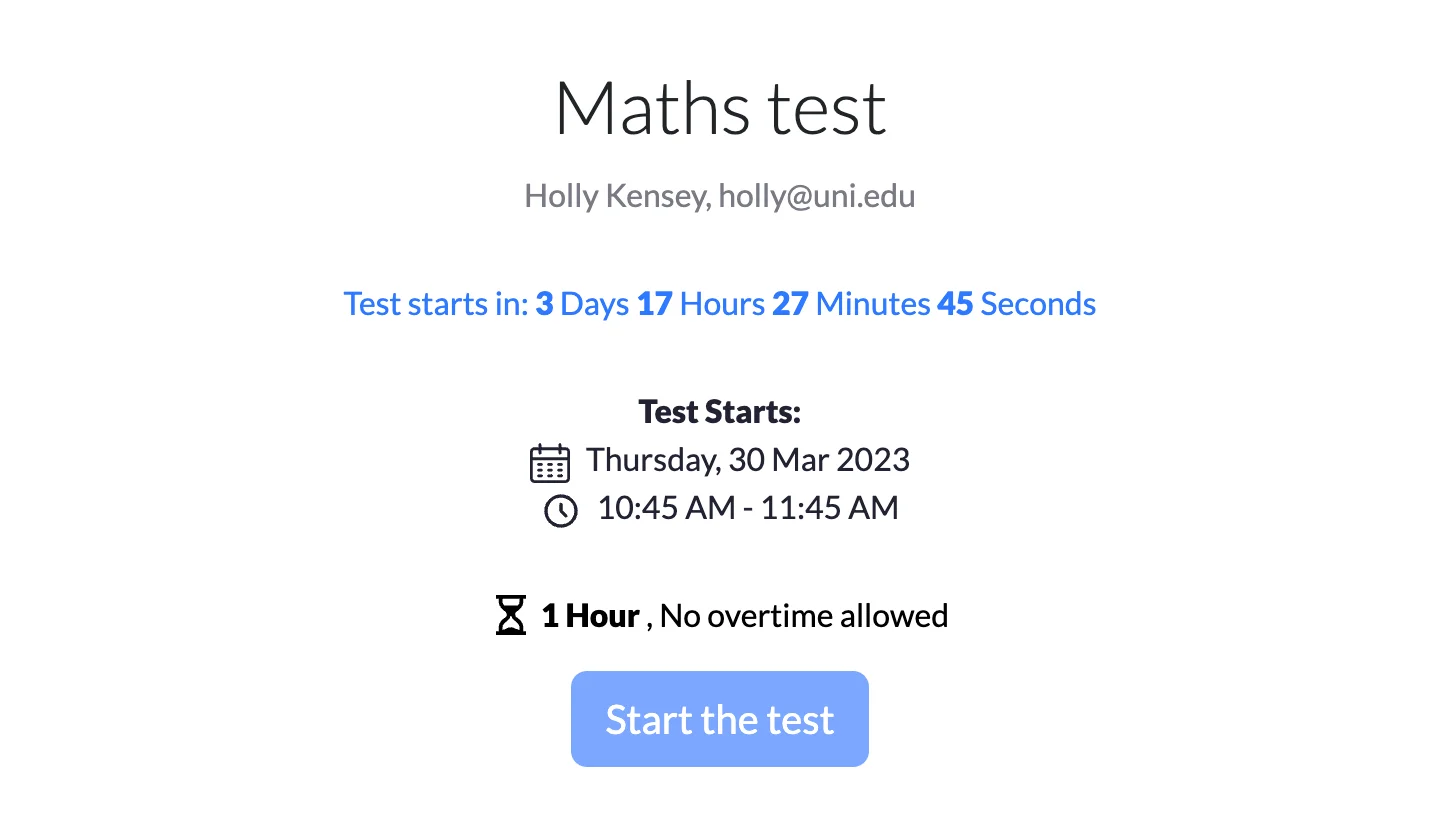
This setting defines when test takers can start their tests. Quilgo provides two options here: "Any time" (default) and "Start no earlier than". If you choose the latter, test takers will be able to register for their tests but won't be able to start before the date and time you set.

This value defines how long would you like your tests to be. By default Quilgo sets 60 minutes and you can choose the value from 1 minute to 1440 minutes (24 hours).

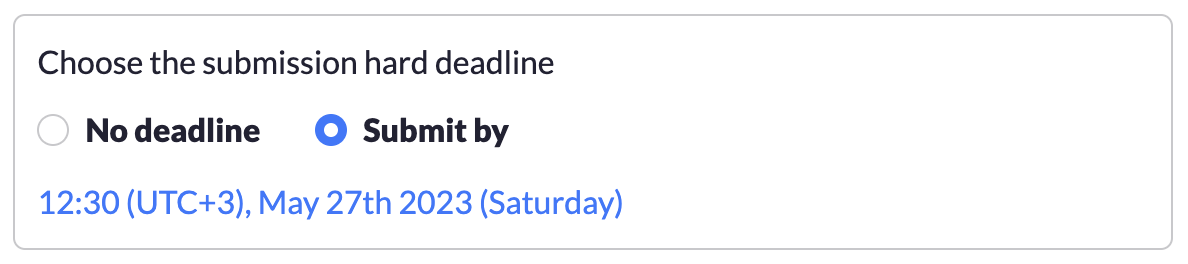
The Submission Deadline is a "hard deadline" option, which means, it has priority over the duration. For example, if the deadline is 16:00, the duration of the online test is 1 hour, but the respondent starts the test at 15:40, then they would only have 20 minutes to take the test, not 1 hour.
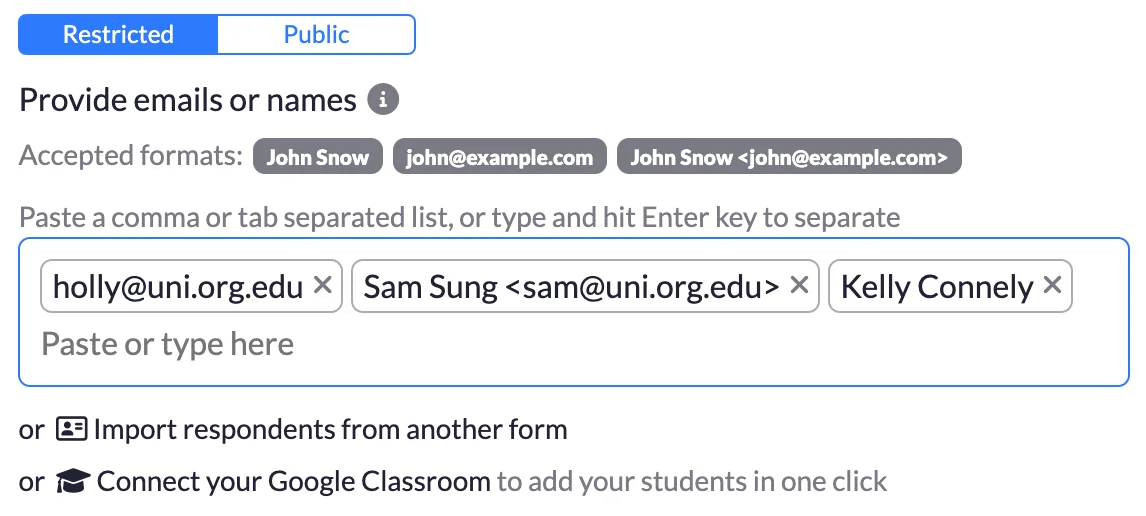
Quilgo provides two access options: "Public" (default) and "Restricted". The "Public" option does not require any configuration, however, it might not be suitable for online exams or interviews, for example, where restricted access might be preferred. However, you can limit the registration to a specific domain to exclude unwanted registrations.

If you choose "Restricted" you will need to pre-create online tests by providing test takers' email addresses or/and their names, to identify them later. You may also import test takers from another quiz. The "Settings" button will change to the "+ Add tests" button.
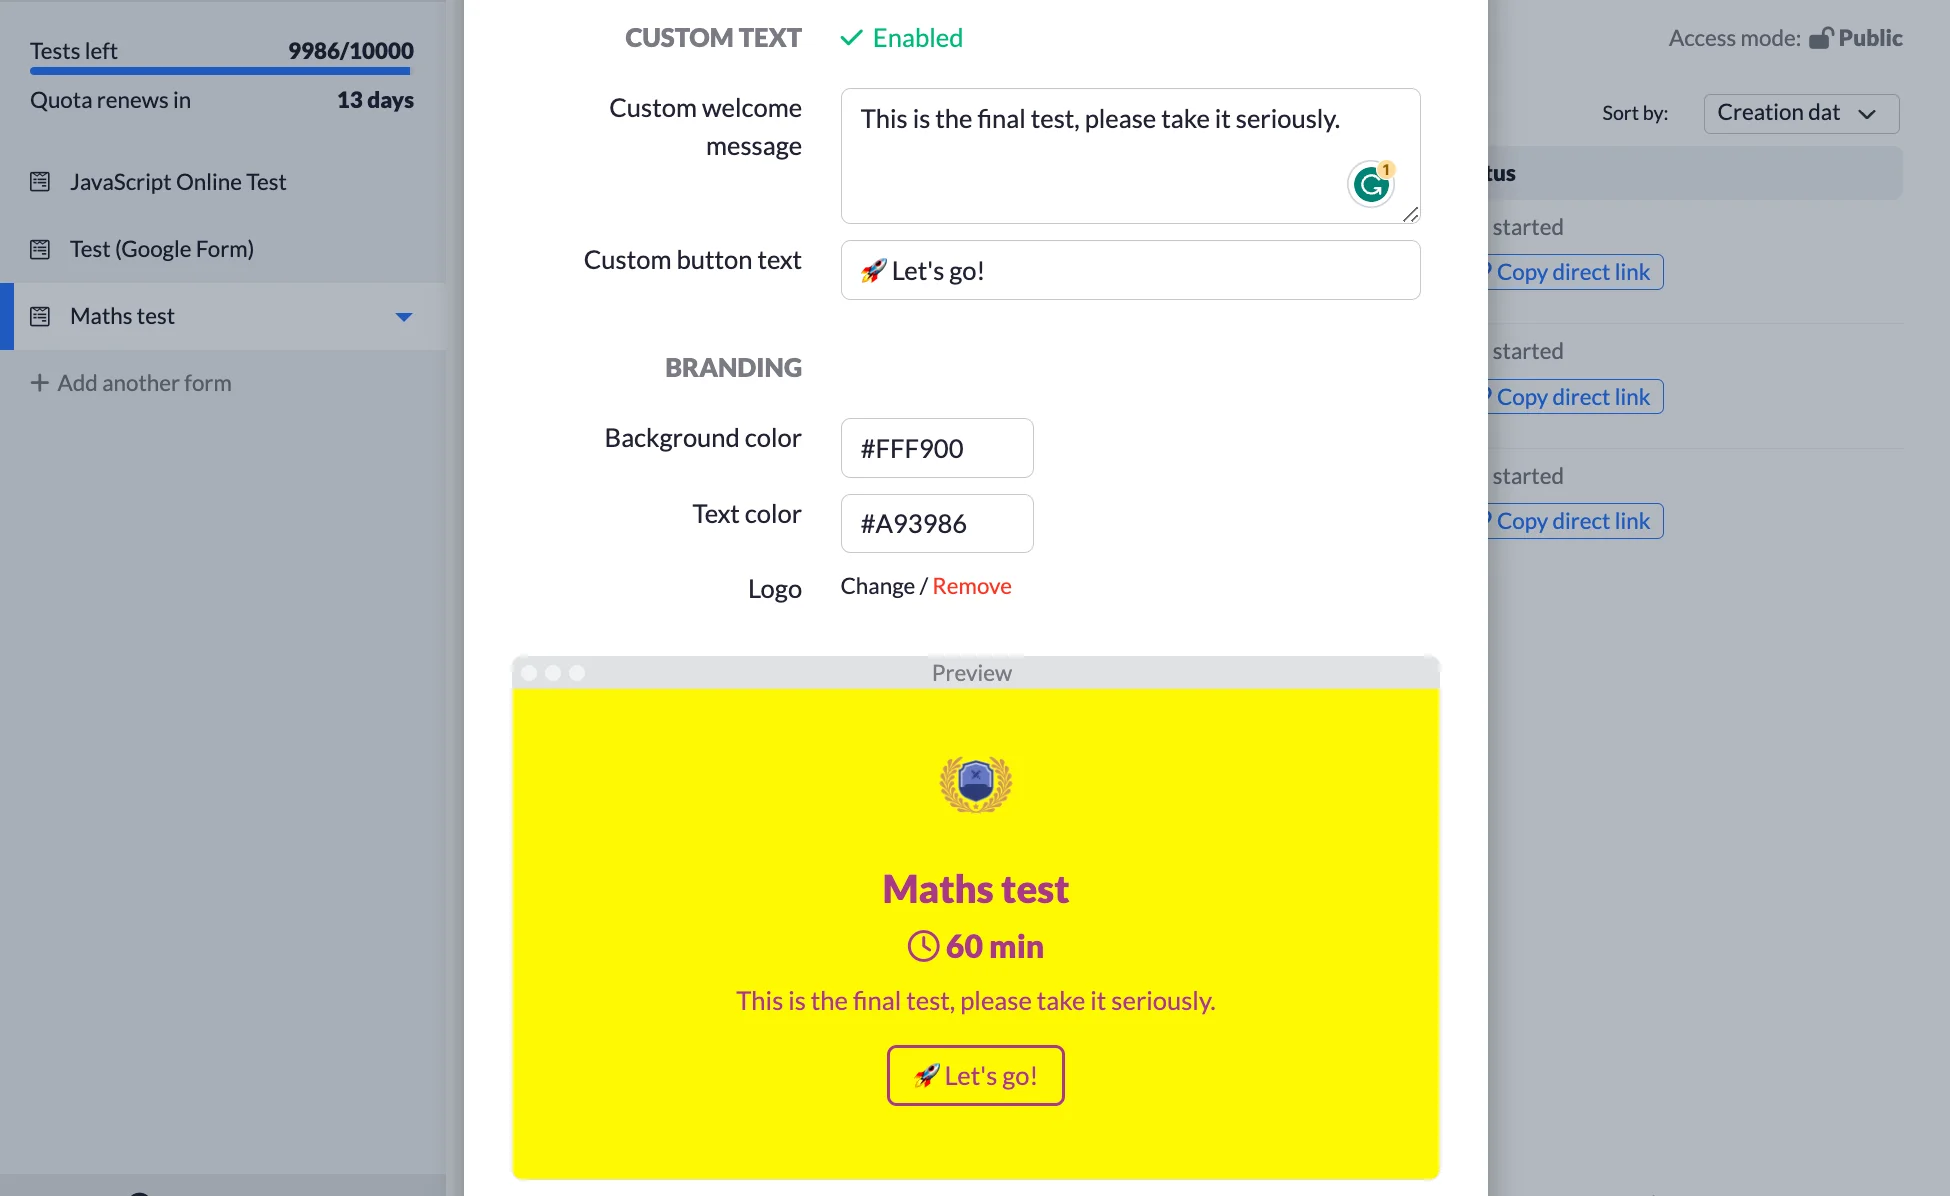
Finally, you can choose optional features.
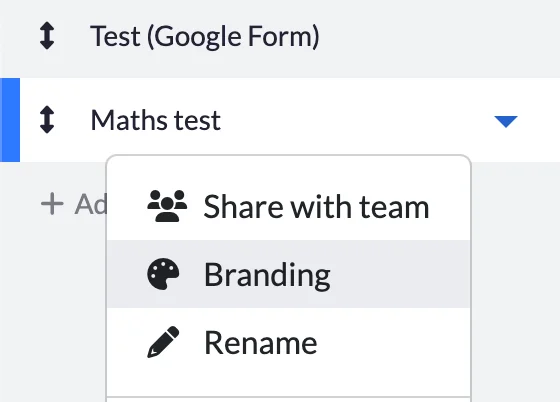
You can set background and text colors and also upload your logo by choosing the "Branding" option.
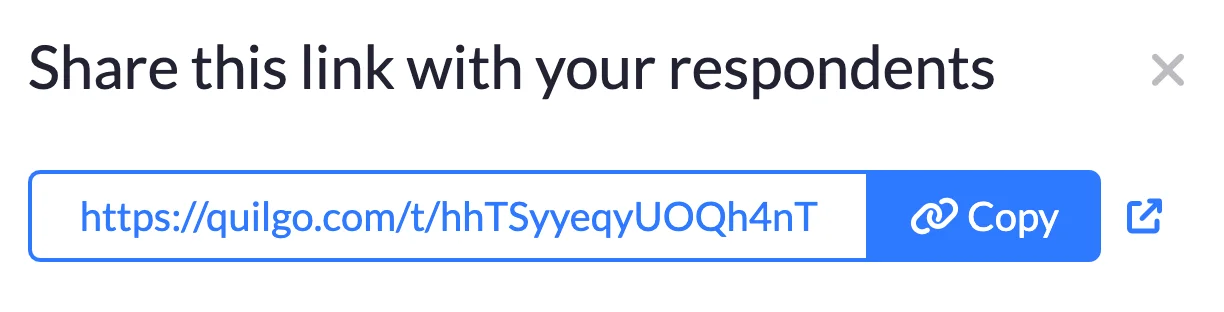
The default method is the Single Link and it is introduced once a new quiz is created. You can copy this link and send it to the group of test takers. If you use the Public access mode, then anyone would be able to register with any email address and take a test. It also is possible for the same person to use multiple email addresses and take multiple tests in this access mode. If you chose the Restricted access mode and already pre-created online tests by providing email addresses in advance, test takers will only be able to register specifically with these email addresses and will need to confirm the ownership. Single Link appears when a new quiz is created and also is always accessible by clicking the "Send Tests" button.
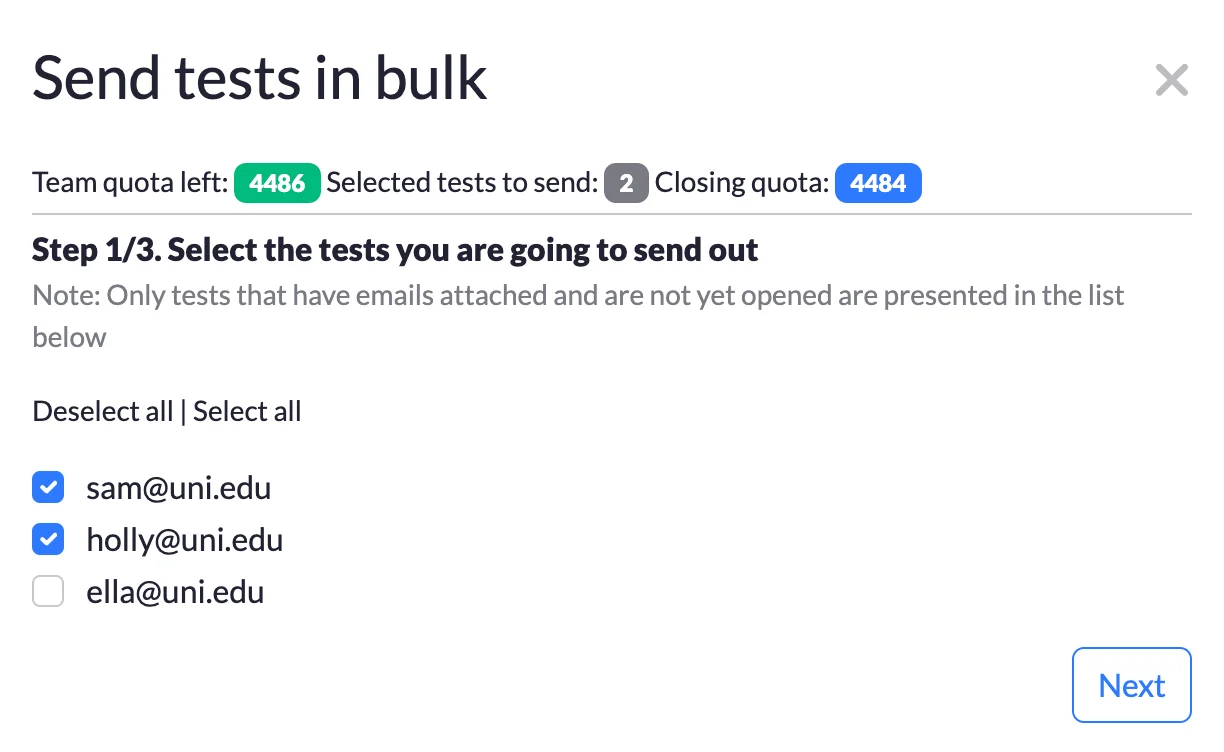
You may also consider sending individual links to online tests in bulk. This feature is most useful in the Restricted access mode. Note, you need to pre-create tests with email addresses to use this feature, pre-creation with names only would not work as there will be no email addresses to send to. To use this feature click the "Send Tests" button and then choose "Send tests directly via email". You will need to choose the tests you are going to send, provide a subject and a supporting message and send. You will also be able to send an email to yourself first to check if it looks intended.
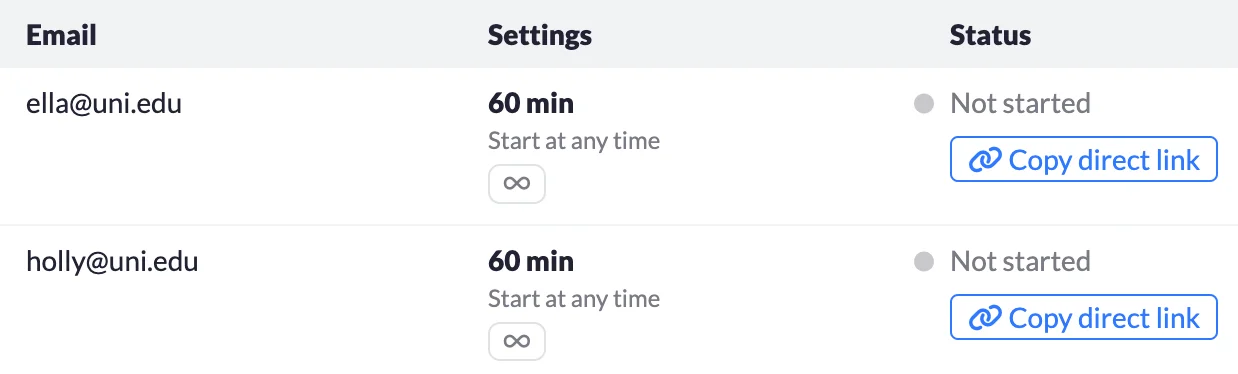
You can also copy a link to a pre-created test, this is mostly useful in the Restricted access mode. To do so, click the "Copy Direct Link" button correspondent to the test.
The most common reason for test links delivery failure is spam filters. It is common for organisations to set rules against spam, however, they sometimes cut "good" emails off as well. If you think that this might be the reason, please contact your system administrator and ask them if emails from Quilgo have been recently blocked.
Before test takers can start filling out the test, they will see a welcoming screen. Depending on the additional features you choose there might be a setup process with instructions and additional information.
If the test is set on a future date, test takers will see a countdown and will not be able to start their test earlier.
Once the test opens, it will contain a timer on the top of the screen and test takers can now start filling out the quiz.
Once the quiz is submitted, Quilgo will show a "Thank you" message. A score can also be shown on this screen if you choose this option in Optional Features.

Once tests are submitted, you will see statuses change in the tests table. The statuses may vary depending on the time the test was submitted as they may indicate overtime or a failure to submit the test in time.

A corresponding "Download report" button appears when a test is submitted. Click this button to view a personal report containing all the information about the test including time, score, tracking results and answers. This report can also be printed and saved as PDF.
A quiz report is also available via the "Responses" button that is located above the tests table. Click this button to see all the responses in a single table. The report can also be downloaded in CSV format.

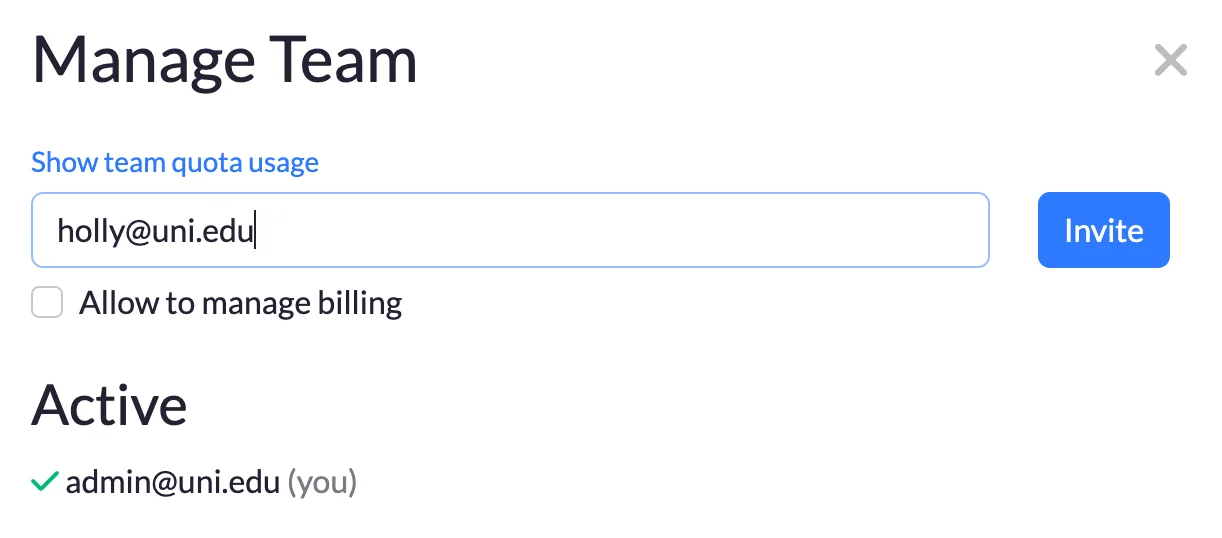
You can share quizzes, tests and reports with your team members. To do that, invite your team members by clicking "Manage Team" from the top-right menu.
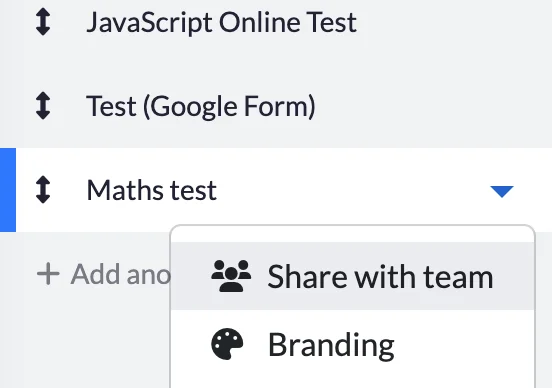
To share quizzes and the data associated with them with your team, use the correspondent option in the quiz dropdown.
You may use Quilgo as an add-on to Google Forms. In this case, please click the link below to open a separate document made specifically for our Google Forms integration.